|
|
Post by ericvw on Jun 18, 2014 18:05:28 GMT -8
Help!!! How do I upload an image from photobucket to a post? Feeling frustrated!
thx from Yankee Doodle Dummy!
EricVW
|
|
|
|
Post by Daryl on Jun 18, 2014 21:33:08 GMT -8
1. Scroll over the picture which contains a tool icon (in the top right corner) in Photobucket.
2. Click Get Links
or
1. Click the picture
3. Links for Email & IM, Direct, HTML, and IMG will appear. Scroll over Direct. Click to copy link.
4. Click the REPLY button located on the right of posts/threads on this site to create a post (not the Quick Reply box at the bottom of the thread)
5. The Tool Bar for the post will contain a Picture Icon. Scrolling over the icon will read "Insert Image". Click the icon.
6. An Insert Image box will appear. Paste the Direct link from Photobucket in the Image URL tab. Click the Insert Image button.
The picture will appear in your post.
|
|
|
|
Post by ericvw on Jun 19, 2014 3:20:27 GMT -8
![]() I don't know if it worked yet, but thanks for the tutorial Daryl. EVW |
|
|
|
Post by ericvw on Jun 19, 2014 3:21:16 GMT -8
|
|
|
|
Post by Daryl on Jun 19, 2014 4:32:45 GMT -8
Are you erasing the original "http://" from the Image URL in the Insert Image box? Check that it is erased before you paste the link from Photobucket. |
|
|
|
Post by ericvw on Jun 19, 2014 17:20:46 GMT -8
|
|
|
|
Post by ericvw on Jun 19, 2014 17:44:53 GMT -8
guess photobucket worked, still not sure how, but.... So as I posted earlier, this mold does not include the infill pieces that were added before the pour. I'm a little embarrassed about the final cast, as my frustration of trying to pull measurements from the SketchUp link from one of the posts here on Rocket stoves forum was a real task, but not totally discouraged. I will try again with 1" foam board(not 2" like in this mould). 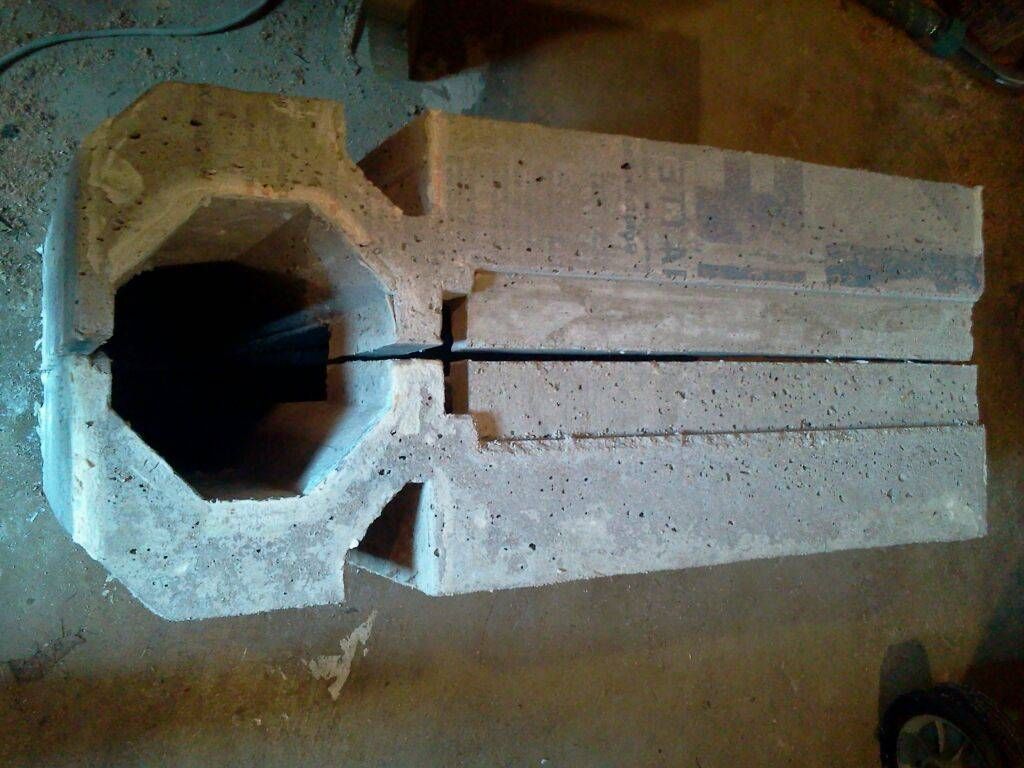 this is the first finished cast. Anyone can easily see that proportions are not equal on several faces. I'd like to design or see a link to individual components or sub assemblies so measurements can be made specific to each foam piece. Anyone have anything to share about simplifying mould making....Please?! Thanks for everyone's help and advice, EricVW |
|
|
|
Post by ericvw on Jun 19, 2014 17:52:02 GMT -8
last two posts confusing. The post with the final casting has info about the mould from the previous post/pic of an incomplete mould. Sorry, Y'all, still trying to figure computer side of things out. well, casting side too!!!!!
I appreciate the support and advice-
Eric
|
|
|
|
Post by ericvw on Jun 19, 2014 18:21:34 GMT -8
Full Member
***
dvawolk Avatar
Building RMH batchbox, single bell.
Posts: 154
Project:RMH,horizontal feed Batchbox model 6", Jan 24, 2013 at 8:25pm knurd75 likes this.
Quote like
Post Option
This post contained the sketch up file of 6" that I tried to follow. Not a pro on sketch up at all! Really, don't even know how to copy and paste previous links to current posts. Is there some tutorial on doing this I haven't uncovered. Hate to take up valuable time of members on what seems like the basics of simple forum posting.
thanks again,
Eric
|
|
Deleted
Deleted Member
Posts: 0
|
Post by Deleted on Jun 20, 2014 3:51:25 GMT -8
Anyone have anything to share about simplifying mould making....Please?! You have already used the simplest method for two pieces liquid moulding. The only simpler way of liquid moulding would be a one piece mould. For inexperienced people it would be better to avoid liquid moulding and instead to build up shells with plastic mouldables or ramming mixes. The industry has lots of offerings in this area. |
|
morticcio
Full Member
 "The problem with internet quotes is that you can't always depend on their accuracy" - Aristotle
Posts: 371
|
Post by morticcio on Jun 23, 2014 16:04:23 GMT -8
Eric,
You are getting there but it isn't easy as you're finding out! It is an intricate casting so you can't really simplify it unless you make it using smaller modular pieces/panels which are then cemented together. One advantage of this method is the side panels can be mirrored for each half.
I used a normal cement/sand/gravel mix on my first few attempts before moving on to the more expensive refractory castable.
I notice you have a few air pockets - I applied a thin slip made from fire cement to cover these up on the one side that this problem - seemed to have done the trick.
|
|
|
|
Post by ericvw on Jun 23, 2014 18:23:18 GMT -8
Thanks for the advice Morticcio!
Air pockets aside, I suppose I was wondering about the set up and rendering of the mould, in terms of measuring, cutting, techniques and in general, ease of constructing the mould to begin with... I saw your wood moulds, Peterberg's foam moulds, and am just looking for some tips and tricks on mould construction.
Beyond the Sketchup file for 6" batch box, realizing the measurements and making parts like this is new to me... I will push on. I've seen octagon shaped riser's and that they're acceptable, but what about round heat riser(inner)? I also have an idea for round with hollowed, rounded rear of entry into heat riser area(instead of 45 degree at back of riser floor) w/ a little kickback piece like Peter's optimized J tube/Dragon Heat(Endrunner) design. Any thoughts, Morticcio?
thx again,
Eric VW
|
|
|
|
Post by ericvw on Jun 23, 2014 18:36:34 GMT -8
BTW, Morticcio, I responded on Experiments,results, can check that thread too?
Thanks,
EVW
|
|
|
|
Post by ericvw on Jun 23, 2014 18:45:00 GMT -8
Thanks for the reply, Karl,
Your cut to brass tacks advice is appreciated! Looking for tips and tricks to get a different angle on mould building. Hard to translate the skp file to reality, sometimes!!!
Eric VW
|
|
morticcio
Full Member
"The problem with internet quotes is that you can't always depend on their accuracy" - Aristotle
Posts: 371
|
Post by morticcio on Jun 24, 2014 10:34:44 GMT -8
I stuck to Peter's design - he had done all the hard work perfecting the dimensions etc. and worked out of the box without any modification. A round riser might give an improvement but could be harder to build.
As for the moulds, try to add a few degrees where you can to make it easier to release. On my plywood one there isn't much give and needs to be dismantled in places.
|
|


