morticcio
Full Member
   "The problem with internet quotes is that you can't always depend on their accuracy" - Aristotle
Posts: 371
|
Post by morticcio on Mar 9, 2013 11:53:53 GMT -8
I've been following the posts on the horizontal batch feed rockets for a while and a friend and I have started to build a mould for a castable 6" version with the intention of using it in a bell or masonry type heater, complete with a door. I've used Peter's BatchBox and Smarty's mould Sketchup models. Links to these can be found in Klemen's thread here. The only change I have made was to allow for pouring the mould from the top and being able to split each half after the cast has set. I dissected the mould model and made a cut-out plan using Visio. I've used 2 sheets of 8' x 4' 18mm hardwood plywood - one for each side of the mould. We also had to use some 3mm & 12mm ply to make up the difference when needed. Right and left mould with both halves joined together Both halves of right hand mould Both halves of right hand mould Right hand mould showing how both halves join together Right hand mould showing how both halves join together Outer half of right hand side mould Outer half of right hand side mould. The base of this half has a double skin of 18mm ply.  Inner half of right hand side mould Inner half of right hand side mould.  Plywood still needs to have filler applied for the holes and gaps and then a thin coat of varnish? To stop the castable material sticking to the mould, I will lightly spray oil on all surfaces. Might coat each surface in cling film if possible to get a smoother finish. The mould will be filled from the top. I've got some valve springs to use for a vibrating table. Also making a mould for a 650mm riser extension. Here is a Sketchup image of one half.  It's a first attempt on casting so any comments or tips are more than welcome! |
|
|
|
Post by peterberg on Mar 10, 2013 2:15:23 GMT -8
The only change I have made was to allow for pouring the mould from the top and being able to split each half after the cast has set. Nice moulds, no faults or glitches as far as I can see. However, there's one reason in particular why I've drawn the halves like this. It's awfully difficult to cast a high and thin wall segment properly. Not easy to get the air out at the bottom, because it tend to get stuck there. And also, when vibrating on a table, the lowest parts are running the risk of compacting too long, while the top could be compacted not enough. By doing this, the heaviest parts of the refractory will sink to the bottom. In effect, it will cause separation of the binder and the additives. This will result in a poor quality of the casting, too much aluminum cement at the bottom and too little at the top. What I would do (and have done): overturn the moulds, side which is facing the other casting down. And use the other half as separate filler blocks, fixed to the mold during pouring. By this way, the inevitable air bubbles are on the outside of the casting. But of course it's your project, please do what you see fit. Also making a mould for a 650mm riser extension. This is correct, it should be casted with the open side down and two 45 degree filler blocks at the rear side. |
|
Deleted
Deleted Member
Posts: 0
|
Post by Deleted on Mar 10, 2013 2:58:05 GMT -8
If one wants to use a mould more than one time it should be sloped by 1°.
Sloping makes it a lot easier to get the cast out of the mould.
|
|
Deleted
Deleted Member
Posts: 0
|
Post by Deleted on Mar 10, 2013 3:10:08 GMT -8
Not easy to get the air out at the bottom, because it tend to get stuck there. Drilling small holes is commonly used in the craft to let the air escape. Hard steel wire can be used to drill very small holes. |
|
|
|
Post by Vortex on Mar 10, 2013 3:23:50 GMT -8
Nice work Mort! I'd forget the clingfilm, I tried it and it's really difficult to get it to stay where you want it as it only sticks to itself and the texture it leaves is all wrinkles not smooth as you'd expect. I found coating the moulds with linseed oil works well to stop sticking and swelling. I also give mine a coat after using and cleaning them to protect them while in storage.
Also I'd second what Peter said about casting the thin vertical sides.
|
|
morticcio
Full Member
   "The problem with internet quotes is that you can't always depend on their accuracy" - Aristotle
Posts: 371
|
Post by morticcio on Mar 11, 2013 5:34:59 GMT -8
Thanks for the comments and suggestions. @ Peter Good point about being easier to expel air from a wider/thinner mould than a tall/skinny one. And also ensuring the mix doesn't separate with excessive vibration. My main concern was that air would be trapped in the octagonal heat riser as I lowered the top half (outer face) on to the bottom half. How did you get round this? Did you have some holes on the top half to allow the excess castable mix to escape through or did it squeeze through the joints as you screwed the two halves together? Do you have any photos of the steps you did to fill the mould. VortexI'll forget the clingfilm idea! Thanks Andy |
|
|
|
Post by peterberg on Mar 11, 2013 7:52:46 GMT -8
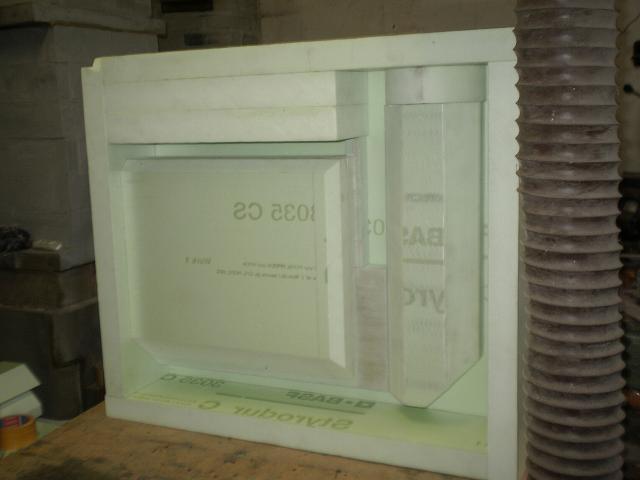
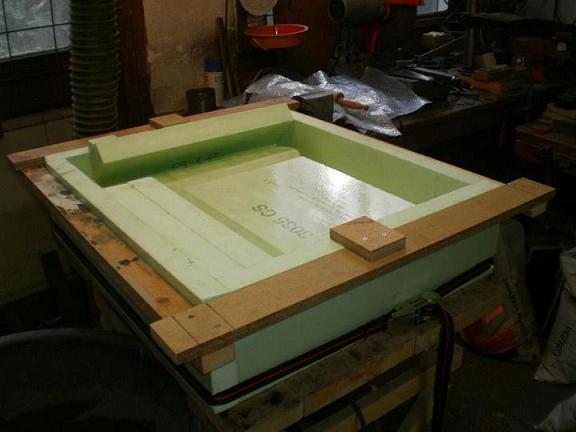
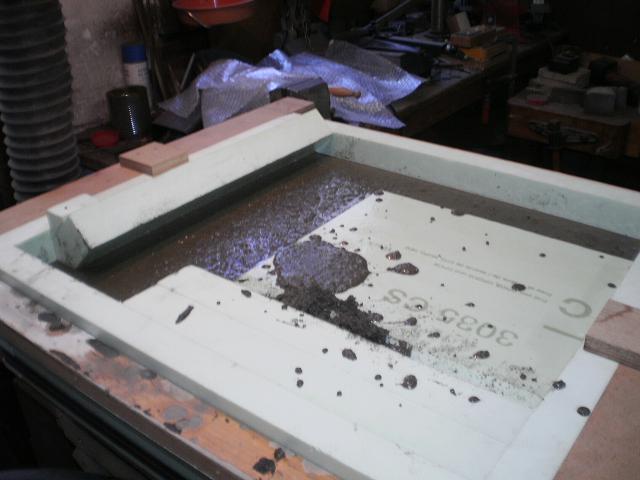
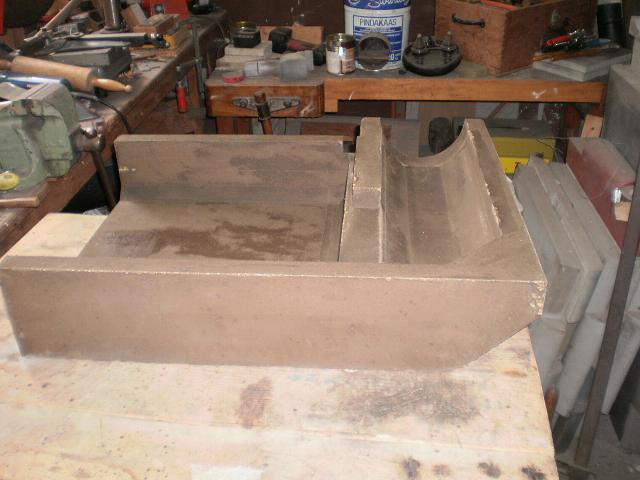
Did you have some holes on the top half to allow the excess castable mix to escape through or did it squeeze through the joints as you screwed the two halves together? Short answer: the mould consisted of just one single item. With some fill blocks to create the 45 degree angles on the outside. I'd made the entire mould out of XPS polystyrene foam, all the parts are stuck in there by means of two-sided adhesive tape. Here's a picture of one mould.  High res pic: High res pic:I've used only one fill block for the outside at the back:  This is the mould filled for a part and vibrated. This should be about the stage to mount the rest of the fill blocks, in effect, hanging in there and secure. Not a complete lid on the box so to speak, but some bridge holding the fill blocks down.  High res pic: High res pic:Of course, you have to fill and compact it further, up to the top. The unmoulded product should look something like this:  High res pic: High res pic:Is this clear? |
|
morticcio
Full Member
   "The problem with internet quotes is that you can't always depend on their accuracy" - Aristotle
Posts: 371
|
Post by morticcio on Mar 11, 2013 15:49:58 GMT -8
Yes and thanks for the photos - I can remember now seeing one of those photos on your original post. Did I read somewhere you used 2-stroke oil to release the mould? How did the mould cope with being re-used?. XPS polystyrene foam seems a cheaper and quicker way of building a mould! I have numerous sheets of 25mm & 50mm Kingspan in the garage. |
|
|
|
Post by peterberg on Mar 12, 2013 1:27:16 GMT -8
Did I read somewhere you used 2-stroke oil to release the mould? Yes, but it's possible to use any mineral automotive oil. Applied with a brush and wiped with a cloth to remove excess oil. How did the mould cope with being re-used? It didn't, I simply destroyed the mould. This happened to be a one-off, the first with an octagon riser. Some details are different in this one, like the height of the port for instance. The second was cast by someone else, in accordance with the newer findings. |
|
|
|
Post by smarty on Mar 12, 2013 8:28:17 GMT -8
Lovely moulds, glad to see the sketch up mould model is being put to good use. I am at about the same stage. I just need to get the vibrating table up and running and I'll be casting them up.
One thing I did do by way of a modification on the design was to create a 'draw' on the sections that want to be pulled out of the finished casting. A draw is simply a 1 or 2 degree slope to the edges that are perpendicular to the base of the mould such that the mould will pull out without too much drag.
I have a large chop saw that I managed to do this with but you could use a planer. I don't think this will affect the heater design too much in terms of how it works. I sealed my timber mould with shellac and then a good coat of car wax. You have to avoid the cartable loosing any water into the wood. it is also a good idea to seal the corners of the box with silicone sealant for the same reason.
When you and I come to cast our finished stoves there is something about getting the vibration right. For optimum results it needs to be at a certain rpm and also for a certain duration. vibrate too long and all the fines will separate from the coarse aggregate.
I'll post some pics of my efforts when I get to the casting stage which will be tomorrow weather permitting.
|
|
|
|
Post by smarty on Mar 15, 2013 0:43:41 GMT -8
I cast up a couple of moulds yesterday. Forgot to take any pics in the heat of the moment. One thing I have found out is that the castable that I have is a bit of a pig to work with.
The difference between having too much water and too little is like on a knife edge. The sheet that came with it didn't give any indication about proportions so I phoned the supplier and some guy said in a vague way that it should be no more than 30% water.
I used an electric drill with a paint mixing paddle on it, this kind of worked if you had it sloppy but you kind of need it a bit dryer than this method can really cope with, if you happen to have a proper plasters mixing drill with the big paddle that would probably be best. Forget trying to do it by hand in a bucket. I might try it on a mixing tray with a shovel next time because although my drill is old I am rather fond of it and the windings were close to burning out yesterday.
Once you get the stuff in the mould you need to cover it up with wet towels and polythene once it has begun to firm up. Mine was still not firm enough to do this to at the end of the day so I covered it with just polythene and a board over the top. The ones in the foundry were ok like this but the ones I had to leave outside over night because they were too heavy and sloppy to move dried out on the top. I have tried to resurrect them with the watering can and a load of wet sheets but I have my doubts.
Now the castable that I have needs to be left to cure for 24 hours at least, before demoulding, and after that it needs to dry before firing up.
There are then three stages to the casting process: 1. initial setting, 2. curing, and 3. drying prior to baking/or firing up with a batch of wood inside.
In the setting stage you just have to leave it alone, in the curing stage you need to keep it damp and covered up, and in the drying stage you need to demould it then leave to air dry or with a moderate heat to evaporate the water. You know when it is dry when you can lay a bit of cool metal against it for a while with no condensation forming on it.
Oh and another tip: remember to take your cup of tea off the vibrating table before you turn it on!
|
|
|
|
Post by peterberg on Mar 15, 2013 2:28:51 GMT -8
The difference between having too much water and too little is like on a knife edge. Refractory concrete is quite different as compared to normal concrete. Many castable refractories are a pig to work with, yes. A concrete mixer isn't suitable, best thing since sliced bread is a compulsory mixer. I've done a lot of mixing by hand, a bucket isn't right either, use a trough and a bricklayer's trowel like masons do. The mix should be as dry as possible, just the right consistency to make balls out of it. When it's possible to lay such a ball on the table without it falling apart it's the right mix. Remember, the amount of water needed to complete the hydraulic reaction is surprisingly small, the rest of the water is to make it a workable mix. When all the water would be used for curing the casting would end up dry, wouldn't it? When the mix in the mold is still not solid, it's perfectly possible to cover it with a plastic film of some sort. I've used cut-up plastic bags to that end with success. Avoid draft , this will dry the surface out too quickly. The learning curve of working with these materials is steep. Nobody will do it right first time, it's like learning to walk. Been there, done that a long time ago. |
|
|
|
Post by bernardbon on Mar 15, 2013 7:15:33 GMT -8
|
|
|
|
Post by phlogiston on Mar 15, 2013 17:31:44 GMT -8
Nice looking job.
+1 on moulding on the flat rather than on edge
I would radius all of the external edges on your mould.
A sharp radius on an internal corner of the cast piece has a higher tendency to stress fail than an internal corner with even a slight radius.
I see one part of the mould that could leave you with a bit of a problem getting the mould off without breaking the cast. I'm assuming you have made the mould square.
The leg at the end of the burn tunnel where the bottom fillet leaves a gap before the riser section (outer section moulding). if you chamfer the end of the fillet back a bit you will have a stronger leg section and less chance of it breaking off on separation. Would be no harm to do the same for the front also.
Like to see this one progress I'm planning something similar.
By the way - anyone know what volume of refractory you end up with from a 25 kg bag?
Kevin
|
|
Deleted
Deleted Member
Posts: 0
|
Post by Deleted on Mar 16, 2013 2:56:54 GMT -8
For small lots or to achieve exceptional properties,
I would only build the inner mould and form a shell on it.
No vibration plate required, therefore no separation.
This approach is much simpler to realize and gives much more freedom.
Allows to build the shell with several layers of different properties.
For example an inner and outer layer of greater mechanical strength
with a very insulative inner layer, which may lack mechanical strength.
Fiber fabrics could be used too, to give more strength.
In this way it could be made much more lightweight and durable.
The industry offers fire resistant materials which would allow to use laminate techniques.
|
|