|
|
Post by hof on Nov 26, 2019 2:05:04 GMT -8
If move chimney pipe close to center may the height be lowered? Less then 15? Or Use a funnel at the end? New schema of stove. Do not know that to do with 4 cv gap at the right and how to make top on fireplace. 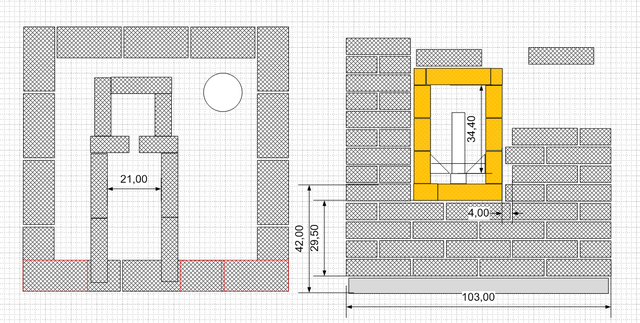 |
|
|
|
Post by peterberg on Nov 26, 2019 3:12:04 GMT -8
If move chimney pipe close to center may the height be lowered? Less then 15? Or Use a funnel at the end? When gases can enter all around the perimeter of the pipe the space between floor and pipe could be theoretically down to 7.5 cm. For understanding why: take the cross section area of the pipe and devide that by the circumference of the same pipe. The resulting figure should be multiplied by 2 because the gases need to go through a 180º change of direction. If you add a 200 to 150 mm reducer at the bottom end, the 200 mm circumference applies so pipe could be even lower. All the theoretical calculations aside, I wouldn't go lower than 10 cm for a 150 mm free-hanging pipe. New schema of stove. Do not know that to do with 4 cv gap at the right and how to make top on fireplace. That gap could be closed by making the system size a little bit larger so all the dimensions scale up slightly. For example, a 160 mm system could well be run on a 150 mm chimney. So you are scale up a bit so it'll fit your bricks better. I think you mean the top of the bell? Use a construction like in the Mallorca build. It'll cost some superwool but it'll work flawlessly. The guys of batchrocket.pt adapted this same technique a couple of times as well. The top end, specifically the part of the bell walls above the riser need to be doubled with superwool between so the expansion of the bricks won't crack the outside of the bell. See videos: batchrocket.eu/en/designs#squarecorewww.facebook.com/winkelmeijer/videos/10156590712398589/ |
|
|
|
Post by hof on Nov 26, 2019 3:37:42 GMT -8
Now I redraw stove from 150 to 160 mm and I do not need bypass any more! ISA 6,2-6,53 square meters (if stove height will be 1,8 or 1,9 m) - close to recomended (6,14). 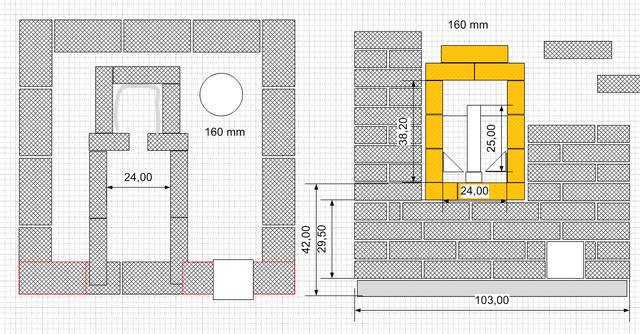 |
|
|
|
Post by hof on Nov 26, 2019 3:58:25 GMT -8
I think you mean the top of the bell? Use a construction like in the Mallorca build. It'll cost some superwool but it'll work flawlessly. The guys of batchrocket.pt adapted this same technique a couple of times as well. The top end, specifically the part of the bell walls above the riser need to be doubled with superwool between so the expansion of the bricks won't crack the outside of the bell. I meant this: 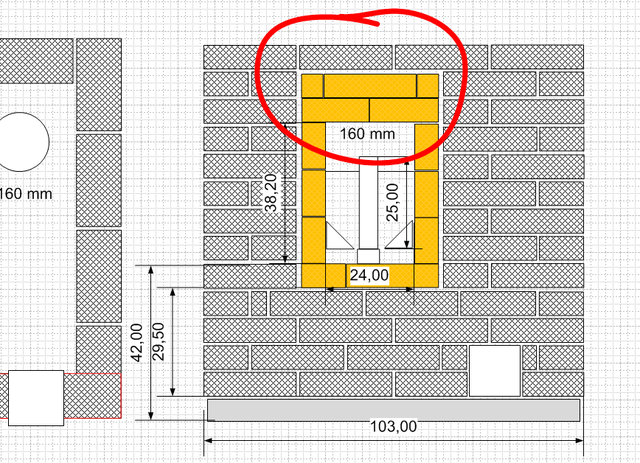 |
|
|
|
Post by peterberg on Nov 26, 2019 6:24:11 GMT -8
Ahh, I got it wrong then, you meant the top of the core! It could be done like you suggest but... you run the risk of caving in. What I would do in your situation is to let the two layers of top bricks stick out left and right. That way, there's more weight to counter the down force in the middle. It's not as pretty but it's safer anyway. Behind the wall of the bell you could even place more bricks left and right on top of those two layers of firebricks.
Next question is probably how to close the wall above the firebox. Superwool all around the firebox that's enclosed by wall, some more on top and steel bar between layers of wool so steel is able to expand freely. Brick on top of that, this simple construction is used quite some times before and it works. Now I come to think about it: even in the Mallorca build which is in use for its third winter as we speak.
A word of warning: please don't go over the maximum recommended values for the ISA of the bell, preferably a bit less. It might help to insulate the firebox all around, at first the heater will be wet and all which makes it harder to get going.
|
|
|
|
Post by hof on Nov 26, 2019 7:45:22 GMT -8
Thank you!
|
|
|
|
Post by hof on Nov 28, 2019 11:17:09 GMT -8
Took 5 hours to lay first layer. Tired. 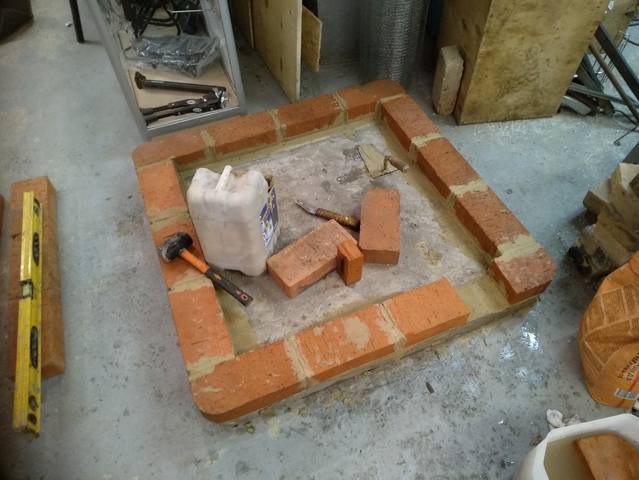 |
|
|
|
Post by peterberg on Nov 28, 2019 11:24:07 GMT -8
<grin mode on>Calculating this heater as 24 layers high (just a guess) that would make 120 hours, not counting the core.<grin mode off>
I am sure you could do better than that!
|
|
|
|
Post by hof on Dec 9, 2019 21:55:57 GMT -8
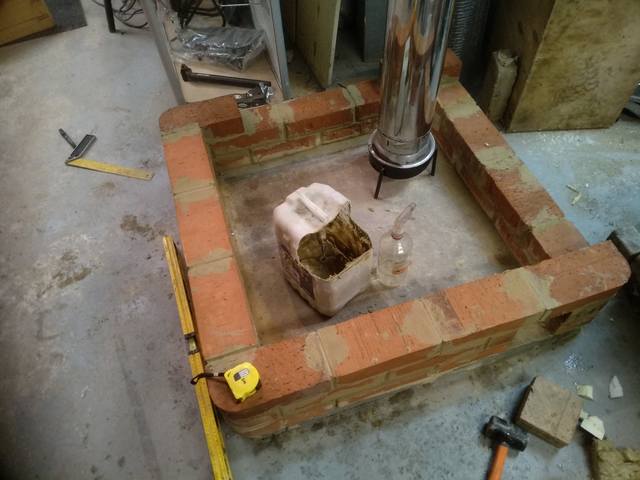 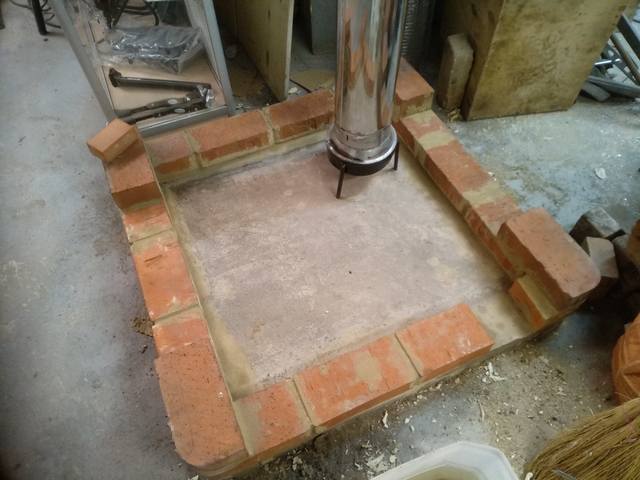 Continue. Installed flue pipe. How to isolate flue pipe? |
|
|
|
Post by peterberg on Dec 11, 2019 0:47:35 GMT -8
There's a choice: not at all or with superwool and chickenwire or another steel wire mesh around it to keep it in place.
Consequence for not at all: you'll lose inevitably some heat but the thing will start up right away, whatever the circumstances. See it as an automated bypass, it's a little bit open all the time.
|
|
|
|
Post by hof on Dec 11, 2019 9:01:17 GMT -8
|
|
|
|
Post by hof on Dec 12, 2019 13:00:39 GMT -8
  Desided to make brick shell for riser and insert 20 mm IFB. |
|
|
|
Post by wisc0james on Dec 12, 2019 18:18:42 GMT -8
Thanks for documenting this, Hof. I am contemplating something similar. Looking good! I can't wait to see it through to the end.
|
|
|
|
Post by peterberg on Dec 13, 2019 2:04:07 GMT -8
Looks good! Inserting IFB, ceramic fibre board or superwool as insulation inside the riser instead of outside means riser is very quick to get to operating temperature. Another consequence would be that the firebricks as riser shell aren't necessary anymore, this could also be regular red brick.
|
|
|
|
Post by Orange on Dec 14, 2019 11:23:38 GMT -8
Looks good! Inserting IFB, ceramic fibre board or superwool as insulation inside the riser instead of outside means riser is very quick to get to operating temperature. Another consequence would be that the firebricks as riser shell aren't necessary anymore, this could also be regular red brick. is the hard shell even needed if IFB or CFB is used?
edit: not need for shell after the first port, original DRS2 was bould with only IFB/CFB.
|
|