|
|
Post by peterberg on Apr 9, 2019 0:32:46 GMT -8
The combustion core is a 120 mm (4.72") system while the chimney is a 150 mm (6") sized one. Even the exhaust from the lower barrel is the larger size. So in all, the chimney is roughly 40% too large for the core. That limiter need to be there, otherwise the draft of that chimney would be too strong I'd think.
The question remains whether or not a correctly sized stack would need a limiter as well.
|
|
|
|
Post by Vortex on Apr 9, 2019 1:09:14 GMT -8
Peter, An efficient smokeless fireplace would be an awesome addition to the rocket stove family  I guess it's also possible that a 4.72" chimney might not have enough draw, and that the oversized chimney might be needed for it to work. |
|
|
|
Post by peterberg on Apr 9, 2019 2:49:03 GMT -8
You might be right Trevor.
Although the draft limiter I am using always opens shortly into the burn. Fixed setting 12 Pascal, checked with the Testo.
Beaufort 1 or 2: 8 minutes.
Beaufort 3 or 4: 6 minutes.
Beaufort 5 or 6: 4 minutes.
Beaufort 7 or 8: 2 minutes.
Strong gusts of wind: from the start of the burn or even before.
Above Beaufort 4 it stays open for the entire rest of the burn.
There's of course a sliding scale between a bit open and as wide as possible so the above numbers are just an indication. Plus the valve of the limiter swings a lot between a bit and wide open.
In my opinion: likely, the chimney size could be smaller for this particular system.
|
|
|
|
Post by travis on Apr 9, 2019 5:37:44 GMT -8
Wow! Peter this is a really wild step and im very excited about your discoveries. Great job!
I couldnt find the proper ratio for the second port(which is the opening from top box to the bell right?) What did you measure it to be again? And is the first port the normal batch box size?
|
|
|
|
Post by peterberg on Apr 9, 2019 7:37:18 GMT -8
Hi Travis, the firebox and port are in fact like the normal standard one. The riser is square instead of octagon or round but still the standard size. So one side of the square is the same figure as the diameter of a round one according to the calculator. The end port (to the bell) is 6% larger as compared to the first and as wide as the top box, that's all. Beware though, the placement of this port and the ridge at the ceiling are critical.
Edit: Funny thing is, ashes that settle down in the top box show an empty patch right beneath the end port. Indicating a higher air velocity over that particular spot. It emerged since the ceiling ridge moved to its current location.
|
|
|
|
Post by independentenergy on Apr 12, 2019 10:26:30 GMT -8
it would be interesting to know if the exit door could be moved to the side, it would give the possibility of many designs for kitchen stove.
|
|
|
|
Post by peterberg on Apr 13, 2019 8:24:26 GMT -8
it would be interesting to know if the exit door could be moved to the side, it would give the possibility of many designs for kitchen stove. Frankly, I don't see the crucial advantage of a side exit opening. As it is, the hot plate could be above the top box and maybe a simmer oven at the side. A side (or both sides) opening is providing the possibility of having the hot plate at the side of the oven, yes. The downside is someone need to do the research whether this provides equal results and when it isn't doing the development all over again. This idea is on the back burner for the forseeable future as far as I am concerned, pun intended. At the same time: if the advantages of this variant seemingly are very good to you, please be my guest and take up development yourself. |
|
|
|
Post by independentenergy on Apr 13, 2019 9:13:20 GMT -8
I was thinking of a top plate that closes the shoebox directly, and the side exit in an oven.
Unfortunately I don't have the means to proceed with a development.
thank you
|
|
|
|
Post by peterberg on Apr 13, 2019 9:46:31 GMT -8
This week I played around with the open fireplace idea some more. If anything, it turned out a run need to be done within somewhat narrow parameters in order to be a good run. Below are the reports of three runs, done in as many days. The first one fully loaded with dry, less than 15% moisture oak and beech, and I goofed up with this one quite a bit. Have a look at the load first: 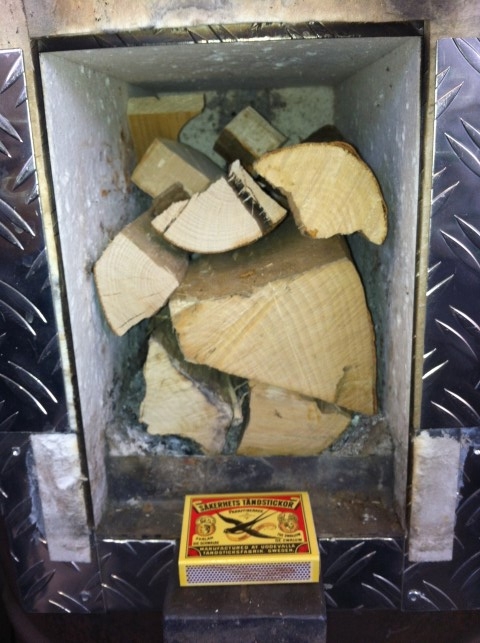 As you can see, there's one big log in there but it's only big at the end which is visable. The other end is much thinner, the difference filled in with smaller pieces. Besides that, there's plenty of air around and between the fuel. Development of the fire was very quick, oxygen passed the 8% line in seven minutes flat. When something like this is happening I normally lower the glass "door" panel. And leave a reasonable opening for primary air so off-gassing would hopefully go to a lower level and the secondary air provision could take over. So I inserted the glass panel only to see the dive of oxygen to continue. Within two minutes I realised I goofed up big time, there wasn't a secondary air inlet active, the duct was upside down in it's trench! So I pulled out the panel at the 10 minutes mark and hoped for the best. Eventually, combustion stabilized and hobbled to the end-of-burn. 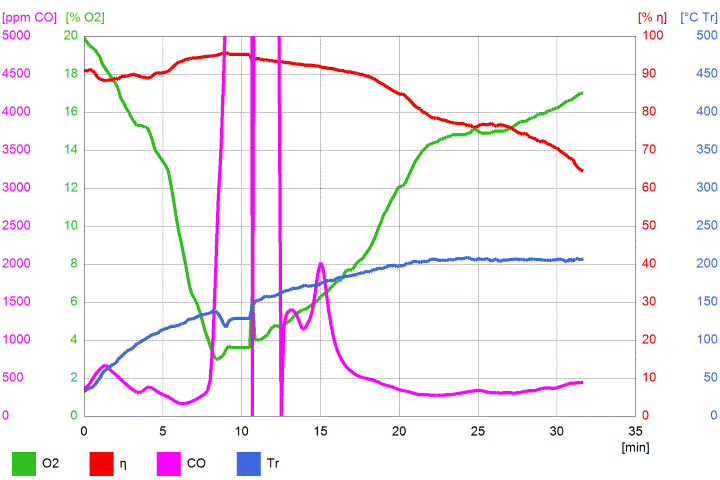 Not a great succes, averages were such that the thing would be rejected as not compliant to the current norm, let alone the coming one. But as you all should know now experiments can't fail, there's always something to learn. I learned from this one bone dry, high calorific fuel is better not loaded to the top. Averages, just to place results in perspective: O² 11.4%, eff. 85.6%, CO 4033 ppm, stack 162.4 ºC. Next day I aquired some bags containing hardwood suitable for open fireplaces. It turned out the moisture content was well above 20% but I decided I could run the DSR2 with it and see what happened. Being a bit wary in light of the day before I filled the box to 2/3, prepared the Testo and lit the fire. 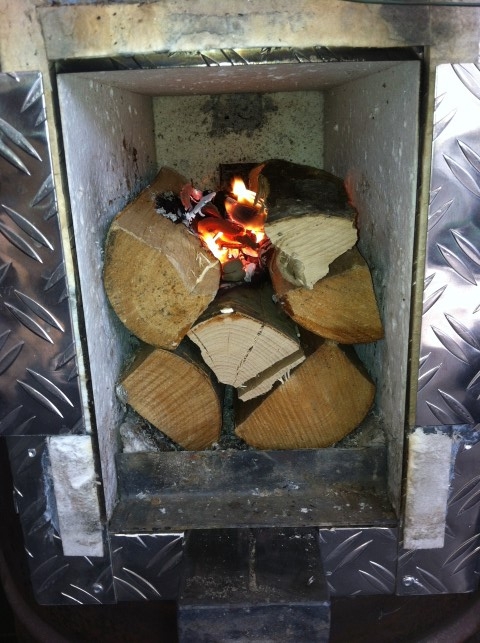 At the 15 minutes mark there still wasn't happening much so I added two dry pieces of hard pine to speed things up. It did, it stabilized, formed a smallish peak of CO and stabilized again. 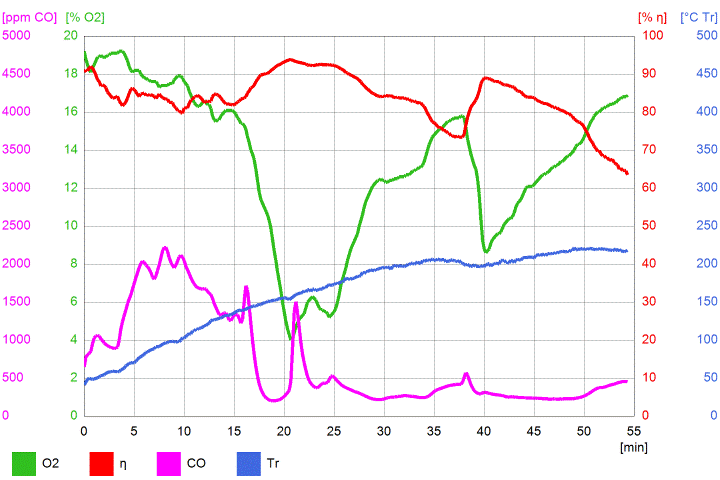 Being a quite uneventful burn from there on (steam puffing from the logs' ends) I decided to add two smaller pieces at the 38 minutes mark. This went well in that it prolonged the burn for about 13 minutes without major hiccups. Averages: O² 13.4%, eff. 83.6%, CO 714 ppm, stack 163.4 ºC. Not bad, could be better but within specs of the EU 2022 norm. Today I took another approach, bone dry lumber scraps, tightly stacked and filled to 3/4. Lower calorific fuel, but spaced very sparingly. This tightly stacking is against common practise as far as building a healthy fire. But then who cares, this combustion unit is already quite odd so loading is as well. 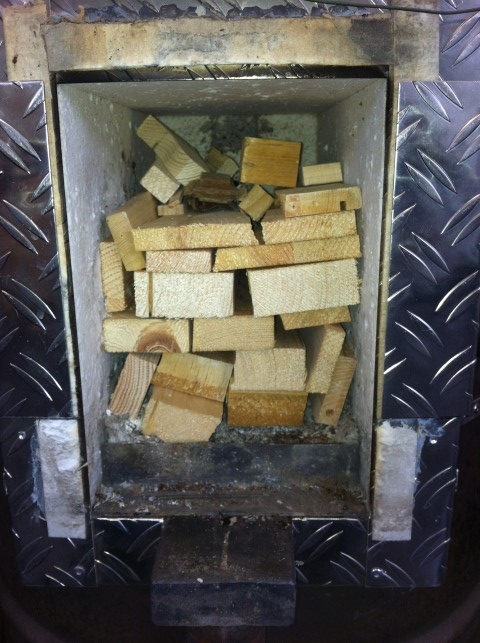 While I lit the thing I decided not to interfere in any way, just see what it would be doing on its own. And I have to say, it didn't let me down. 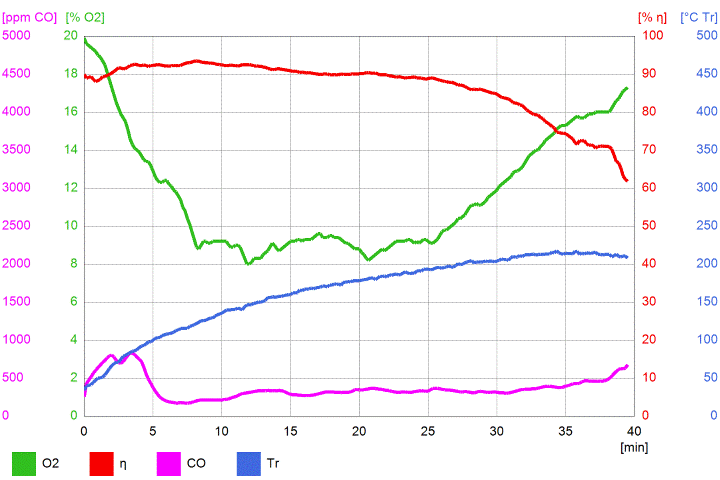 The fire came on moderately quick, oxygen stayed just above the 8% mark. As was expected the stack temperature got high, up to 217 ºC, and consequently efficiency wasn't really tops. But then, the thing was running open, only a spark screen in front and that was it! Lots of so-called wood burners wouldn't touch such numbers I'd imagine. Averages to round off: O² 11.7%, eff. 86.7%, CO 373 ppm, stack 163.9 ºC. In conclusion: moisture content is very important but wet fuel should be split finer and loaded in larger quantities. Hardwood and softwood fuels are quite different from each other. Softwood need to be loaded tighter to obtain a stable burn, hardwood should be loaded in bigger chunks when dry. But in retrospect, this isn't any different from what a responsible wood heat user should know already. Mark the average stack temperatures are very close to each other, it looks like it's specific to this configuration over all. |
|
|
|
Post by travis on Apr 13, 2019 14:57:08 GMT -8
Thank you Peter, I hope to build a 200mm one this summer to replace the stove that I built when the old conversation started!
You are doing some great work my friend
|
|
|
|
Post by smartliketruck on Apr 13, 2019 15:59:38 GMT -8
Any chance you could share this sketchup file or the dimensions & postions of the stumbling block and second port? |
|
|
|
Post by peterberg on Apr 13, 2019 23:54:47 GMT -8
Thank you Peter, I hope to build a 200mm one this summer to replace the stove that I built when the old conversation started! You are doing some great work my friend Thanks Travis, you're welcome. A 200 mm system is a big jump up from the 120 mm I am working on right now. It might be a bit too much in terms of height to cook on it. Presuming the firebox is on floor level like the 200 mm batch box rocket at Paul Wheaton's place, height of the core itself is 738 mm. Material thickness in this calculation is 50 mm, space between core and cooktop would be about 150 mm. Together close to the 920 mm which is an accepted height for a cooktop in my country. Also, you won't be able to avoid refractory materials, notably the horizontally slabs. But your current kitchen stove is of a smaller size, isn't it? |
|
|
|
Post by peterberg on Apr 14, 2019 0:26:08 GMT -8
Any chance you could share this sketchup file or the dimensions & postions of the stumbling block and second port? Stumbling block as opposed to trip wire! Nice term, I'll use that from now on if you don't object. I could share this file, yes, but it's a principals drafting, not a real-life drawing utilizing real-life materials so material thickness won't be correct, for one. In short: it isn't a reference design, that's more than a couple of months away, for sure. I'll dub the file "DSR2 RC1", meaning "Double Shoebox Rocket mark ll release candidate one". Edit: The file can be downloaded using this link. It's in SketchUp version 8, the lowest commom denominator. |
|
|
|
Post by travis on Apr 14, 2019 3:11:20 GMT -8
Thank you Peter, I hope to build a 200mm one this summer to replace the stove that I built when the old conversation started! You are doing some great work my friend Thanks Travis, you're welcome. A 200 mm system is a big jump up from the 120 mm I am working on right now. It might be a bit too much in terms of height to cook on it. Presuming the firebox is on floor level like the 200 mm batch box rocket at Paul Wheaton's place, height of the core itself is 738 mm. Material thickness in this calculation is 50 mm, space between core and cooktop would be about 150 mm. Together close to the 920 mm which is an accepted height for a cooktop in my country. Also, you won't be able to avoid refractory materials, notably the horizontally slabs. But your current kitchen stove is of a smaller size, isn't it? Right now we have a 150mm system which in the coldest times of winter needs two or three consecutive fires to warm the house the way my wife likes it. When you say cant avoid refractories is it because other material will break or is not accepted? I dont have proper refractories but I have tested making the gap with available bricks and it works well from what I see. I have thought of the cooktop and ours is about 980mm right now. It should be in an acceptable range. |
|
|
|
Post by travis on Apr 14, 2019 3:45:02 GMT -8
I tried making my own refractory mix for the stove we have now but it did not last and cracked too bad to use. So I wanted to try plain brick and cut thin splits to put in place of the old firebox. They show no signs of wearing or cracking, which has been so nice. Also the port is cut into a brick. Just being put in place with thick clay slip this seems hopeful to me.
|
|