|
|
Post by BenAlexanderT on Oct 8, 2018 23:55:38 GMT -8
Good morning from Greece. Yesterday I tried to incorporate the same idea in a 12cm system. in the beginning, I had a lot to smoke and the flames did not go past the port, but the depth of my firebox was 44cm instead of 34.6cm, but after I used a firebrick to decrease the depth to 38cm the smoke started to clear and I saw double horns. Also, after the changes with the depth, I change the primary air from the original 4.8cm*4.8cm to something close to 7cm*9cm and I saw improvement. The heat riser low part is 13cm*11cm*29cm = 4147cm^3 = 4.147 liters and the top part is 17cm*22cm*15cm=5610cm^3 = 5.61 liters, total of 9.757 liters. The total volume of my previous riser (86cm height 12cm diameter) was 9.718 liters. Today I will try to cut some brick to change the lower part to 12cm*12cm=144cm^2 The current box dimensions are Width(17cm) Height(26cm) Depth(38cm) And here is a video: photos.app.goo.gl/hBzkEr8WriuNnjJ9AP/S When I smelled the smoke it was just heated after the changes in the depth. P/S2 The exit opening of the heat riser is 17cm*8.5cm=144.5cm^2. |
|
|
|
Post by peterberg on Oct 9, 2018 0:55:12 GMT -8
Hmmm... According to your video, some things are quite different from Travis' heater and my test bed, there's no chimney. Every batch rocket ought to work best with a chimney to induce draft. The port is doing nothing more than accelerating that gas velocity. In your case there's very little draft or even absent. Could you place a pipe on top and see what happens?
Besides the above, the air inlet seems to be at the front's right side instead of at the bottom. I'm inclined to think you made the port deeper by placing a brick inside is another deviation of the configuration. Also, the size of the original primary air inlet is based on a system coupled to a chimney.
In case the air speed is very low, you need a wider opening in order to get enough air inside. My own heater does need initially a primary air opening twice as large or more when starting from cold until the chimney warms up and air velocity is speeding up. Air supply isn't about an opening as such but a combination of opening and velocity instead.
In short: ramp up the draft and the situation will change dramatically, almost guaranteed.
|
|
|
|
Post by BenAlexanderT on Oct 9, 2018 8:58:16 GMT -8
I tried the system again this morning before you posted. I decreased the depth of the box to 36cm and I ran it again. It went way better than before. Video: photos.app.goo.gl/ghcxXNsAXAcQyQhm7After that test, I saw your post and in the evening I ran it again but with a pipe on top of the riser per your instructions and it indeed increased the draft a lot. I had heavy smoke in the first 2 minutes but by the fourth/fifth minute it was clear and it didn't smell. The primary air was 4.8cm*4.8cm as in the regular 12cm system batch box. Video: photos.app.goo.gl/Bsn3Mme3g2dryBDi7Video: photos.app.goo.gl/qqjGbVPBvcUFMaEX6The brick yesterday was not placed behind the port. The depth of the port is 5cm as it's suggested in the dimensions calculator. Drawing: photos.app.goo.gl/fA99ufiLBMM44dbU6 |
|
|
|
Post by peterberg on Oct 20, 2018 3:08:32 GMT -8
Finally the Testo returned to base after 4 weeks. I left the configuration as it has been before and did a couple of test runs to establish what its behaviour is, sporting a tapered riser. A couple more this weekeend and on to the next step. This is planned to be opening up the bell and replace the tapered piece with a normal straight riser and do a number of test runs again. Hopefully, behaviour of both configurations are comparable. Either succesful or not, I intend to try a normal riser with a (port) restriction on top next. Depending on what the results will be, I'll try a tapered riser that's stepping out instead of funnel shaped. All that done, trying a de Laval nozzle on top of both risers would be an option. Don't hold your breath, all this will take lots of time. |
|
|
|
Post by travis on Oct 21, 2018 0:30:49 GMT -8
Wow thats quite a lot of work! Will look forward to seeing your results.
After living with it a bit these are my thoughts.
I have personally noticed that the stove can be a little sensitive in this set up. I would not always feel like i want another person to make a fire since there are a few things that seem to easily make it smoke. I think I personally prefer a standard riser that gives consistent clean burns, but I also have not used as good of materials. Since the riser is brick wrapped in insulation it warms up slowly i think. It may do better with quality expensive materials though.
|
|
|
|
Post by Orange on Oct 21, 2018 1:32:22 GMT -8
hm, the default batchbox is already efficient, I remember Yasin measuring 97% combustion efficiency with short riser and no insualation. That would also indicate that the combustion mostly happens in the lower part of the riser and so there is not much room for improvement except to cut CO spikes and improve efficiency at the beginning and end of the burn with 2nd port (taper).
I'm curious what the result will be with a calibrated device since the best result seems to be open system without secondary air  |
|
|
|
Post by peterberg on Oct 21, 2018 6:52:17 GMT -8
I'm curious what the result will be with a calibrated device since the best result seems to be open system without secondary air  Not likely, number seven of the published diagrams is the best. Which is a closed system with secondary air and all. Results so far are encouraging, most runs this time are star examples of a well-behaving heater. Although it's inevitable smoke will be produced by loading the firebox in a sloppy way. Cramming it full with small pieces of soft wood is one of the ways it could get haywire. But then, it's easy to do the same with the normal configuration if you know how. hm, the default batchbox is already efficient, I remember Yasin measuring 97% combustion efficiency with short riser and no insulation. What Yasin built isn't a default batch box. Although there's a short riser, the smallish horizontal bell downstream from the riser is absolutely necessary otherwise the thing will produce very dirty burns now and then. Tested and all by Yasin. |
|
|
|
Post by Orange on Oct 21, 2018 12:02:22 GMT -8
thanks for the clarification. I thought the CO value is the most important number because you can always improve overall efficiency by lowering the exhaust temperature. And I thought the combustion happens only in the lower part where the flames are present.
|
|
|
|
Post by peterberg on Oct 21, 2018 12:08:53 GMT -8
And I thought the combustion happens only in the lower part where the flames are present. It might look like that yes, but in reality it isn't. The space downstream is necessary to slow the gases down directly after the riser so there will be a longer stay in the hottest zone. So that small bell is actually part of the combustion system. And oh yes, part of the flames aren't visible as orange or yellow but blue instead, only to be seen in the dark. |
|
|
|
Post by travis on Oct 23, 2018 17:12:53 GMT -8
Thats true, some of my trouble may be that im still learning to load it properly. I pushed coals to the front before loading and it was very clean. So I obviously have some things to learn still as I watch the chimney.
|
|
|
|
Post by peterberg on Oct 26, 2018 8:31:34 GMT -8
Testing is commencing, have done 5 tests with the tapered riser, the rest of the configuration exactly the same. I took out that riser a couple of days ago and built a straight one out of insulating firebricks. Again rest of the thing the same so I would be able to see what the differences are. No dramatic deviations from the desired pattern so far, most of the runs are stellar examples.
I plan to do 5 test runs with each riser variant and hope to get at least 4 good ones out of 5. Any more faulty runs, that configuration will be shelved as not good enough. I hope to report about results so far and planning during the weekend.
Incidentally, nails in the ash bed turned out to be a recipe for very low carbon content of the ashes. I've done 9 runs so far without emptying the ash bed and it remains remarkably stable volume-wise.
|
|
|
|
Post by peterberg on Oct 29, 2018 4:09:18 GMT -8
It turned out I made a mistake and ran 7 tests instead of 5 with the tapered riser. Broadly speaking, this tapered riser is comparable with the normal straight riser, length 8 times base figure built out of ceramic fibre board (CFB). Specification of this board is 1200 ºC (2190 ºF) continuously. The rear wall of the CFB riser at the height of the port appears to be overheated in the sense the surface has become hard and brittle while the first cm depth of surface area seems to have been shrinking a fair bit. 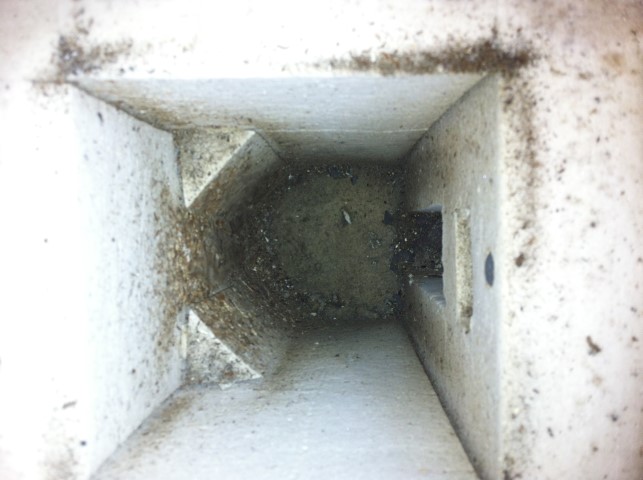 Results are excellent, six out of seven diagrams are really good. One diagram shows a sharp CO peak somewhere halfway into the burn, caused by "tunnel formation" in the pile of fuel in the firebox. There wasn't any smoke produced during this phenomenon and once the tunnel caved in the burn corrected itself. Of the seven diagrams, only four are showed. 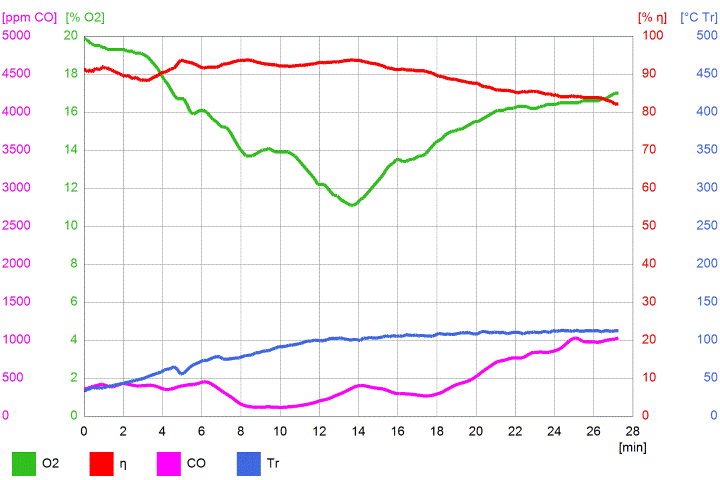 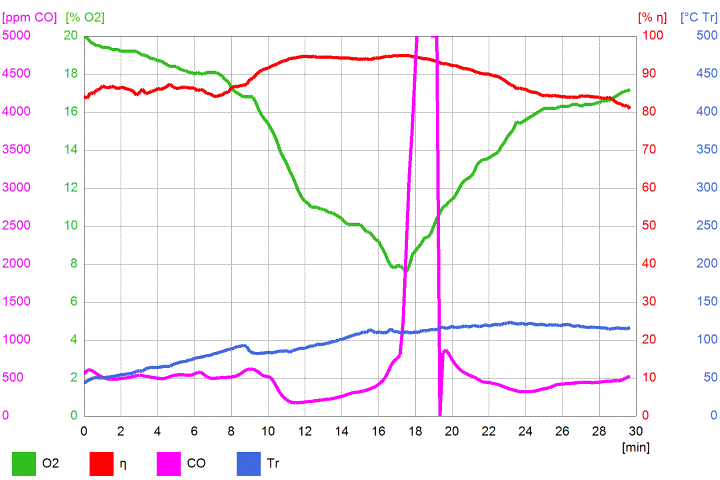 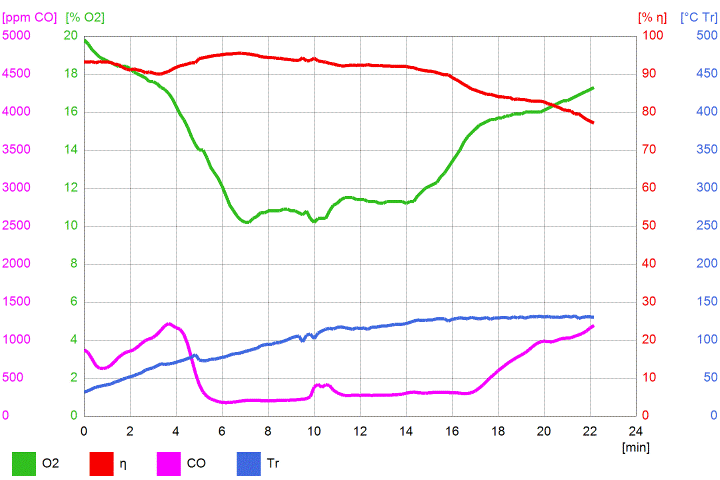 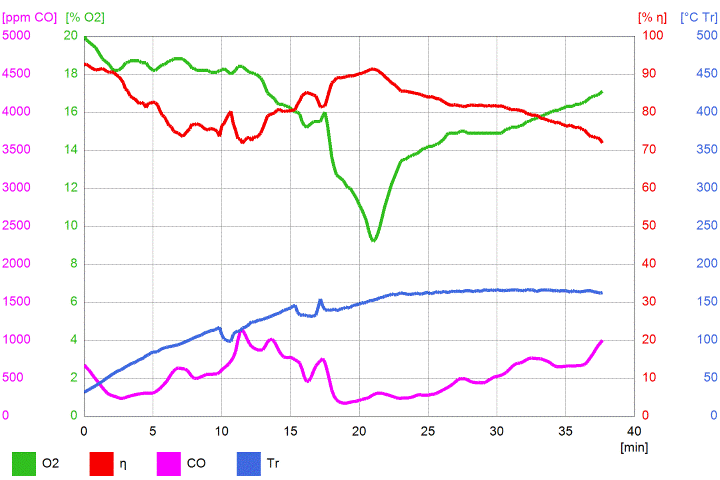 The new straight riser is built using very insulative, lightweight and brittle firebricks. Four layers of those brought the riser up to 8.5 times base figure for a 120 mm diameter riser. Mortar is just clay/sand. 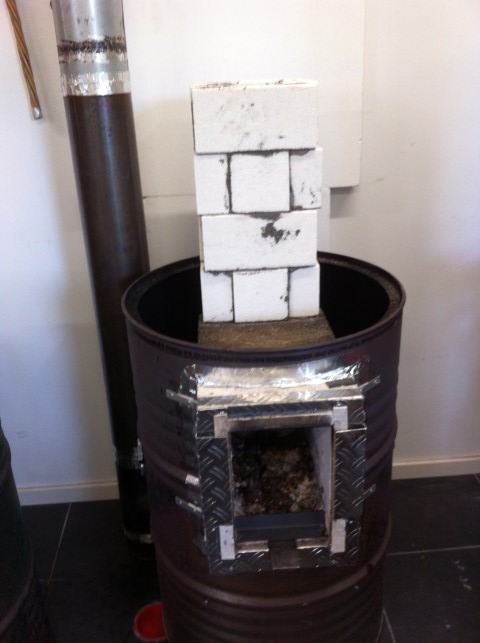 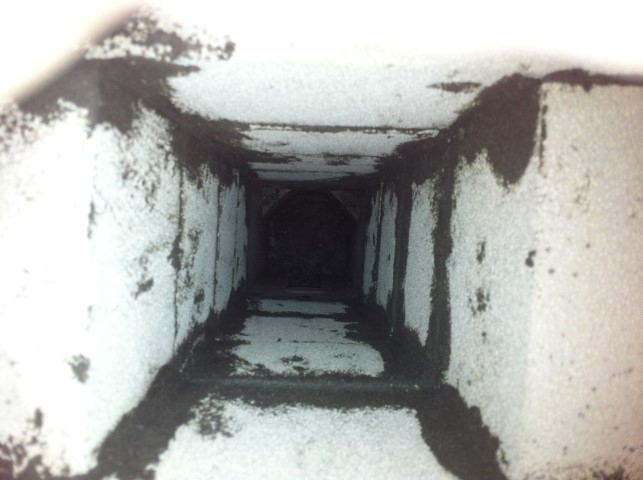 Material difference is minor in the sense that the firebox stayed the same, the new riser's material's temperature specification is comparable. The one difference in performance lies in the usual CO peak in the beginning of the testrun. It seems to be largely absent using the tapered riser, while three of the five straight riser's diagrams showed it in various shapes. 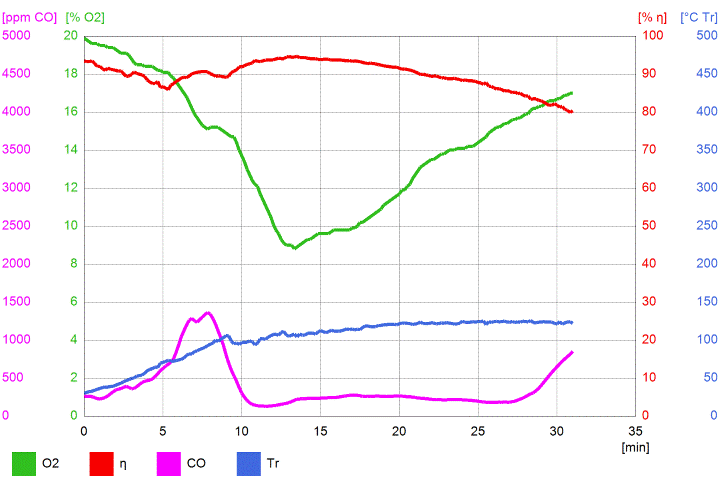 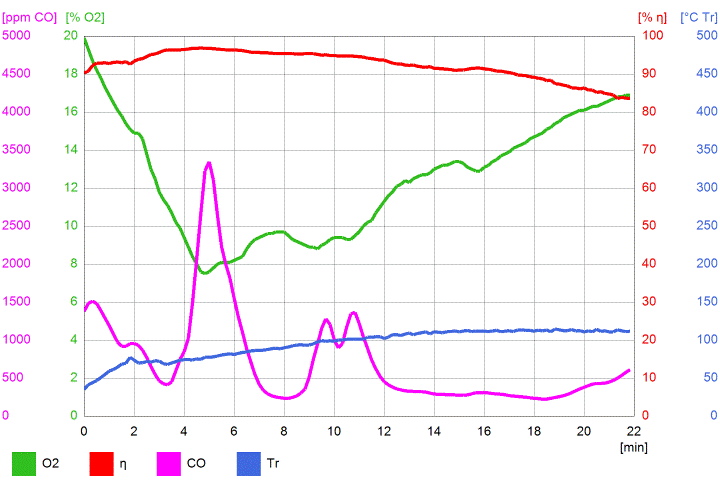 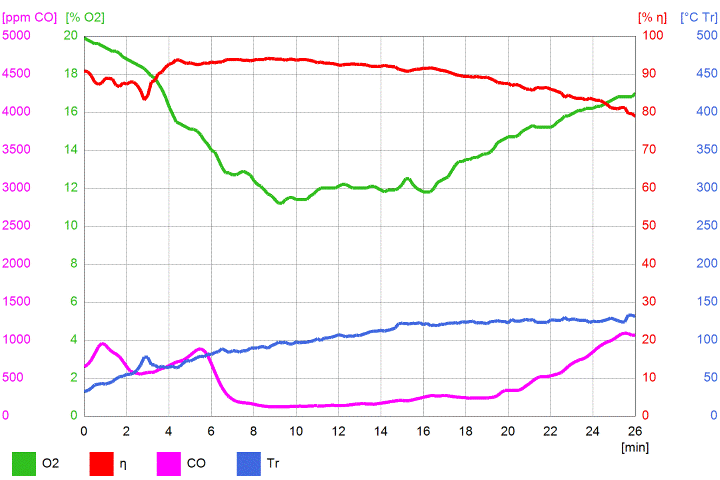 Conclusion so far: the tapered riser is slightly better in performance. Drawback is the relatively complicated way it need to be built. This could be alleviated by stepping it out like Travis did, but maybe there's another possibility to achieve the same goal. Namely placing a box on top of the riser / firebox, wide enough inside so it doesn't pose a restriction to the gas velocity. So, next item on the top of my list has become a rectangular top box instead of the riser. Not the same as the DSR because the port remains in the rear wall of the firebox. Although some of the processes inside the top box could be very much like the DSR, I do hope and expect it to be more reliable. 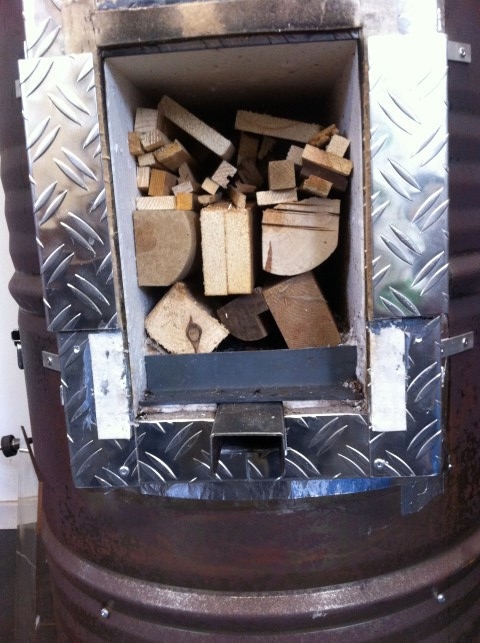 Something like this has been done by Yasin Gach of Uzumé Association with commendable results although his "top box" being more like a small bell. |
|
|
|
Post by Orange on Oct 29, 2018 12:52:51 GMT -8
that is great news Peter, not only because of lower CO but because of lower height of the riser  |
|
|
|
Post by Berend on Oct 30, 2018 7:42:09 GMT -8
My riser behind the firebox happened to be 31 cm high, this is 12²*31= 4464 or 4.464 liter.. This part is just straight because of space constraints. The higher part is tapered from 12² to 20² and 21 cm high. Which is calculated (12²+20²):2= 272 cm² as the average csa of that partt . The volume is calculated as 272*21= 5712 cm³ or 5.712 liter. Adding the 4.464 liter of the lower end comes to 10.176 liter. The volume of your tapered riser is slightly smaller because the corners form a pyramid shaped volume. A pyramid only occupies a third of the volume instead of half... The tapered volume is a summation of 1 rectangular box (12x12x21) 2 wedges at the sides (12x4x21 * 0.5 * 2) 1 wedge at the front (12x8x21 * 0.5) 2 pyramids in the corners (4x8x21 * 1/3 * 2) This equals (144 + 48 + 48 + 21 1/3) * 21 = 5.488 liter The total volume is 9.952 liter instead of 10.176 liter |
|
|
|
Post by peterberg on Oct 30, 2018 10:24:57 GMT -8
Most of the time I draw a volume in Sketchup and let it show the Entity Info. That's what I did just now and you are right, my calculation was not correct. Further development into the DSR2. |
|