|
|
Post by peterberg on Oct 31, 2018 3:56:48 GMT -8
Development leading to this thread.Just to be sure, all diagrams are obtained with the same two-barrel setup, air inlet about 20% of riser csa divided 50/50 between primary and secondary air. Each test run started at the moment the oxygen dropped below 20% and stopped when the CO² came back down to 4% or less for at least 40 seconds. Each interval in the diagrams is 10 seconds in order to avoid hiatus so it's pretty accurate. The Testo analizer is calibrated very recently, but the CO cell is at the upper side of the allowable tolerances. Which means in this case the CO lines in the diagrams are too high. In the best runs the CO level should be zero at some moments, however short, but it didn't and the lowest points in some diagrams were about 140 ppm. Just to signal there's a reason why the CO lines aren't that all time low. The straight riser's appearance when I took off the top barrel yesterday was very good, almost no soot at all at the outside. 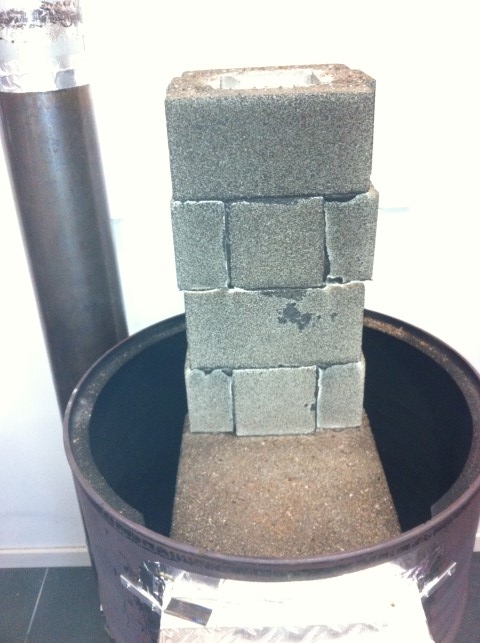 I changed the normal straight riser for a box on top of the firebox. 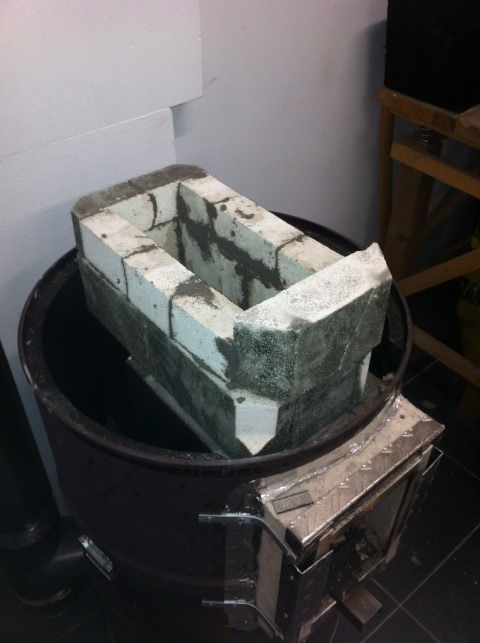 Size inside the box: 120 mm wide, being the same as the lower riser part, 180 mm high. When calculated from a round riser of that size it is twice as wide. When calculated from the square riser of that size it's 1.5 times as wide, so there should be plenty of space to go through the 90º corners. The top of the box being closed by means of dry stacked bricks in such a way that the remaining exhaust opening was as large as 94% as compared to the round 120 mm riser and 70% of the square riser. 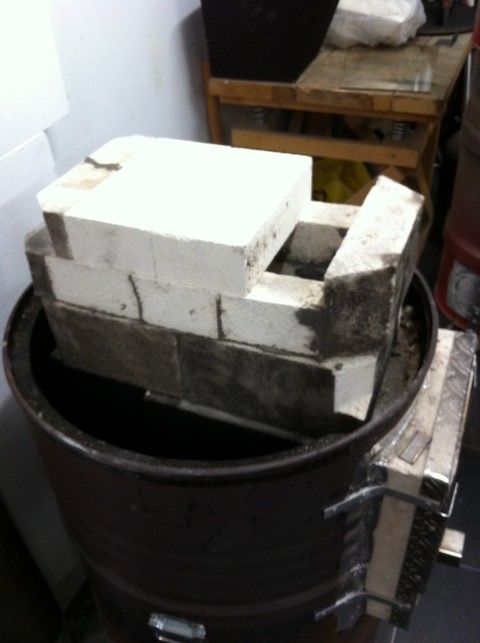 The first run, yesterday evening, looked good at first but at 6 minutes it started to rise instead of descending. The usual sound of the run was somewhat dimmed as well and at about 18 minutes it went completely haywire for the duration of 5 minutes. Don't get me wrong, light smoke was only visible outside for about 1 minute and that was it. 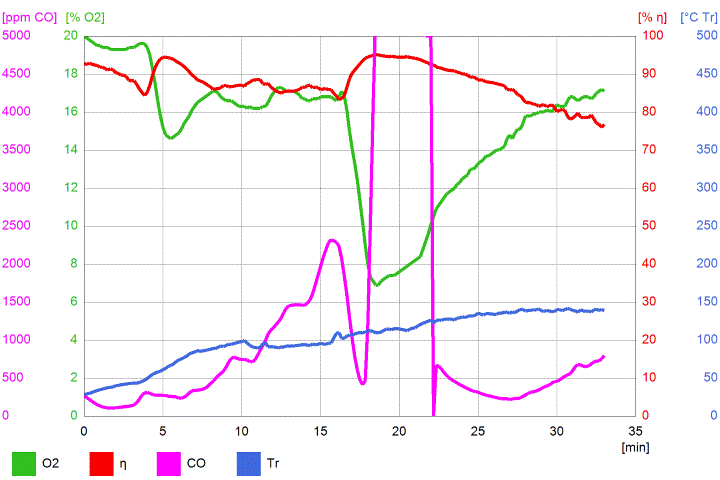 I wasn't satisfied with this run, especially because there was just half a load in the firebox, I intended to be cautious at first! The plan is to amend the topbox slightly and see what the result would be. In case no improvement is achieved I plan to take the topbox down and rebuild it as wide as the firebox so it would be more spaciously. Other possibilities are widening the exhaust opening or narrowing it.
|
|
|
|
Post by peterberg on Nov 3, 2018 3:38:08 GMT -8
Again, I did some testruns with different "topbox" configurations. Some progress has been made, although it's too early days to proclaim it as the solution. At first, I wasn't satisfied with the last diagram in the post some days ago. So I decided to amend the top box in such a way that the exhaust opening was shifted a bit in the direction of the vertical riser stub. This way, the stream pattern would be changed and hopefully for the best. 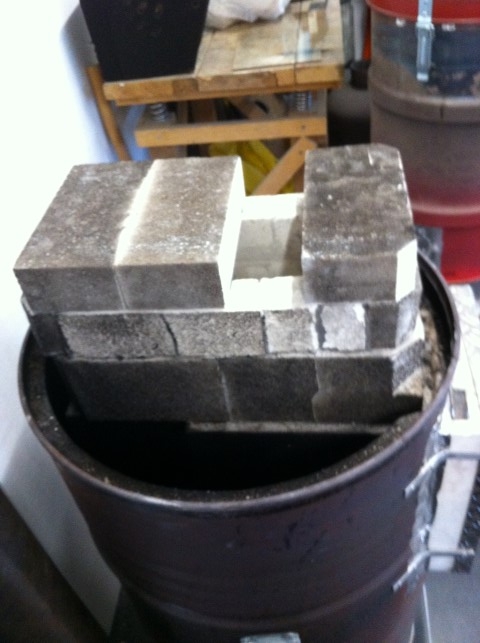 But it didn't to the extend I hoped for, again there happened to be a steep peak in the CO line. Not as high as the last one but still too much, O² was down nicely. 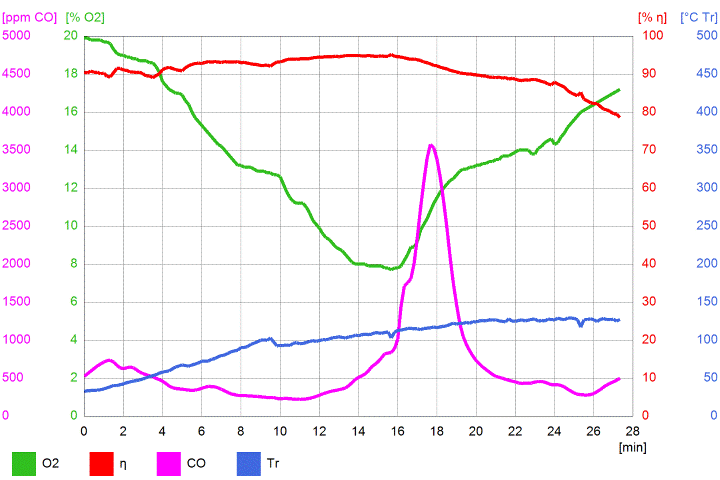 In general, the average numbers together with the diagram are telling the whole story. O² 13.6%, efficiency 90.9%, CO 679 ppm, Tr 97.6 ºC. Oxygen is nice, preferably between 13% and 14%, low enough to achieve high efficiency. CO a bit on the high side of things, I'd like it to be close or lower than 500 ppm. I tried another run on Thursday, being very cautious not to overfeed the thing. CO was lower now, even below 500 ppm given the fact that the Testo is calibrated a bit too much on the plus side. But the oxygen stayed much too high, not even down to 13% let alone the level I want to see it. 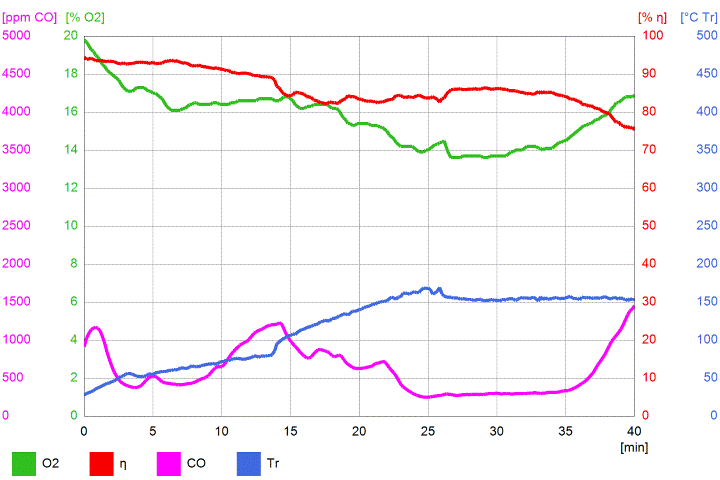 Averages from this one: O² 15.7%, eff. 86.6%, CO 609 ppm, Tr 117.1 ºC. All two of the above runs seemed to be very dimmed like the fire couldn't get fierce enough and even the noise was down a bit. At this point I decided to change the topbox again, now to the same width as the firebox and close to a square cross section area. To allow the gases more room so streaming through would be without severe restrictions. 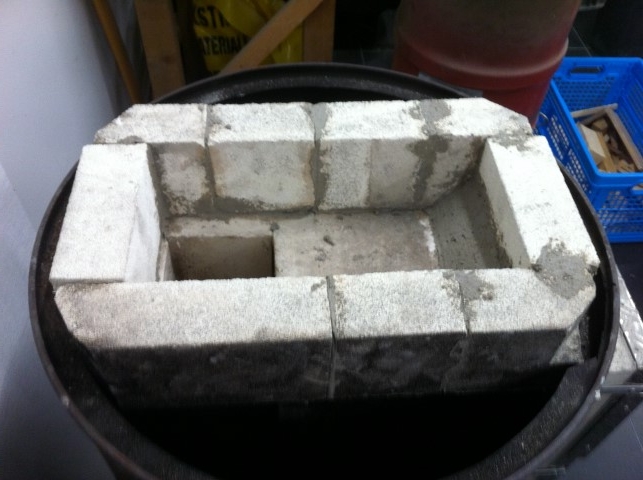 I also added a little ramp in the corner where the gases need to go up. In a scaled-up version this top box could function as an oven this way. Just all the way to the front and adding a door would be sufficient to create a black oven. 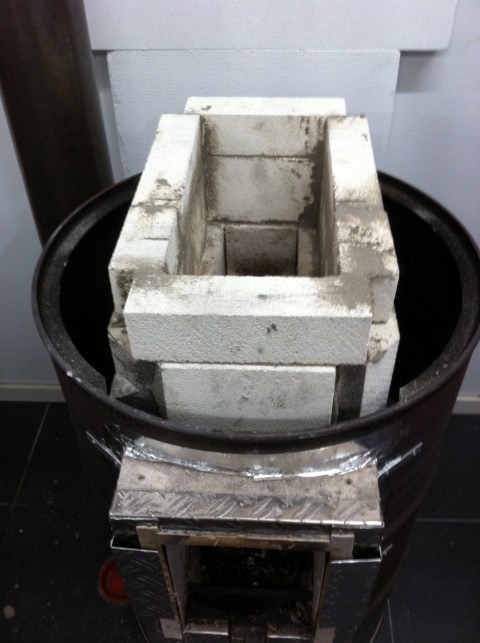 The closed box looks like this, the exhaust opening shifted somewhat to the rear and a csa just as wide as the square riser stub. 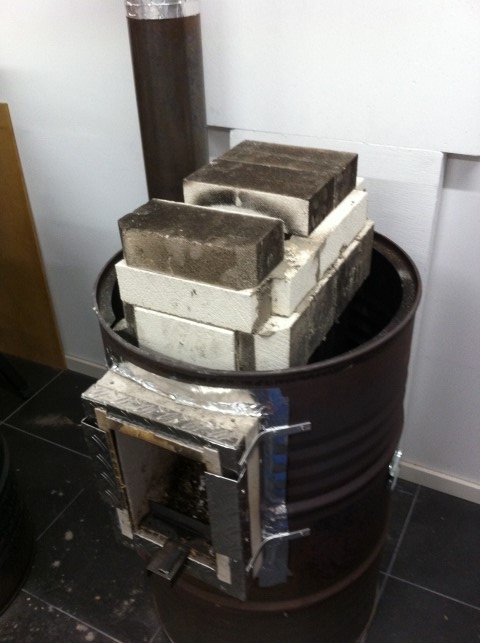 Yesterday night I did a new testrun using a normal 3/4 load of fuel. Results are encouraging. Numbers are excellent, the bump in the start phase like most of the straight riser configurations is completely absent. 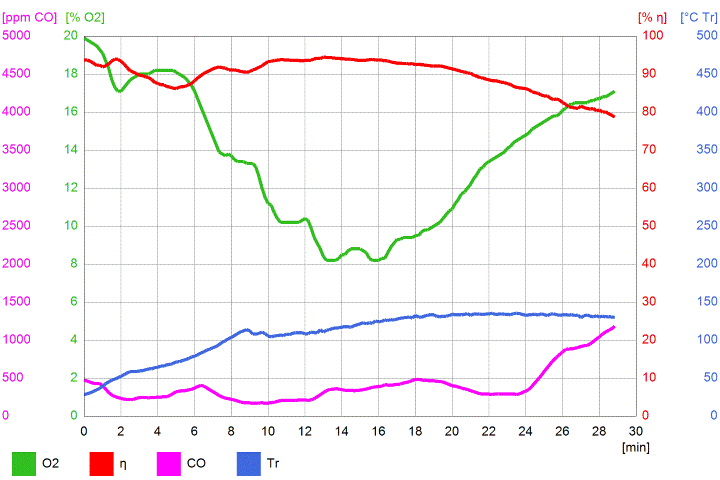 Averages of this run: O² 13.5%, eff. 89.9%, CO 401 ppm, Tr 108 ºC. Very nice, we seem to be on the right track now. More testruns in the coming days need to be executed in order to establish whether this is a one-off burn or not. |
|
|
|
Post by independentenergy on Nov 4, 2018 12:35:46 GMT -8
Great...
it may be possible to convert already built batch boxes with risers....
|
|
|
|
Post by peterberg on Nov 9, 2018 3:28:36 GMT -8
In the mean time, testing has commenced. The above published diagram happened to be not the only one like that. Here's another one: 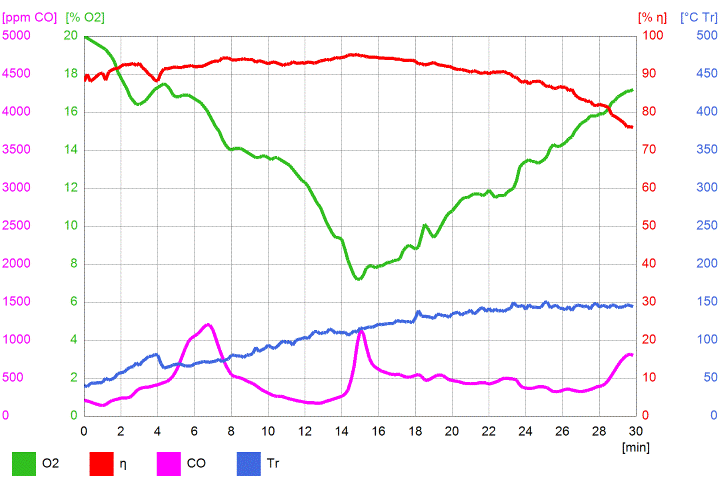 Averages: 13.4 % O², 90.5 % eff., 467 ppm CO, 108.2 ºC Tr. There are more like this, 5 in total. But I ran six test burns with this configuration and one went haywire. 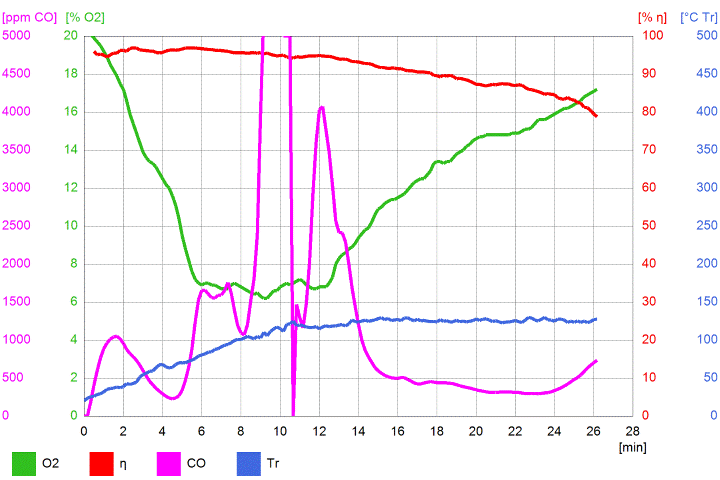 Averages: 12.0 % O², 91.8 % eff., 1460 ppm CO, 103.6 ºC. Efficiency is quite high here, and a corresponding low oxygen figure. But CO is definetely too high, so this run wasn't up to specs. I have to admit I loaded it with lots of small softwood scraps so a too quick fire development was to be expected. I opened up the barrels, took off the top bricks and it looked like this: 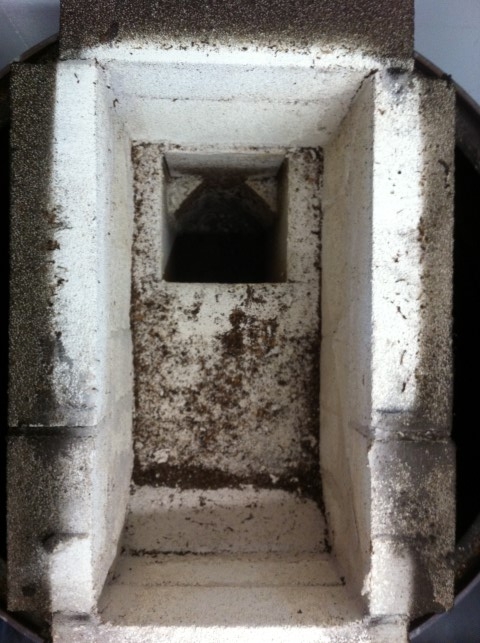 No soot to be seen anywhere, even in front which was covered partly by the first brick. Also, there's some fly ash at the bottom of the box, unlike the narrower version. I'd think that's because there's lots of room in there, although not too much since there's no soot in corners. The top box was amended in the way it exhausted to the bell. The opening on top shifted towards the front so it was situated at the very end of the box. I also closed up the sides with small blocks so the gasses were sent up a little longer. 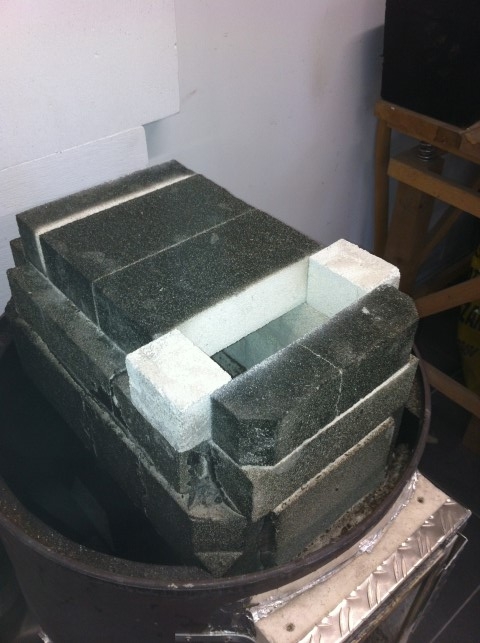 After closing the bell I loaded it up with scraps of oak at the bottom and some bigger pieces softwood on top. The resulting diagram looked like this: 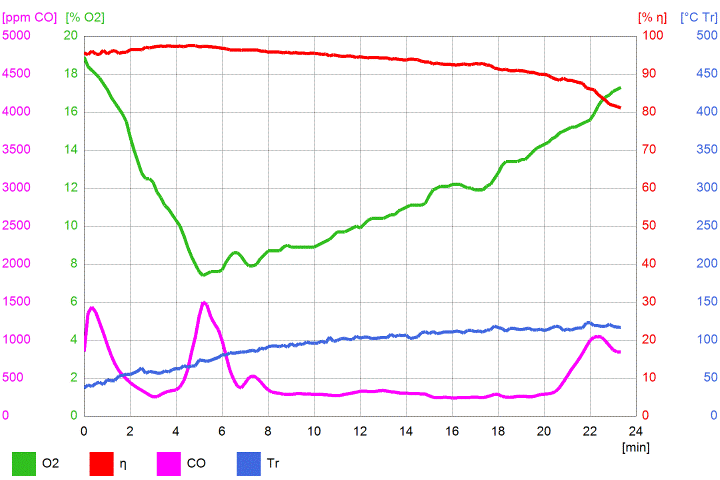 Averages: 11.9 % O², 93.5 % eff., 487 ppm CO, 93.2 ºC Tr. During this burn the fire looked like this: 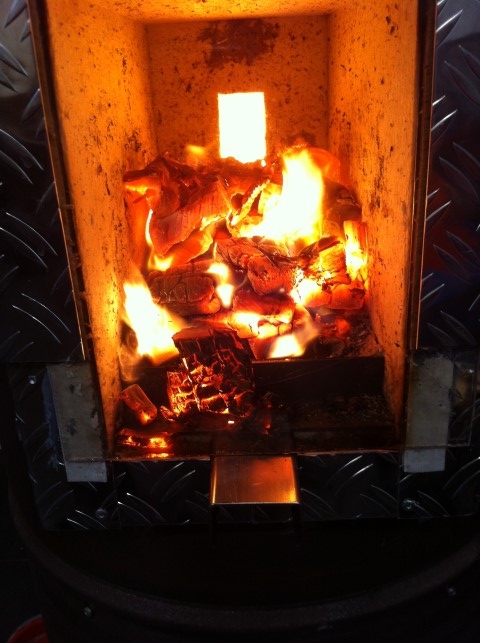 It's obvious that the fire behind the port is much brighter as compared to the inside the firebox. In order to see what would happen with a full load of that dense oak fuel I loaded it up with that and lit it. It came on very slow, at some point it looked like it was dying, might be due to not coming up to working temperature. 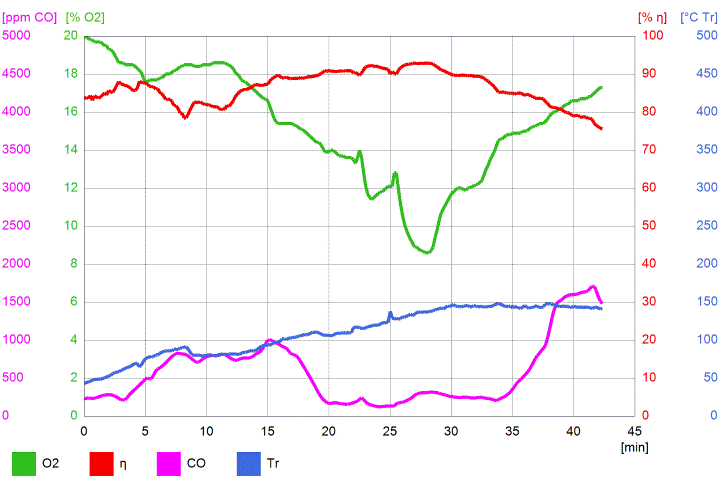 Again not bad, not bad at all, averages were 15.3 % O², 86.5 % eff., 587 ppm CO, 110.5 ºC. More testing need to be done in the coming days/week in order to establish whether or not this is a viable alternative to the normally recommended straight riser. During the last part of the above burn the fire looked like the video down here. The humming sound at the back is caused as usual by the Testo analizer. |
|
|
|
Post by Berend on Nov 9, 2018 5:11:43 GMT -8
How about having a single (45°) taper to the front while keeping the back and sides straight? That way you are not introducing these 90° bends in the exhaust stream.
|
|
|
|
Post by peterberg on Nov 9, 2018 7:05:58 GMT -8
The tapered riser I tested had a straight back wall. The sides were slanted and the front twice as much as the sides. This DSR2 has the advantage of flat panels only so it's easier to build than a tapered riser. Simple designs that perform excellent is the target.
I am nearly there by the way, did another test this afternoon and I was very happy. Six more to go so we'll get a good idea what the stability of the average burn would be like.
Don't forget this is just a small test bed, larger versions are likely to perform much better right out of the box.
|
|
|
|
Post by Orange on Nov 10, 2018 3:50:43 GMT -8
it's interesting to see that efficiency is high even with 1460 ppm CO. And did you notice a difference between a CF batch and a classic one made with firebricks (with or without inulation behind)?
|
|
ssr
New Member

Posts: 7 
|
Post by ssr on Nov 10, 2018 13:54:41 GMT -8
Hello peterberg. Thank you for your work. How long does one load of wood burn completely in DSR2? How long does charcoal burn after the main part of the burn is completed?
You have conducted many tests with different types of fireboxes. What do you think will happen if the port starts above the floor of the firebox and ends at the very top of the rear side of the firebox and has the same dimensions and proportions as in the table batchrocket.eu/en/building? If you did this then what were the results?
|
|
|
|
Post by peterberg on Nov 11, 2018 0:34:40 GMT -8
How long does one load of wood burn completely in DSR2? How long does charcoal burn after the main part of the burn is completed? On average, every run lasts somewhat longer as compared to the diagrams. At a guess: 30 minutes, 40 minutes on rare occasions. Keep in mind this is a small test bed, larger versions are fully expected to sport longer burn times. Choice of fuel is important too, dense fuel tend to burn longer. What do you think will happen if the port starts above the floor of the firebox and ends at the very top of the rear side of the firebox and has the same dimensions and proportions as in the table batchrocket.eu/en/building? If you did this then what were the results? Yes, I tried this port setup in a very early stage. Results were meager, CO stayed high as well as O², efficiency low as result. So I concluded the position of the port is important, the same goes for its sharp edges. |
|
|
|
Post by peterberg on Nov 11, 2018 0:39:11 GMT -8
it's interesting to see that efficiency is high even with 1460 ppm CO. And did you notice a difference between a CF batch and a classic one made with firebricks (with or without inulation behind)? I didn't test anything else than the CF board core as yet, although the top box is built of insulative fire bricks. At this stage I can't tell you what a firebrick core would behave. As an educated guess: not much different, coming up to temperature would be longer and therefore also burn times but I fully expect that will be it. Edit: The CO numbers tell you whether or not combustion is complete, i.e. combustion quality. It has nothing to do with efficiency, that's calculated from exhaust temperature and O² level of the exhaust gases. |
|
|
|
Post by pinhead on Nov 13, 2018 8:49:20 GMT -8
I submit my theory as to why the "early CO spike" isn't present in this configuration. My theory is based upon my experiments with riser length combined with your statement:
From my experience, a taller riser induces more draft earlier in the burn, before the chimney has a chance to induce draft - even at the very beginning when the burn is just starting. This "fans the flames" early on, drawing oxygen over the fire at a point where the temperature isn't high enough to burn the CO.
With the DSR2 configuration, the riser is mostly eliminated and thus the majority of the draft is induced by the chimney - which effects draft much later in the burn.
I expect if you were to add a riser "stub" above the "outlet" of your DSR2, the CO "spike" at the beginning of the burn would return, along with easier starting.
|
|
wooda
New Member

Posts: 2
|
Post by wooda on Nov 13, 2018 10:52:32 GMT -8
To clarify:
CSA of Riser = CSA exhaust to bell = CSA chimney?
|
|
|
|
Post by peterberg on Nov 13, 2018 11:45:25 GMT -8
CSA of Riser = CSA exhaust to bell = CSA chimney? Good question. The first and the second, yes. In my case, the third is actually even a bit larger than that. The practical answer would be: CSA of riser = CSA of exhaust to bell, diameter of chimney = one side of the (square) riser. |
|
|
|
Post by peterberg on Nov 13, 2018 11:53:27 GMT -8
With the DSR2 configuration, the riser is mostly eliminated and thus the majority of the draft is induced by the chimney - which effects draft much later in the burn. I expect if you were to add a riser "stub" above the "outlet" of your DSR2, the CO "spike" at the beginning of the burn would return, along with easier starting. You know, you might be right in this, I'll keep it in mind. Just a thought: since I added those little blocks left and right, the start bump of CO seems to be more pronounced. I could add that stub one of these days and see what happens.  |
|
ssr
New Member

Posts: 7 
|
Post by ssr on Nov 14, 2018 2:36:51 GMT -8
Hello peterberg. With the firebox DSR2 are there overloads during combustion of a single load of wood (when the flame goes above the roof of the upper box)?
Are there any overloads if you burn two loads of firewood one by one without interruption in DSR2?
How does DSR2 work if you put firewood during the burning of the first wood load?
|
|


