|
|
Post by Donkey on May 7, 2016 16:22:38 GMT -8
Yeah.. Putting coils inside of the riser or even too near the riser is asking for steam, rather than hot water.
In the riser will reduce efficiency of the burn itself, so don't do that.
|
|
|
|
Post by Donkey on May 5, 2016 7:02:28 GMT -8
Very good information here!
Yet another layer I hadn't thought of.. Add to the pot and stir!
Thanks!
|
|
|
|
Post by Donkey on Apr 19, 2016 0:02:50 GMT -8
Hey guys. When using imperial measurement (inches/fractional), remember to always simplify your fractions! In the chart below, fractions like 10/16 would become 5/8, 8/16 would become 1/2, and 12/16 would become 3/4! 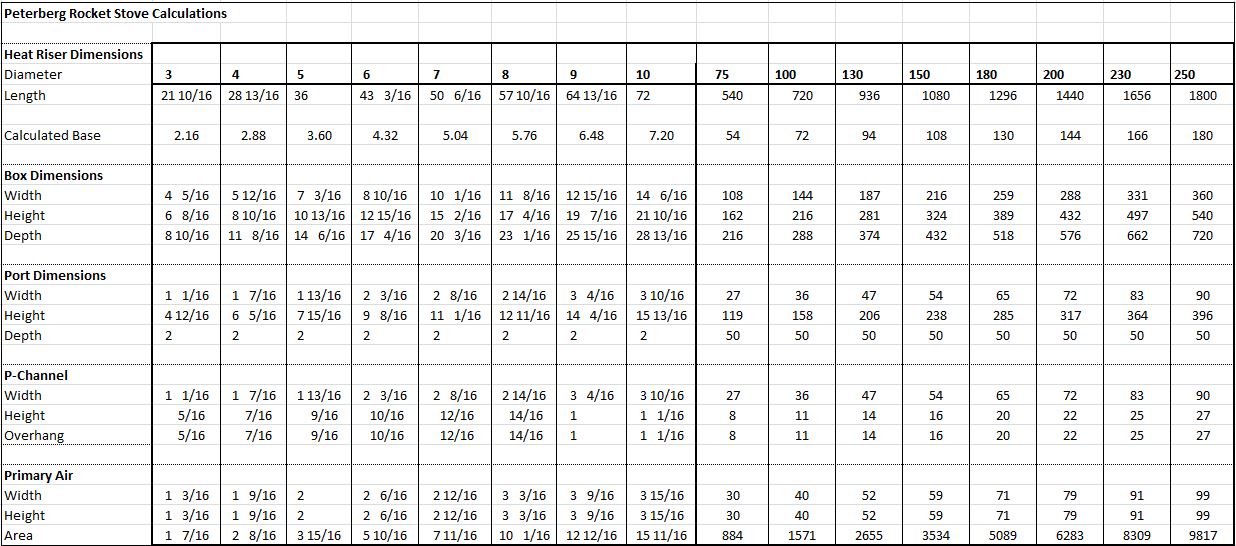 I like how this chart includes primary air.. The chart on the reference library page here doesn’t, you have to look down to peters post below to find the ratio. |
|
|
|
Post by Donkey on Apr 17, 2016 10:51:40 GMT -8
This is GREAT!!
Keep up the good work!
|
|
|
|
Post by Donkey on Mar 30, 2016 20:06:32 GMT -8
|
|
|
|
Post by Donkey on Mar 11, 2016 12:18:20 GMT -8
I use manure, chopped plant fibers (mostly chopped straw) and sometimes cattail fluff.
For the first coat or two, I never add sand, just the fiber. I only really use sand in lime plasters and earth topcoats.
A little cracking on lower coats can be a good thing, it provides a good tooth for the next layer to hold onto. As long as the cracking isn't massive, there will be no problem.
|
|
|
|
Post by Donkey on Feb 25, 2016 15:38:53 GMT -8
I would love to heat the pool in the Spring for my aging parents. Would it be safe to use a copper coil around and above the barrel if the water is pushed through quickly by the pool filter and directly out into the pool? And does salt water make a difference? If you use large gauge pipe, like 1 inch or better for everything and follow the rules of thermosyphon to the letter, it should work fine. The limit will be how much wood you have to use and how much fiddle time would be needed for a swimming pool!! You will need a fantastic amount of BTUs to work, and wood can provide only about 6000 BTUs per pound. |
|
|
|
Post by Donkey on Feb 9, 2016 14:02:41 GMT -8
Davisdesigns,
It is HIGHLY recommended that before you try to improve on rocket stove designs, that you build a working "by the book" model first.
Build it well in the proscribed way and get it up to temperature for an extended period. When you have accomplished this, you will be better informed on how to even begin to improve the technology.
|
|
|
|
Post by Donkey on Feb 9, 2016 13:50:30 GMT -8
Firespeaking's documentation of the Cabin Stove Project as well as an initial release of the Cabin Stove Plan Set are now available to the public! Get yours here: www.firespeaking.com/cabin-stove/ |
|
|
|
Post by Donkey on Jan 19, 2016 20:47:31 GMT -8
So far, so good.
The stove lights easier, smokes back less, seems to burn hotter (can't really prove that). I haven't measured anything yet, but the bench never really got warm before at all and that is no longer true. Last time I ran the stove, I seem to remember that there was a heat gradient from one end to the other, hotter by the stove/barrel, cooler on the other side. How much, as I said, I didn't measure.
I can give you more information in February, I'm out of town till then.
|
|
|
|
Post by Donkey on Jan 3, 2016 9:56:56 GMT -8
|
|
|
|
Post by Donkey on Dec 26, 2015 12:35:41 GMT -8
I believe that the accepted ideal air intake size is still 1/3 system CSA.. That would be my minimum..
Actually, I'd make all of the ducting and channels right up to the firebox base somewhat larger, then build just the base itself to spec.
That way, if for some reason it has insufficient air, changes would only need to be made to the one area.
I think that oversizing most of the ducting would help to avoid friction problems as well.
|
|
|
|
Post by Donkey on Dec 25, 2015 15:21:23 GMT -8
Oddly enough, I just found an image in my stuff that has that air intake in it.. You can pretty well disregard most of what's going on here, it's OLD and most of the ideas I was working worth have since then been shown to be bogus.  In the image you can see the brick base, on this base there are 3 openings. the larger, leftmost opening was for the heat riser (again, experimenting with stuff that didn't turn out) The one in the center (labelled 6 3/8) is the feed and the one on the right (labelled 2 3/8) is the external air channel. To get outside air, you just drop a lid over the two channels (feed and air).. Of course, you need wood that is cut shorter than the feed...  |
|
|
|
Post by Donkey on Dec 25, 2015 15:12:03 GMT -8
I thought about this one quite a lot, before building my first, sweat lodge based sauna. My build is here on the forum someplace, I wouldn't bother looking it up, as you're not likely to learn much from it at this point. I fooled around with external air intakes, looking for a method to satisfy the needs of the fire, while also keeping as close as possible to the traditional sweat pattern.
In the end, my client didn't want the external air intake, so it didn't happen. It was still quite good for me, as I learned a lot about the J-tube feed at that time.
As you guys already know, air pretty much has to come in at the top of the feed and flow down through the wood, otherwise it will cause smoke-back. Sometimes, when the stars are aligned, bottom air can be made to work, but for me it was a MUCH bigger hassle with no guarantees than it was worth.
One configuration that I tried that never failed, was to bring air in next to the feed and bring it to the top in a brick channel right beside the regular feed and at the very top, the brick between the two can be shortened. This makes a gap that air can flow through between the channels at the very top. This way, a lid can be placed all the way across the two, blocking the light without blocking airflow. With the lid off, air tends to come from the room, but no matter how the lid is placed, the fire is never deprived of air, it never smokes back, etc.
|
|
|
|
Post by Donkey on Dec 15, 2015 22:36:36 GMT -8
Oh my god!! I just saw this!!
That's great!!
How frigging cool is that? Just about perfect portable demo model!
Want!
|
|


