|
|
Post by peterberg on Apr 4, 2016 1:09:12 GMT -8
So I closed the air inlet and could hear the burn pick up straight away. OK, the draw isn't great yet but it shows the air feed was too large. Closing this the air is drawn in through leaks and crevices which is apparently enough to raise the temperature inside. I used an old mold to 'cast it' so is probably wider than it needs to be (which might constrict gas flow somewhat). It is about 310mm across, and given the barrel is about 590 internal the gap is around 140 mm if my maths is correct. Is this likely to be a bottle neck? Additionally, it is only about 500 mm high. So the side gap is 14 cm all around? That is quite wide, there isn't a restriction there but a slow gas movement instead. With the exit from the barrel at 15 cm this would sum up to 329.86 cm2 which is 1.86 times the cross section area of the 15 cm dia pipe. My own goal for the plenum is 150% for every 90 degree corner so this is already excellent. Keep firing it, progressively more. Water need to be driven out first, when that's gone the temperature of the bell and the exhaust will rise. Keep us posted. |
|
terry
Junior Member

Posts: 128 
|
Post by terry on Apr 4, 2016 12:26:54 GMT -8
Thanks peter. I did make the few changes to the heat riser. In the rough pic, well as you can see it was rough. A test of concept more than anything. I simply cut a large circle in the 'fixed' end of the barrel (ie the lid is on top) and to make that airtight I just used regular fibreglass insulation. As it got used you could see it glowing red as the heat affected, I stuffed more f'glass in the crevices until eventually it stayed sealed. In effect I had a ring of fused glass that kept it airtight, if that makes sense. I also sat the heat riser on a thick bed of f/glass within the barrel, so the bottom was quite thick and fluffy.
Now I have provided a much sturider base for the barrel to sit on I removed that internal f/glass as the barrel is mortared in place. Hopefully no leaks in the mortar. I also extended it's height, turns out it was only 400 high which seemed a bit short. It now reaches to 110 under the top of the barrel.
It is burning better each time I do the small test load, which is good. I have noticed a few rust holes in the barrel which is not optimum, so I might have to bite the bullet and pull this one off and do a new barrel. I think if I do that I will end up using a ten inch connection between the barrel and bell. Will run this one for quite a while yet to understand better how it works.
I have yet to do todays burn, waiting till the sun comes up so I can see, but at the end of y/day i was quite happy with the cleanliness of what was coming out of the chimney. Much better, much longer periods on No Visible Smoke. When there was smoke, it was nothing like a standard stove but of course even that was enough to make me grit my teeth. However, it was more noticeably 'blacker' in colour than before the bell.
I have found that I can easily overload it. It was getting dark when I stoked last night (trying to get as much time watching for smoke) and I could hear the exact point when I put that too much bit of wood, and yes sure enough it smoked quite badly for ten minutes. So that shows it is a bit unstable, which is fine once I learn it's idiosyncracies.
NOW for what might be the most illustrative lesson so far. Whilst I didn't expect much life from the BBQ probe, I had it so I thought I may as well use it and see what I could find out. If it was getting too hot I could always pull it out again.
I thought it was broken in some way. I had a flue temp (and the probe tip is actually in the centre of the flue) of 30 degrees or so. That was on start up. The highest I have seen it read is 66 degrees. I can hold it in my hand and read body temp, it seems to react to ambient temps, stick it back in and I get these (seemingly) extraordinarily low temps.
From one point of view that is good news, ie the bell etc definitely is working, but on the other hand, well no wonder there is not as much draw. Still, the fires are getting better each time. After the first smokey burn the entire combustion chamber was black with soot. It is now white and clean which is a good sign.
So not quite sure what to make of these exit flue temps. It most definitely not winter yet, yes the nights and mornings are getting cold but we are still in the middle of an Indian summer. The question is 'if it works good enough now with these low flue temps will it get better or worse as we move into winter proper?'
And, as it turns out I only really have three or four courses of brick I can remove before I reach the entrance point of the bell. So I might have a problem if the result is 'you must raise the exit temps'.
Anyways, off to light some fires.
|
|
|
|
Post by peterberg on Apr 5, 2016 1:37:50 GMT -8
Terry,
Sorry to say, but that temperature is really low. At the top of the burn it should be at least something like 80 C. The heater isn't dry yet so things could improve a bit when dried out. Is that a piece of flexible duct I can see in one of the pictures? If yes, it would be wise to replace because the small ridges inside will mean friction.
Since you use metrics and Celsius instead of imperial and Fahrenheit, are you somewhere in the southern hemisphere? Must be, Indian summer in April seems odd over here.
|
|
terry
Junior Member
Posts: 128
|
Post by terry on Apr 5, 2016 11:27:02 GMT -8
Hi Peter, yes I am in Australia, out in the country. So we have hot summers and (well, not northern European) cold winters. Cold enough anyway. But the last few months have been damned hot, and just hanging around too. I've been 'laughing at myself' because it has been too hot to work on the house renos, so to keep busy I was doing these rocket experiments. Ie, burning wood on stinking hot days haha. Now it is in the house, I can only observe for smoke outside. So that is the funny part, burning wood and sweating on stinking hot days, but will be outside in the cold looking up at chimneys haha.
Yes, I feared as much about those temps. I was aiming or would have liked to see something like 100-110, not sure where that figure came from but nonetheless. As it is not really cold or winter yet it is probably too early to judge but another 'problem' is that I get too much heat from the barrel and not enough from the bell. Tho we might like that barrel heat in winter, don't know yet. The bell is currently capped by a cast concrete slab from the hardware store. For $40 there was no way I was even gonna contemplate making my own. It is probably 50mm thick.
Within half an hour or an hour that is too hot to touch, I can maybe rest my hand on it for half a second. The top three/four courses of brick might then be body temperature. But the kitchen will be a sauna from the barrel.
As a very quick experiment I insulated the top of the barrel as much as I could, and stuffed fibreglass between the back of the barrel and the wall. The theory was to shed less heat from the barrel and force more heat into the bell, and maybe even see a higher exit temp. Did not work in any obvious way sadly. Highest observed temp was again around 65. After a good hour or two.
Before I forget, yes I just used the flexible duct as the exhaust. Additionally, not sure I have mentioned it, it is 125 mm diameter. The prices they ask for flue is amazing so I thought 'as it is only an experiment for one season'...that might have been a mistake. Of course, what did I find a day or two after I finished it? SS flue 150 mm for $50 each as opposed to the usual price of $75. Still expensive but a damned sight cheaper.
One last thing on the flue that might have a bearing, it only goes up into the chimney at a guess three metres and then opens into the chimney after that. The chimney would have to be twelve metres or so high. Twelve metres of ridged duct might have been a hell of a lot of drag, but for the final build twelve metres of smooth duct will give a nice draw I would imagine.
So my biggest concern is the heat storage of the bell. Of course the cover slab will preferentially get hot, only 50 mm as opposed to a brick of 110mm, but that radiant heat will be normal to the surface of the slab, ie straight up to the ceiling. One idea i have had is to take off the flat concrete cap and replace it with an arched top made of, for example, insulated fire brick. You probably guessed it, likely I'd use hebel block. Or something. The idea is to cap the bell, absorb as little heat into the top as possible thereby sending more heat into the walls of the bell and maybe having an extra benefit of raising the exhaust temp a tad.
If I go the other way, say clad the barrel with brick (which i have vague memories of people saying that does not really work too well) I would increase my mass storage and lessen the radiant heat but run the risk of sending less heat into the bell and maybe adversely affecting the flue temps.
So decisions, decisions.
Last quick observation. On startup it seems to work less well than before. A bit more smoke than previously and for slightly longer. Within about five minutes it is essentially smokeless however and stays that way for the remainder of the load. Not ideal, but I would accept that for this year.
Today I might just dry stack a layer of bricks on top of the concrete slab, just see what that does if anything.
|
|
terry
Junior Member
Posts: 128
|
Post by terry on Apr 6, 2016 2:40:19 GMT -8
Well, very very happy indeed with today.
Made some changes, no doubt it is drier than ever before, so what proportion of improvement is due to which factor is a bit hard to work out.
basically, the only real change was to dry stack a layer of bricks on the concrete cover slab. The top took much longer to heat up, and the heat in the bell was vastly increased. rather than the top three or four courses being warm, it was all warm (quite warm actually) all the way down excepting the bottom three courses. Which co-incides with the outlet.
You will laugh at me, and that is fine. The BBQ thermometer is a base station and hand held reciever. Basically what happened is that when watching from afar outside the receiver was not picking up the signal. So when the temp did not change for twenty min, which stumped me, it was not getting the signal. Anyways, very quickly the temp went to between 70 and 80 degrees, and stayed there for hours.
Very little smoke. One of the reasons I thought the design was a bit unstable was because there was some Pine we trimmed off trees that always smoked in all of the earlier tests. Did not really bother me, have plenty of dry hardwood. just as a curiosity i burnt some of this Pine. Not a snippet of smoke which stunned me. Mind you, it had a few hours of burning by this stage so was more up to temp than ever before.
So now heat is well and truly thru the system, probably dried out properly, exit flue temps look nice (think the highest i saw was about 91) and bell warm, will be interesting tomorrow morning. How well/how much is stored, the first burn will be from a warm position not tried before.
Really very happy.
Thanks for all and any interest.
|
|
mudder
Junior Member
Posts: 50
|
Post by mudder on Apr 6, 2016 5:58:45 GMT -8
sounds like a success terry! congrats
|
|
terry
Junior Member
Posts: 128
|
Post by terry on Apr 6, 2016 20:18:12 GMT -8
|
|
|
|
Post by satamax on Apr 6, 2016 21:31:00 GMT -8
|
|
terry
Junior Member
Posts: 128
|
Post by terry on Apr 6, 2016 23:30:21 GMT -8
yes satamax, been thinking along all those sorts of lines too. Thanks. TBH if I were to do something like that, enclosing it in brick is more likely the way I would go. I was kinda correcting my earlier 'recollection' that cladding it in clay 'did not work too well' I obviously had that wrong so was correcting the record so to speak.
|
|
|
|
Post by peterberg on Apr 7, 2016 0:47:30 GMT -8
I think he mentions something about expansion or a gap between the clay and barrel, but to be honest the translation can leave a bit to be desired. I wonder if there IS a trick (like accounting for expansion) that has to be followed,or just start making mud and throwing it on. Yes, there's a trick to avoid severe cracking of the mud around the barrel. When the barrel is heated up, it will expand, the cob will crack. What he used is a type of plaster carrier which isn't common around the world. In essence it is chicken wire mesh with a small lump of clay at every crossing of the wire and fired after. So the lumps are baked clay, providing a space between the lath and the barrel. Part of the trick is also the fact that he's applying the cob when the barrel is hot so it's already expanded. See this link for how this brick lath looks like. You could use one layer of cob with a lot of straw on the barrel. Then chicken wire mesh around it, fire the heater and apply another layer with finer and less fibre. Since the barrel is expanded and hot the cob will instantly dry in the expanded state. |
|
terry
Junior Member
Posts: 128
|
Post by terry on Apr 7, 2016 2:29:42 GMT -8
Hey thanks peter, could not quite work out the translation, the link certainly made it clearer. I guess when translating on the fly like google translate you can be excused grammatical errors (as they mainly are) but, when you have proof readers it is a bit harder to excuse, as in the link 'Unmached for over 100 years!' (tho that one is not grammar but a simple spelling mistake) but quibbles aside, it makes sense. And yes, as someone renovating a 180 year old house in Australia I can agree that products like this are not widely known. So much of what I discover in this field (renos) are usually widely available in europe, not here in Aus. Heck, contemplate even something simple like double glazing and be prepared to sell your kidneys just to get it. ridiculous. Thankfully today has been (by comparison) a bit of a cold snap, I am finally GLAD I have the fire going! Still ridiculously happy, and to be honest I think the results have exceeded what I hoped for. Daughter came and went, two quick pics. Not that they are anything special, but hey get all the data into the thread. 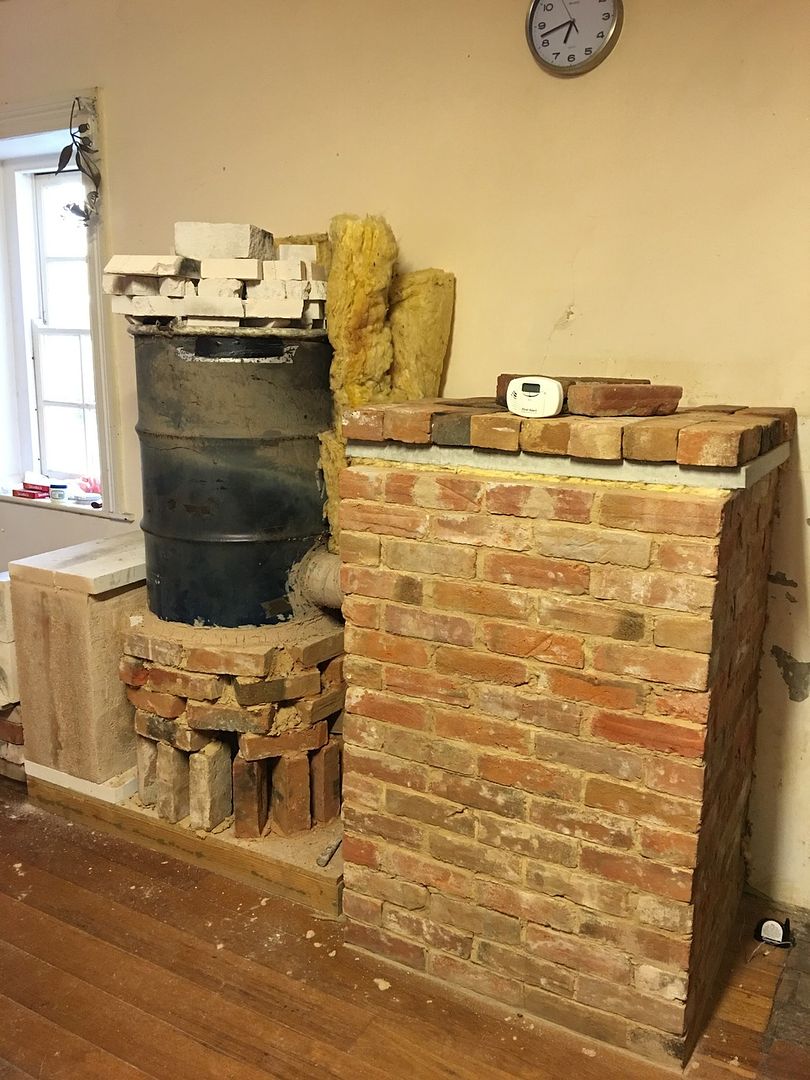 Still have the wooden base, absolutely no sign whatsoever of heat stress, singe marks or burning. So thought it safe to keep using. The firebox insulation from before (scrap hebel blocks etc) have gone, and I cast a perlite/fireclay/ciment fondu mix around it. A quite more substantial barrel foundation and then the new bell. The f'glass behind the barrel and scrap hebel on top was the experiment earlier to force more heat from the barrel to the bell. It did not seem to make any difference. On top of the concrete slab capping the bell is the dry stack of bricks. THAT seemed to make a hell of a difference, tho of course it could have been because the bell dried out more. anyway. On the bottom right is the sender for the flue temp, the probe reaches into the centre of the exit flue. the highest temp I have seen is 91, briefly. usually sits between 60-75. 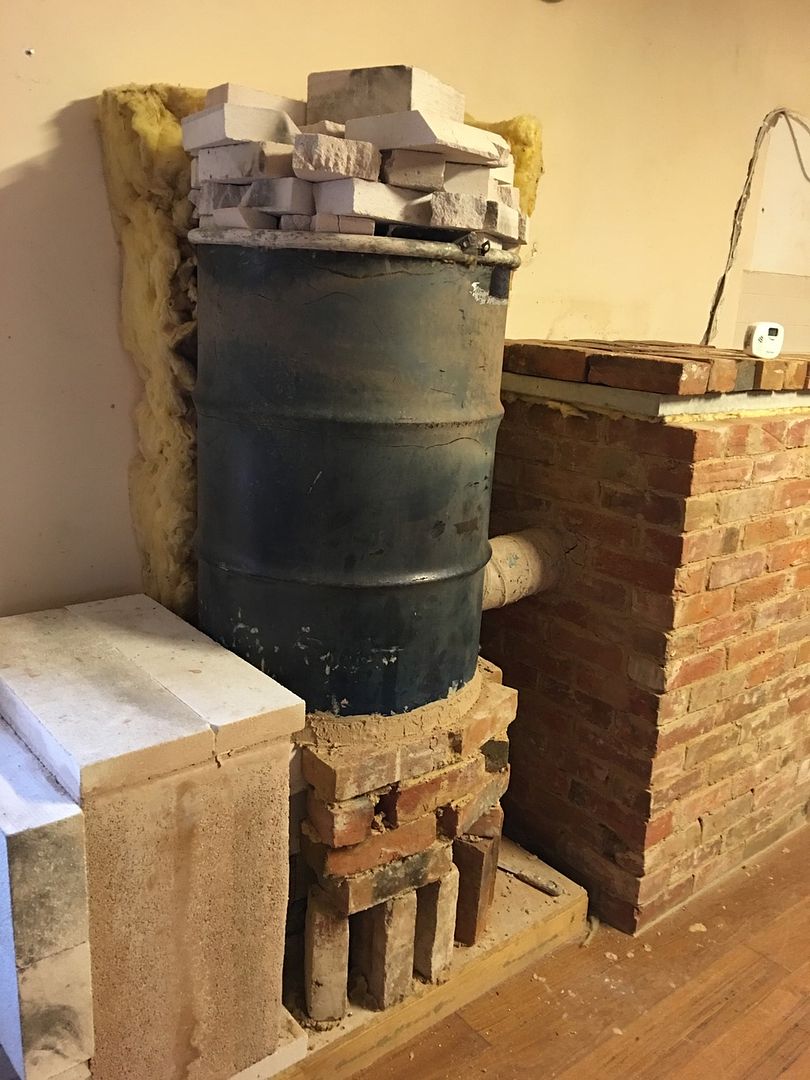 Quick view from the other direction. The combustion chamber 'door' for the moment are simply two four inch hebel blocks. the main thing I want to learn is the amount of opening that works all the time, no fiddling. I finally have an opening (air inlet) that works and the only time I see smoke is the first burn after (say) ten hours. even then it is extremely light smoke for less than three minutes after which it is smokeless. that will do me. For now at least. this view shows the exit from the barrel into the bell. In the first (very smokey, poor, wet) attempt the entry to the bell was at about the same height as the vertical on edge bricks. that was were the two ninety degree bends were. anyway, very happy indeed. I still get a buzz when looking at the chimney and seeing no smoke. It still feels kinda surreal. hope I never lose that simple childlike pleasure! |
|
|
|
Post by satamax on Apr 7, 2016 3:01:56 GMT -8
|
|
terry
Junior Member
Posts: 128
|
Post by terry on May 17, 2016 23:06:35 GMT -8
thought I'd do a little update after using it for how ever long...forgot to see when I first posted it. Some parts of this were experimental, namely the use of hebel block faced with refractory, and the very thin sheet metal P channel. As of a few days ago, the metal P channel is still fine after 311 hours of burn time, and the hebel block is still intact and working after 374 hours of burn time. The p channel is easy to replace if needs be, just a few pop rivets and a bit of time with tin snips, but it still looks very good, I think it will last the season. Time will tell. (it gets a damned good workout at times, not that I look very often but the other day after a few hours of continuous use, it was glowing a dull orange whilst burning heavy solid hardwood. The whole firebox was the dull orange colour, very impressive. I must get a video shot of that when the time comes) My biggest worry was that the hebel block would deteriorate, that is much more work than the P channel to fix if it went sour. There is nothing to indicate it is on its way out tho, so fingers crossed it will last the season. The point is, whilst not something I would trust to 'last forever' for quick, cheap and easy experiments it certainly does the trick. Much impressed I is. It has been however, 'temperamental', at times completely smoke free, at other times far from it. It's been driving me mad frankly, and have been trying to isolate the cause. (To be honest tho, when WE say 'smoking' it is not anything like normal wood heaters, but still any smoke for us is anathema no?) I had volunteered to make a video, hopefully one good enough for peters new website showing smoke free operation and hence 'why people should be interested'. At the time I stuck my hand up, for three days in a row there was.no.smoke.at.all. Then it started smoking again, grrr. I felt like a fraud, here I was helping peter with his website and I did not even have a stable, non smoking heater. Anyways, I tracked it down, and was initially very surprised at the cause, tho now having found it it makes complete sense. To more easily illustrate this, I might re post a picture from the first page, then all will be clear. 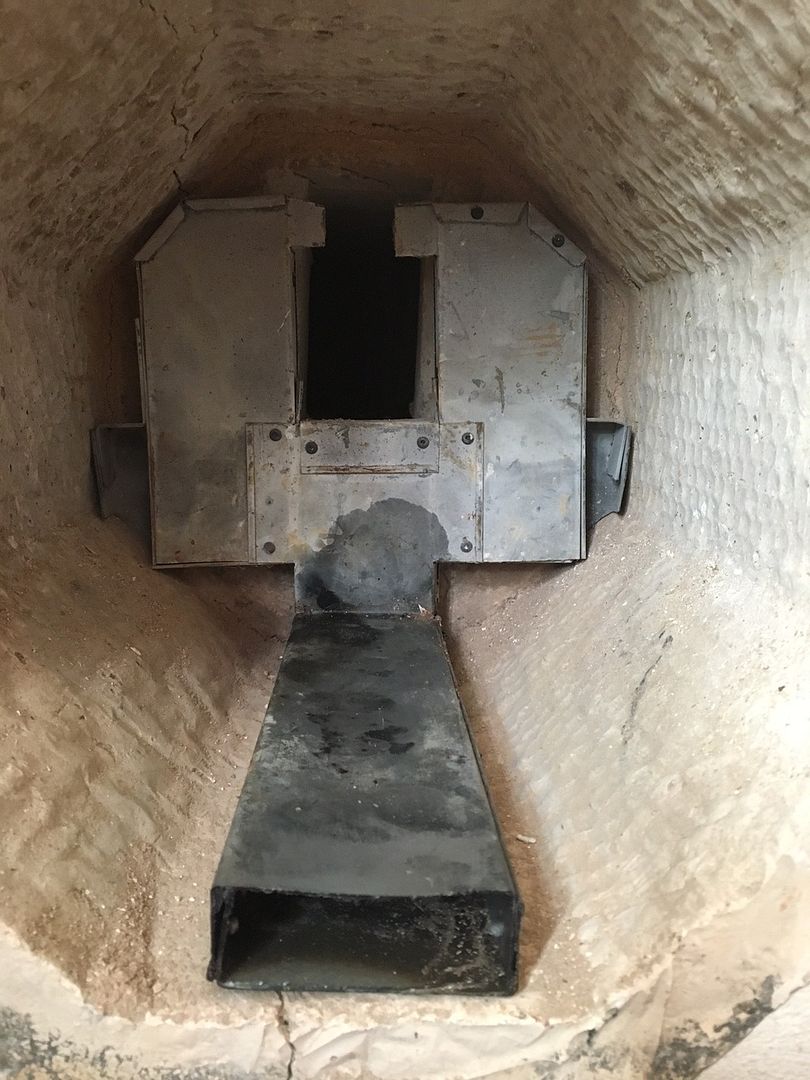 Sorry, it is very big ain't it. The trouble? Ash. For the three days it burned without smoke I did not really clean it out, and so slowly the ash built up inside. The door is set so that it 'just clears the top of the P channel inlet' seen just above. SOOooo, when the ash builds up each side of that P channel, there is effectively no primary air! That explains the slow, gradual appearance of smoke till one day there was smoke all of the burn, every burn. I took the top off the barrel hoping to find a 'problem' (as then there would be an explanation), nothing. Took the P channel out to see if it was blocked, nothing. Swept it clean and low and behold, no smoke again. That was when I twigged it was the ash build up, and looking at it it made perfect sense, even tho it was not my first guess as the answer to the problem. Simple solution, every morning for the first burn just sweep out the ash (as little as it might be) and voila, no smoke. This is probably old news to most here, but anyways a happy ending to a quite frustrating couple of weeks. |
|
|
|
Post by mkrepel on May 19, 2016 8:57:12 GMT -8
Terry,
I am amazed that your sheet metal secondary air is holding up so well. That seems to be the first thing that burns out in similar stoves (Walker cookstove, for example). You get big points in my book for your willingness to experiment with all of this. Thank you for sharing.
|
|
terry
Junior Member
Posts: 128
|
Post by terry on May 20, 2016 15:04:48 GMT -8
Hey MK yeah it is pretty amazing really. Have been having a bit more of a look at times, when burning our eucalyptus hardwood it comes up to a dull orange glow so it gets worked 'hard' at times. The missus just got an I phone thingy, it can probably take pictures and so no longer have to wait for visits from daughters, so I might take an after shot so we can see how it is tracking.
|
|


