|
|
Post by peterberg on Apr 24, 2015 11:39:22 GMT -8
Last year, I was invited to come to the Masonry Heater Association's annual meeting in April 2015. To act as an instructor of a workshop and doing a seminar about rocket heaters and the batch box rocket in particular. This is not to be taken lightly, this year there happened to be 125 attendees all together. And in the same time frame six workshops were going, two demonstration projects, two masonry classes and several seminars and mini-clinics. I made a new design for the rocket workshop, an 8" combustion unit and a brick bell with 5' long blind ending benches on both sides. A lot of the masons at the premises highly doubted whether those benches would get warm but it did.  Lasse Holmes aka Canyon acted as my assistant and the rest of the team consisted in no particular order of Donkey, Ted, Jean-David, Alexander, Mike, Francoise and now and then Leslie (Jackson), David, Patrick, Jonathan, Jessica and Damien. They all did a fine job, the whole heater was built in a little bit of over two days. The original design featured a double skinned brick bell, inner skin built out of fire brick on edge. During the build, it turned out there weren't probably not enough firebricks at hand to complete all the workshops so we changed to single skin. Half up in brick and the top half(ish) in firebrick. And during the second day of the build there appeared a somehow forgotten pallet full of firebricks of a slightly different dimension. We decided in a short team consultation to keep the single skin bell because it was almost finished. Now and then the team acted as a fine example of democracy at work, me serving as the enlightened tyrant who took the final decisions. The whole atmosphere was optimistic, with good food and a lot of laughter. But... this workshop happend to be also a way to learn more about the limits of bell construction. The benches got warm quite quick but in retrospect the bell/benches combo was slightly too large for the bare stovepipe chimney we could use. Since we didn't follow the design in its entirety due to the change to single skin. The first run we did with the bell two courses lower than the final state in order to dry the soaking wet masonry, which worked just fine. Next day two more courses were added and it appears now and then the thing wasn't running as clean as I aimed for. So being at home and most of my jetlag fading I recalculated what the design ISA was, that of the intermediate heater and the final state. According to the scaling method I used to scale from 6" to 8" system the maximum I could use was 10.4 m2. The design was intentionally tuned down to 9.6 m2, so we could expect it would always work. The intermediate stage comprised of 9.85 m2 which worked fine, wet and all. The final stage, largely dry already ended at 10.3 m2 which appeared a bit too much at times. This suggest the 10.4 m2 of the upscaling process is too large, this should be 9.8 m2 maximum, preferably a bit less when the chimney stack isn't that good. Following this and assuming the used scaling method is correct the conclusion would be that the 6 m2 for a 6" version is too large. This would be more around 5.4 or 5.5 m2, a consequence which should be mentioned in the reference library. The scaling method is the ratio between the 6" riser and the 8" riser's csa. This would be roughly 1.77, so the maximum ISA of the 8" system is 1.77 times as large as compared to the 6" system. I don't have pictures because I have been far too busy. There will be a lot of photo's on the MHA website in a few days. Also, here are the slides of the seminar and a bit more for download plus the SketchUp drawing of the design. 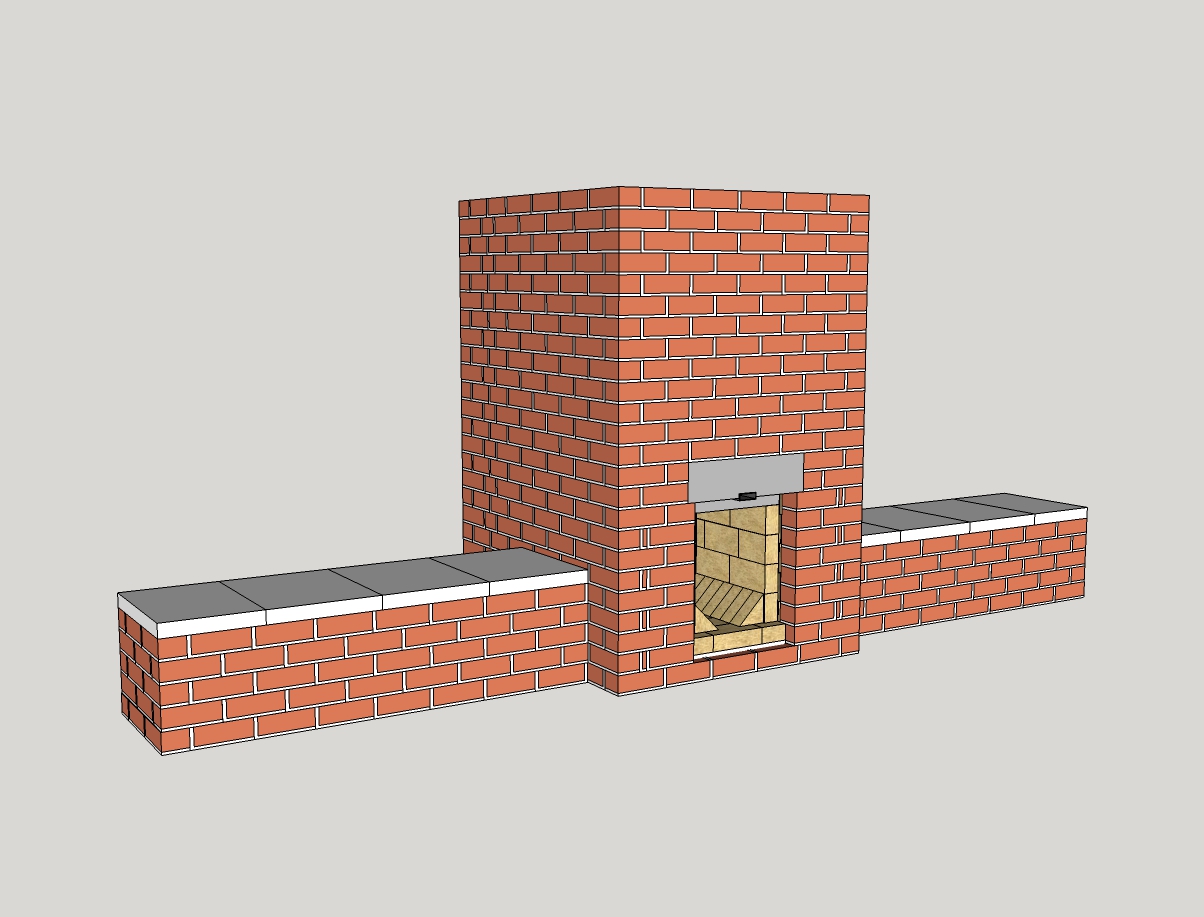 |
|
|
|
Post by matthewwalker on Apr 24, 2015 13:24:02 GMT -8
I sure have been wondering how that all went Peter. Thanks for the write up and update...I'll look forward to seeing the photos and hearing from the others as you guys get caught up. I wish I could have been there!
|
|
|
|
Post by Donkey on Apr 24, 2015 21:10:22 GMT -8
One of the issues that we had was that the firewood that was available was very long. When placed in the firebox, one end of each stick of wood would be almost in the port, while the other end occluded the air intake. Several times the stove went into fuel overload with not enough air for combustion. Reaching into the fuel from the primary air intake with long thin sticks and clearing space for more air always seemed to fix it just about immediately.
Next time, it would be wise to look at the available fuel source before building the demonstration stove, a slightly longer firebox would have made our lives a LOT easier.
I had a GREAT time! It was very nice to have met with Peter in person after years.. The event was amazing, definitely worth making an annual appearance!
|
|
docbb
Junior Member
 Back from ZA
Posts: 92
|
Post by docbb on Apr 25, 2015 5:26:43 GMT -8
The scaling method is the ratio between the 6" riser and the 8" riser's csa. This would be roughly 1.77, so the maximum ISA of the 8" system is 1.77 times as large as compared to the 6" system. Dear Peter, the scaling method is based ont the ISA of every side except the floor, but in the other building usually the floor is insulated or dry, could it be of any importance? or the scaling method should may be take into account the cubic root of the scaling ratio of the respectives linear diameters of the riser ? |
|
|
|
Post by peterberg on Apr 25, 2015 7:48:55 GMT -8
Dear Peter, the scaling method is based ont the ISA of every side except the floor, but in the other building usually the floor is insulated or dry, could it be of any importance? or the scaling method should may be take into account the cubic root of the scaling ratio of the respectives linear diameters of the riser ? In all my experiments since 2008 it'd take a long time for the bell floor to warm up. Mostly after the fire was gone, by direct conduction from the walls down. The sand of the workshop area was completely dry, due to an open pavillon. Also, the lower bell did much better, wet and all, and the bare stovepipe could still be touched easily. The other 8" version in Montana happened to be 9.5 m2 as well and had equally low exhaust temperatures, somewhere between 150 and 200 F max. I tried the scaling method by diameter of the riser. That came nowhere near a plausible figure. The other one, I think you mean by volume of the bell, is no good either. Try a bell with a footprint in the shape of an H or M instead of a square. The volume of the latter will be much bigger when the ISA is the same. Maybe we have to revert to rules of thumb in this. There's a way to verify the 6" version's figure, though. I am building a straight square bell at home in autumn and I can test this one extensively at different heights. |
|
|
|
Post by peterberg on Apr 25, 2015 9:23:59 GMT -8
And yes, there's more to tell about this bell implementation. In one of the top slabs we made a peep hole right above the riser. On Friday night we opened it up and installed a mirror of ceramic glass at an angle of 45 degrees right above the hole. This way, one could look right into the riser, seeing the double vortex moving at surprisingly high speed. Regrettably, we had to close down the mirror within ten minutes. The chimney temperature happened to be too low and the hole too large in order to maintain an underpressure in the bell. So the exhaust gases were coming out the peep hole and the combustion was getting a lot worse.
In retrospect, we could have fixed it with a larger piece of the same glass which happened to be there as well. With the larger piece over the hole we could have looked through provided the glass was burning clean. I need to remember that should another opportunity arise.
The benches were a bit different from each other. Just one aspect, the right one one foot to the rear and the other 4" more. Just to make it to look less formal. The unexpected effect was that the right one warmed up quicker than the other and stayed ahead 3 or 4 degrees Fahrenheit all the time. Conclusion could be that the left one was situated a little bit closer to the exhaust opening, thereby recieving cooler gases. So it looks like the benches could be tuned to temperature this way.
Alex Chernov remarked there should be probably a horizontal devider in the transition between bell and bench in order to separate the in and out streaming gases. We made provisions during the build to open up the bench and on Friday morning we did before firing up. He placed the devider as he had seen Lars Helbro doing about halfway the height of the transition opening, we closed the bench and started up. There was some difference, but not the expected. The right bench which was warmer before now reached the almost exact same temperature as the other one. Apparently, the devider didn't turned out to be an advantage but a restriction instead. So, this could probably used as another way to tune the benches, after the build is being done.
Donkey, could you digress about the poopy plaster and its effects on the bell?
And maybe Canyon about how it has been being a Barefoot Beer Commissioner?
|
|
|
|
Post by Donkey on Apr 25, 2015 11:46:37 GMT -8
The poopy plaster! Someone commented (I've forgotten who) that it would be cool to earth plaster the bell. I agreed to take it on and so began casting about for materials. The main mortar being used (to build all the stoves) was sand/clay with the clay being a bagged product, reddish in color; for fiber, I slipped under the electric fence into the next-door horse paddock where I liberated a quantity of horse crap; sand was provided in abundance in the form of a golden colored mason's sand, also originally purposed for the mortar. I made a clay slip with the bagged stuff and mixed together 1 part clay-slip with 2 parts whole road-apples (horse poo); using a drill mixer to spank the parts together well, I then added roughly 2 shovels full of sand to stiffen the mix as it seemed a little wet. This was our base plaster, which was spread on by hand then troweled relatively flat; there was a large, uneven area at the top where the body and the lids that we had cast (refractory) didn't meet well, so I tossed some of the plaster mix on the ground and kneeded in extra sand, etc. to thicken and make a heavy filler mix. After getting that process started and finding plenty of willing helpers to carry on, I went looking for finish coats to paint over. It turns out that the natural clay soil right on site is heavy on Mica! I found a place were water runoff has deposited an extra dose of mica over the years and dug out enough micaceous clay to make a paint. A little water added made the material easy to spread with brush/sponges and this was painted over to create various patterns in the surface that sparkle in the light. All of the above was added while the stove was being fired, which got quite hot as we worked and actively steamed and dried as we went. To the surprise of many, there was practically no cracking (one place up top where the plaster filler was very thick and overly clay heavy), the whole thing steamed hard in an hour (or so), it was very fun for all, educational for some and beautiful in an almost effortless kind of way.  I've got some images that I'll load up here in a little bit.. |
|
adiel
Junior Member
Posts: 119
|
Post by adiel on Apr 26, 2015 12:37:46 GMT -8
sounds like an amazing festival. wish i was there.
peter - if you make a bypass would it allow to increase the isa?
|
|
adiel
Junior Member
Posts: 119
|
Post by adiel on Apr 26, 2015 12:56:39 GMT -8
also - i see you use a fiber blanket for the riser. i've been told that it's not resisted to turbulence of the fire. is it true?
|
|
docbb
Junior Member
Back from ZA
Posts: 92
|
Post by docbb on Apr 26, 2015 22:05:08 GMT -8
There's a way to verify the 6" version's figure, though. I am building a straight square bell at home in autumn and I can test this one extensively at different heights. What i meant is that most of your experiments where done with barels so the shape of the bell(s) is quite tubular (sic) although this one is more square shaped it has two long benches, and i was wandering if there was kind of a link in the ratio VOL/ Area and the shape of the bell which could influence the heat dispersion, The idea came from a french forum a long time ago about the size of a fire box and the heat exchange area of it : "By reducing the width to 34 cm and increasing the height to 62 cm, I have the same volume than with 39 cm x 54 cm. But the surface of the brick in contact with fire is 10% higher!". So , something in relation withe the gaz volume and mass, the exchange area, and maybe the speed of the gaz. or something like the prismatic coef. in hulls design |
|
|
|
Post by satamax on Apr 26, 2015 22:34:17 GMT -8
The volume vs surface is something i have pointed before on the forum.
But there's another one everybody forgets, time! If a given volume of gases stays in contact with a given surface, for twice the time as it did before, in another stove for example, it has to give away more heat. So yep for sure not only the surface but also the volume influences a bell's reaction. I've said this before, the biggest area for a given perimeter is the circle, then the triangle, then the square, then if you want, star shaped, long rectangles etc. In this case, may be the mortar's moisture came into play too!
|
|
|
|
Post by peterberg on Apr 27, 2015 0:37:01 GMT -8
sounds like an amazing festival. wish i was there. peter - if you make a bypass would it allow to increase the isa? Yes, it would allow the chimney to heat up properly before heat extraction in the bell. But it also would make the heater more complicated. See it like this: on the one hand you get a larger bell and the means to heat the stack whatever the circumstances are. But you have terrible efficiency the first part of every day's burn, which isn't very handy when you have one single burn only once a day for most of the season. In the absence of a bypass in a well-tuned heater the efficiency is high right from start to end. Resulting in a simpler heater, no damper to fail at the wrong moment and cheaper as a whole. My view has always been to use the laws of physics do the work in an appliance without bells and whistles. |
|
|
|
Post by peterberg on Apr 27, 2015 0:41:36 GMT -8
also - i see you use a fiber blanket for the riser. i've been told that it's not resisted to turbulence of the fire. is it true? The riser wasn't made out of straight ceramic fibre blanket by myself. It's a manufactured product, vacuum formed with a heat-resistant rigidizer, normally used for transporting liquid metal. In those circumstances the ducts need to be replaced within a couple of months. Used as a riser, this would be light duty only, probably lasting forever. |
|
|
|
Post by peterberg on Apr 27, 2015 0:52:37 GMT -8
What i meant is that most of your experiments where done with barels so the shape of the bell(s) is quite tubular (sic) although this one is more square shaped it has two long benches, and i was wandering if there was kind of a link in the ratio VOL/ Area and the shape of the bell which could influence the heat dispersion. No, that isn't correct, most of my experience with bells comes from building those with bricks in different shapes and volumes. With a couple of different ISA / volume ratios as well. See this link to an old thread.As far I am aware, as long as the space at the inlet and outlet is more than 5 times that same inlet and outlet it will act as a bell irrespective of the shape. And yes, that French builder had it right, that's the same effect what I meant with a bell in the shape of an M, sporting the same volume as a cube. The ISA of the cube would be quite a bit smaller then. But that is already in my last answer to you, did you actually read that? |
|
|
|
Post by pyrophile on May 3, 2015 2:55:46 GMT -8
Nice meeting in Wildacres, like each year!
I would like to go there but it is too far away!
We try to make the same kind of meeting in France since last year, mixing theory and practice ( in a smaller version).
Does it exist in other countries?
Benoit
|
|


