|
|
Post by bernardbon on May 15, 2013 14:01:24 GMT -8
Ok Peter,
I understand. I don't know Dynamics of fluids. In the case that the firebox a square riser 6 is better to a rectangle 4.25x6.30?
Thanks
|
|
|
|
Post by peterberg on May 16, 2013 1:59:09 GMT -8
There's a simple formula to calculate the rectangle csa to an equivalent circular one.
This is 2 x length x width, divided by length plus width.
I've done the calculation for you, your 4.25 x 6.3 csa is roughly equivalent to a circular duct of 5 inch, which is obviously too small. Try the formula with a square, you'll see what I mean.
Moreover, using a rectangle you are missing out the favorable double corkscrew turbulation. This turbulation is much more pronounced using a more or less round riser.
|
|
dvawolk
Full Member
   DSR2 125mm open system (actual project)
Posts: 273
|
Post by dvawolk on May 16, 2013 11:31:05 GMT -8
OK, now here is the updated version. I deepened it and lowered it by one row. As for the ISA: the total is 5.9 sq. meters. I didn't add the surface area of the top and left outer wall of batchbox as it would be heated directly from the fire and would achieve 100°C probably in less than half an hour of burning. Should i add the mentioned surface or not? If not, i may slightly widen the bench to get to 6.3 square meter. The heat riser CSA is my mistake. I will change it to 150x 150mm square. If i get figure out how to make octagon with these insulated boards, then i'll make octagon... But here the question comes: what is better: square insulated riser or octagonal firebrick riser... The port CSA is 70% of CSA of 150mm diameter system size. The batchbox was short but wasn't meant to be, my bad. Now it is fixed to 44cm. This was also the lenght i my previous tests... Also it will be built with firebricks (color changed). I also made sloped sides smaller. I agree with Peter that it is much easier to clean the ashes... The bare pipe wont be in the room, but will be closed in the wall (this is now seen on the newer sketch. Also, The main chimney pipe does not go exactly to the floor level, so direct bench-chimney connection is not possible. I have deepened the first part of the bell, actually i had to, otherwise the batchbox would not fit in. But i stayed with the position of the batchbox on the floor level with two reasons: - when testing it was such a nice feeling of heat coming from batchbox window at the floor/feet level.. - if i put the batchbox slightly to the left and up to the top of the bench, then the distance from heatriser to the arch would be to small. Also, i prefer to have the first part of bell quite low. It is better to have a heating source as low as possible... As for the insulation of the batchbox: please, check the attached sketch: insulation will be present around the bottom of heat riser up to the height of batchbox. I will correct the heatriser in the sketch to 15cm x 15 cm. A fat thank you for anyone with suggestions, opinions etc. It really helps alot... P.S.: Anyone has spare doors for this stove?!? =) Klemen Attachments:
|
|
|
|
Post by peterberg on May 17, 2013 0:53:43 GMT -8
As for the ISA: the total is 5.9 sq. meters. I didn't add the surface area of the top and left outer wall of batchbox as it would be heated directly from the fire and would achieve 100°C probably in less than half an hour of burning. Should i add the mentioned surface or not? If not, i may slightly widen the bench to get to 6.3 square meter. OK, this is correct, the outer surface of the firebox shouldn't be in the calculation indeed. So you could add some volume to the bench. As for the The heat riser CSA is my mistake. I will change it to 150x 150mm square. If i get figure out how to make octagon with these insulated boards, then i'll make octagon...
But here the question comes: what is better:
square insulated riser or octagonal firebrick riser...I would go for the square insulated riser, although an octagonal insulated riser is much better still. I do miss something in the riser, namely the sloped backside at the bottom. This is important, please don't leave that one out. It's possible to use the same triangle bricks as in the firebox for this. You've made a whole series of informed choices, you've built the thing outside first and ironed out the niggles. You are ready I'd think, go for it! |
|
docbb
Junior Member
  Back from ZA
Posts: 92
|
Post by docbb on May 17, 2013 10:00:53 GMT -8
OK, now here is the updated version. I deepened it and lowered it by one row. Klemen hello May be you 'll find some inspiration on this photo thread in dutch |
|
|
|
Post by Donkey on May 17, 2013 23:10:59 GMT -8
That is one BEAUTIFUL stove!
Nice job!
|
|
|
|
Post by matthewwalker on May 18, 2013 11:57:33 GMT -8
I watched your video on the construction of that stove a week or so ago Peter. It's an absolutely beautiful build, and the skill of the craftsmen involved was flat out amazing and inspiring. What a wonderful thing you and your fellows have created. Thank you for sharing that.
|
|
|
|
Post by peterberg on May 18, 2013 12:36:47 GMT -8
Thanks Donkey, thanks Matt.
The stove as such has been their first commercial build. My involvement has been the technical design. It's a single bell system, even the bench is part of that. Quite complicated build, chimney temps hasn't been over 50 C (122 F) yet.
Matt, perhaps you saw the video on my youtube channel? That's a different stove, built during a workshop.
|
|
|
|
Post by matthewwalker on May 18, 2013 12:59:50 GMT -8
Yes, it was on your Youtube channel. I didn't realize it was a different stove. I was very impressed by the craftsmanship shown in the video. Extremely nice work.
|
|
dvawolk
Full Member
   DSR2 125mm open system (actual project)
Posts: 273
|
Post by dvawolk on Aug 29, 2013 11:47:33 GMT -8
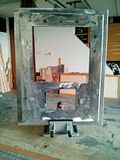
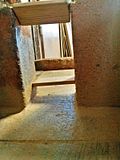
Hi, All! After some months time has come to start building the stove. I slightly changed the design, it is one bell system with tower and bench. I widened the bench to 58cm inside. The tower has 3,4 sq. meters and the bench has 2,9 sq. meters of ISA which totals 6,3 sq. meters of ISA, single bell system. Based on my previous tests i don't think that the gasses would have much over 200 degrees Celsius when entering the bench. Thats why i decided to make a bench with concrete material... In the end all the stove (brickwork and concrete) will be done in clay plaster*. In the past few months i was learning clay plastering and now i do have guts to try it on this stove.. I must confirm (as others have said it before) that with clay plasters really you need to get a feel for it - trying to mix the fiber-sand-clay proportions is too much time consuming. In sketchup file you will see the concrete material in white. And here comes the first question: I will make concrete blocks about 30cm wide to cover the gap of 58cm of the bench. What thickness of these concrete blocks would you suggest? With or without rebar?After searching the net i didn't find any useful (and budget friendly) stove door. Also i had ceramic glass from previous projects, so i decided to weld it on my own... The basic design is seen in sketchup file. Also The photo of door in progress is attached. And here is my second question: How in the world should i fit the door to the batchbox?((Welding skills are far less than perfect, no need to comment =) )) So, below the sketchup file attahced and photos.. Please, do comment!    |
|
morticcio
Full Member
   "The problem with internet quotes is that you can't always depend on their accuracy" - Aristotle
Posts: 371
|
Post by morticcio on Aug 30, 2013 1:05:06 GMT -8
After searching the net i didn't find any useful (and budget friendly) stove door. Also i had ceramic glass from previous projects, so i decided to weld it on my own... The basic design is seen in sketchup file. Also The photo of door in progress is attached. And here is my second question: How in the world should i fit the door to the batchbox?The door frame is the part that is secured. I can't see a door frame in your photos but I'm assuming you have one. A good clear example is on this video from Peter's Dutch group's stovebuilding weekend. The frame is fixed using (stainless?) steel straps secured between the batchbox and outer skin. Door fitting on the video is at 4:20. |
|
|
|
Post by peterberg on Aug 30, 2013 2:26:38 GMT -8
I will make concrete blocks about 30cm wide to cover the gap of 58cm of the bench. What thickness of these concrete blocks would you suggest? With or without rebar?The concrete blocks should be without rebar, the steel will expand more than the concrete and will break it apart. About the thickness I feel 7.5 cm would be adequate, 10 cm would be best. |
|
dvawolk
Full Member
   DSR2 125mm open system (actual project)
Posts: 273
|
Post by dvawolk on Sept 4, 2013 2:59:52 GMT -8
morticcio, thanks. I have totally forgot about this video. It seems simple enough. The door frame is on the photo, too. It is the outer metal frame... I will post more detailed photos later on... Yesterday i did first few concrete block for the verticals portions of the bench. Peterberg, thank you for the thickness info. I decided to go for 7cm thickness for the vertical walls of the bench. But for the top blocks i will make 10cm thickness. There is updated Sketchup file attached. Nothing new in internal measures, just some details. What comes next? Partial removal of the wall. Dust barrier so that i don't mess with the other part of the flat.. All in all, preparing the working area. - Nothing special... Klemen |
|
dvawolk
Full Member
   DSR2 125mm open system (actual project)
Posts: 273
|
Post by dvawolk on Sept 11, 2013 22:27:48 GMT -8
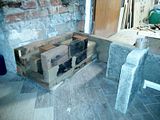
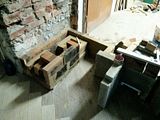
News: So the wall portion is down and all is prepared to build it. I draw the lines on the floor with permanent marker so that i stick to the plan. The vertical concrete blocks are firm enough to carry them around. Below are some photos of progres.. I used sticks of various specific lengths so that i can get more or less exact dimensions of (especially) batchbox. Otherwise it is kind a hart to get to 1 millimeter of accuracy with brickwork, especially if these are not perfect blocks. As fort the mortar... I started the first row with a bought mortar (i have experiences with it from a few years ago)...The problem is that it gets firm very fast so it is hard to achieve a desired position of bricks sometimes.. Also, i have to mix new batch for every few bricks?! And my skin became very f* up after the first row... so... I mixed a batch of clay slip with lots of fine sand (store bought). And from now on, i am using this thing... I guess i was afraid to use it inside my house, thinking: "Oh, it shouldn't be as good as store-bought product? I remembered my first batchbox build under the balcony when i was breaking batchbox apart. The clay did really a good job... What else do i want?! ...And it is so much better to do with clay slip compared to my previous mortar (roefix 961). Under the Batcbox there is insulation of 3cm... The floor will be warmed for sure but there is no hazard and i do like warm floor.. But other part of floor (under the bench emptiness) won't get warm significantly, at least not from the gasses... If i remember correctly, a vertical metal flue has surface temperature much lower compared to the temperature of flue gasses. Question: What would you put on the concrete and tiled floor inside the batchbox bell? I was just thinking of painting it with clay slip?! Photos below: -it is useful to have exactly cut sticks at hand to achieve correct distances among the bricks (especially port width)   -on the right you can see exit hole of the bell..   Comments welcome! |
|
|
|
Post by Dan (Upstate NY, USA) on Sept 16, 2013 4:41:04 GMT -8
Is this build on a concrete floor that is tiled or a wood floor that is tiled?
|
|