|
|
Post by satamax on Feb 10, 2019 9:30:27 GMT -8
Thanks a lot Peter, for the reply.
90° to the side i meant.
I think i will try, but keep at least 50cm of riser above. My rocket is too prone to overload. So i want to keep some margin of safety.
|
|
|
|
Post by peterberg on Feb 10, 2019 12:01:37 GMT -8
My test setup is prone to overload as well, but last tests has seen a very stable behaviour despite unvafourable conditions. Verification tests will take about two weeks, can you wait that long?
|
|
|
|
Post by satamax on Feb 11, 2019 2:46:09 GMT -8
Yes Peter. I want to do the mod before winter ends tho, to be sure of it working before next winter.
|
|
|
|
Post by peterberg on Feb 12, 2019 13:03:51 GMT -8
Of course I couldn't wait for the draft limiter to arrive, yesterday I ran another test. Three-quart load, dry beech, just a bit of wind. I was very disappointed seeing the CO getting up while the fireball went opaque. 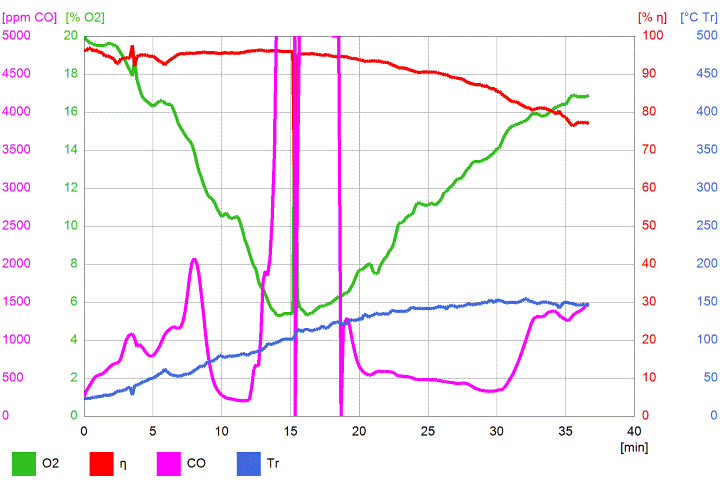 To my eye, it looked like the secondary air fell short of what was required. A wider horizontal part of the floor channel seemed to be in order. To ensure this horizontal part was twice the csa of the vertical stub which wasn't the case before due to material limits. My stock of steel rectangle tube was depleted so today I went out to buy some more. Cutting and welding for an hour or so, cutting the trench in the firebox' floor a bit wider and shove it into place. Smallest primary opening just 5% and secondary opening slightly more than 10% of riser's csa. And oh yes, the stub I had lying around happened to be half an inch longer and I kept it that way. All other parameters being equal, even the brick on the top box' floor wasn't moved. Tonight I ran the thing again using a two-third load of dry beech, just a bit of wind. This run is one of the best that I've ever tested, the fireball came up and even extended briefly into the exhaust opening but remained transparent. 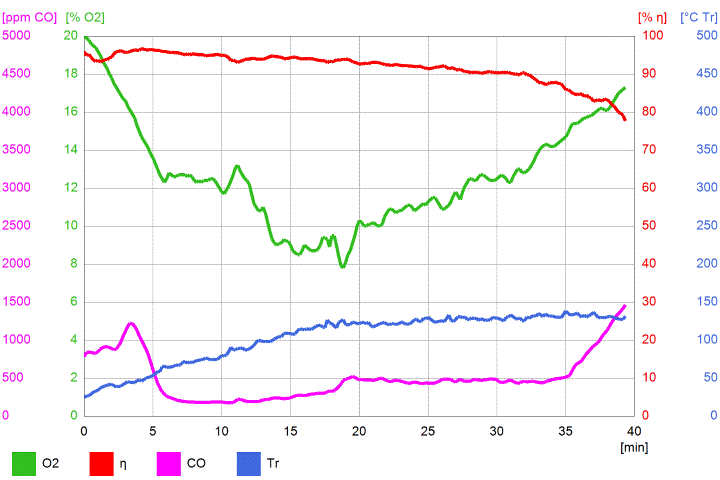 Somewhere at the 15 minutes mark I closed the primary inlet to the minimum value of 5% and the fire kept raging behind the port like a blown natural gas burner. Some average numbers for who's interested: O² 12.7%, eff. 91.9%, CO 507 ppm, Tr 103.9 ºC. As you guys can imagine I am very satisfied. More testruns are in order, hopefully to establish a solid base of stable runs. |
|
|
|
Post by Vortex on Feb 13, 2019 2:47:45 GMT -8
Glad to hear it helped. I found once you get used to watching the flame in the afterburner you learn to read it and it tells you just what it needs.
|
|
|
|
Post by independentenergy on Feb 13, 2019 9:49:31 GMT -8
would it be possible to place the fumes outlet of the upper tunnel on the right and left side?
|
|
|
|
Post by peterberg on Feb 13, 2019 10:10:49 GMT -8
would it be possible to place the fumes outlet of the upper tunnel on the right and left side? One of the possibilities on my list. Not to say I'm gonna try it but I might in future. |
|
|
|
Post by peterberg on Feb 13, 2019 10:13:42 GMT -8
Glad to hear it helped. I found once you get used to watching the flame in the afterburner you learn to read it and it tells you just what it needs. In my case: there's a correlation between certain events like the opaque fireball and what the Testo has to say about it. This correlation is very consistent so when I see it happens I know what's coming. |
|
|
|
Post by DCish on Feb 14, 2019 18:57:01 GMT -8
Glad to hear it helped. I found once you get used to watching the flame in the afterburner you learn to read it and it tells you just what it needs. In my case: there's a correlation between certain events like the opaque fireball and what the Testo has to say about it. This correlation is very consistent so when I see it happens I know what's coming. This very much matches the "feel" I have watching the afterburner flame. Any other correlations you notice between flame patterns and Testo readings, I will happily devour! |
|
|
|
Post by peterberg on Feb 15, 2019 4:17:48 GMT -8
Two days ago I did another testrun on the same configuration as last time. I'd go for a more daring approach, firebox crammed full with dry beech and a lot of kindling on top. Most of the time this is a recipe for disastrous burns. And it lived up to expectations, albeit in a way. It started with a steep CO peak, stabilized while the O² came down and a smallish peak followed at the lowest O² level. 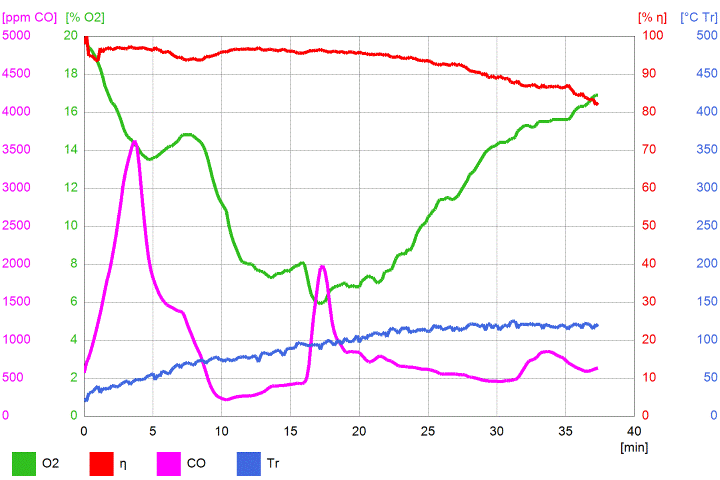 No big deal, within parameters of the EU rules for 2022. But that lowest point of O² bugged me, I'd prefer it to stay at a somewhat higher level in order to avoid problems with a wide margin. There's one peculiar effect though, the end line of CO stayed lower than usual. I took out the grinder and welder again and combined two 40x30x2 mm rectangle ducts into one of 80x30x2 mm (3.15" x 1.18" x 0.078") so I could maintain a shallow trench in the firebox' floor. The vertical stub was upgraded to 35x35x2 mm (1.38" x 1.38" x 0.078") , so actually this is the floor channel configuration for a 150 mm (6") bog standard batchrocket system. Just to see what would happen while using an "oversized" secondary air provision. 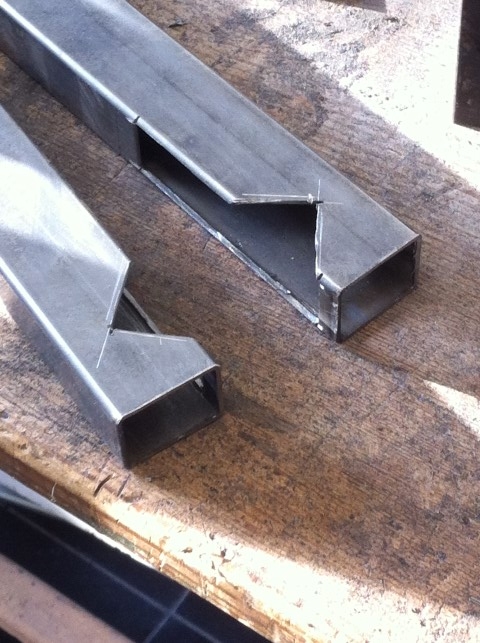 As is visable, just in front and under the stub there's a single open area created by taking out the sidewall part of both ducts. 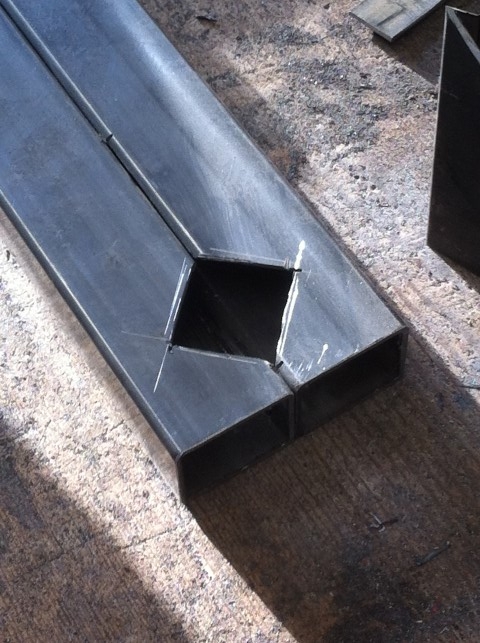 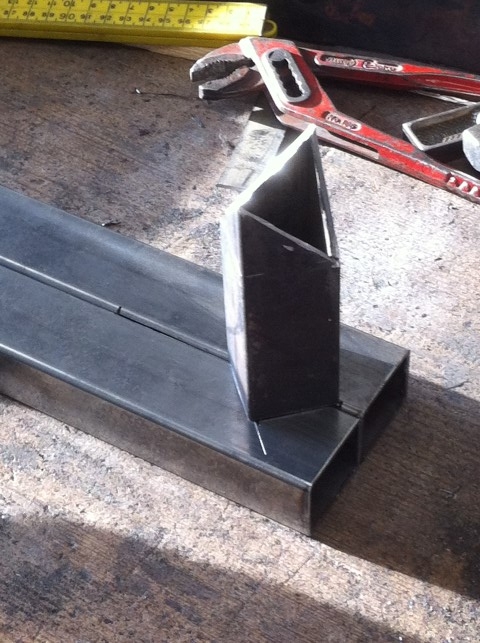 The stub is just welded on top of the feed duct. And here are all three together, from left to right first, second and third floor channels. 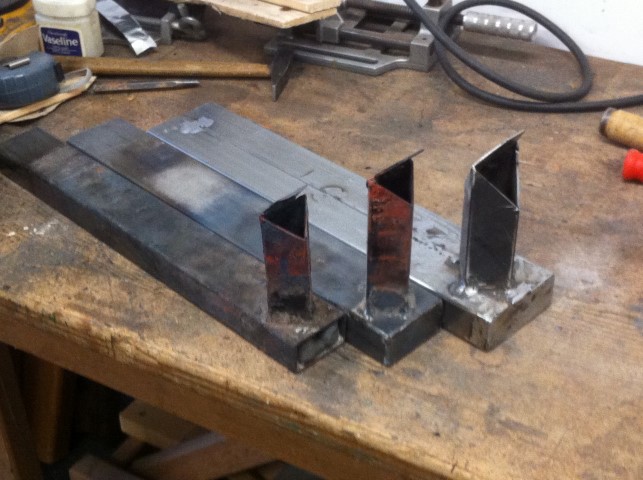 I loaded the firebox to the normally 3/4 full, some kindling on top. Around 7 minutes into the burn I added a lot more kindling, another disaster recipe. The O² and CO wobbled somewhat, stabilized and went on its way. 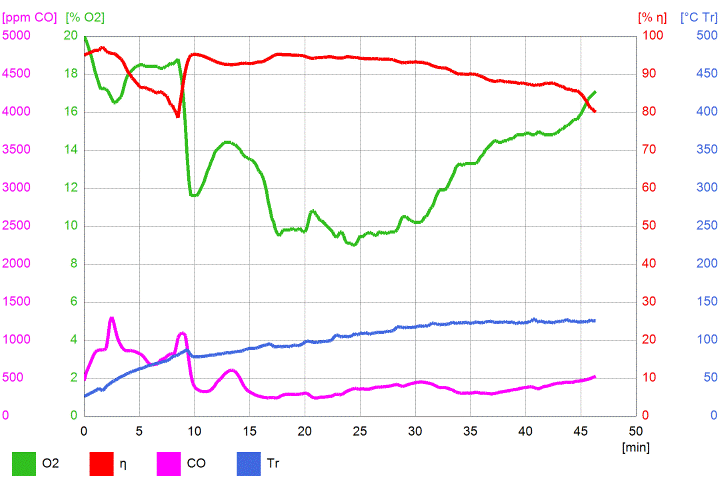 Minimum O² was 9%, all went quite smooth. Mind you, the mid part of the burn, where O² is lowest the fire (in the riser and top box) was raging at very high rate. Which meant I couldn't sit in front anymore, even at a distance of 2.5 meters (8.2') away. As one can see, the end-of-burn CO line remained nearly flat. This is also the longest testrun to date with this tiny system, 47 minutes. As a consequence, average numbers are very good for this testrun. O² 13.5%, eff. 91.1%, CO 466, Tr 98.2 ºC. Weather is getting warmer, hopefully there'll be an opportunity to do another run using this channel tonight. |
|
|
|
Post by independentenergy on Feb 15, 2019 8:59:22 GMT -8
congratulations.
this solution looks very interesting
|
|
|
|
Post by esbjornaneer on Mar 4, 2019 23:06:57 GMT -8
All this is very exciting Peter. Thank you for having found a way back to the DSR idea!
I don't know if it was just a hunch or calculated that you placed the 'dropped' brick in the top box so that the volume between the port and it closely resembles that of a 10*base standard heat riser. And the fact that it blocks the top of the box may hold back the light weight hydro-carbons, if any escaped through the port, in the top box for longer.
Your suggestion that the gap between the first and second part of the top box should be 150%-100% of system CSA is interesting. If it were 100% it would be in line with the recommendations for the tapered riser earlier in the tread.
I look forward to more results when available.
|
|
|
|
Post by peterberg on Mar 6, 2019 8:47:26 GMT -8
I don't know if it was just a hunch or calculated that you placed the 'dropped' brick in the top box so that the volume between the port and it closely resembles that of a 10*base standard heat riser. Not as much as a hunch or calculated, every step followed naturally from the preceding one (or that's how it felt). I started with a brick at the floor of the top box. This went quite well, so I tried two on top of each other. I did this to test the possibility of using the top box as an oven. This restriction proved to be useful so I tried the "dropped" brick at two different heights and also in combination with a brick on the top box' floor. Testing with the lowest "dropped" brick (one third down the height of the top box) and an otherwise empty oven is concluded now. I'll collecting data and pictures tonight and probably also make a video clip how the thing looks like when running and also how the whole of the test rig looks while in use. I showed this DSR#2 prototype in function yesterday to a visitor and the guy said it was an "absolutely convincing demonstration". |
|
|
|
Post by peterberg on Mar 6, 2019 12:51:32 GMT -8
Six runs in a row has been done with very good results. The configuration I tested was with the top third of the top box blocked off, no brick on the floor so no mimic of a food container like a römertopf or a tajine. Fuel beech and ash, moisture content 20% on average. Primary air opening from completely open at the start to gradually 175 mm² (0.27" sq.) at the top of the burn, secondary opening through all of the burn 1872 mm² (2.9" sq.). The draft limiter tuned to a value of 12 Pa (0.12 mbar). Pictures of the fifth recorded run: 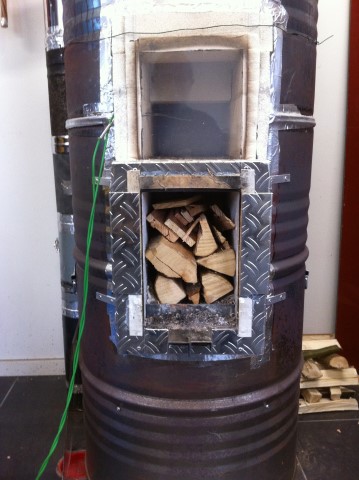 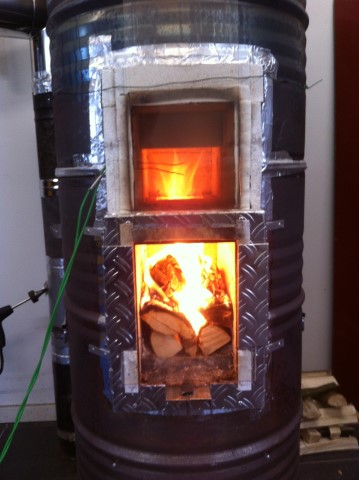 All six sessions yielded results good enough to pass the European rules for 2022. Bar the PM 2.5 values of course, the cost for a device to measure that is way beyond my yearly 'hobby' budget. At some points the diagrams were different, whether or not there was a higher level of CO at the beginning and the end. A way to avoid the peak at the beginning is to start the thing up without the make-shift door and close this gradually while the fire is ramping up. Here are three of those diagrams, all three shows a slightly different pattern due to fuel arrangement and/or start procedure. 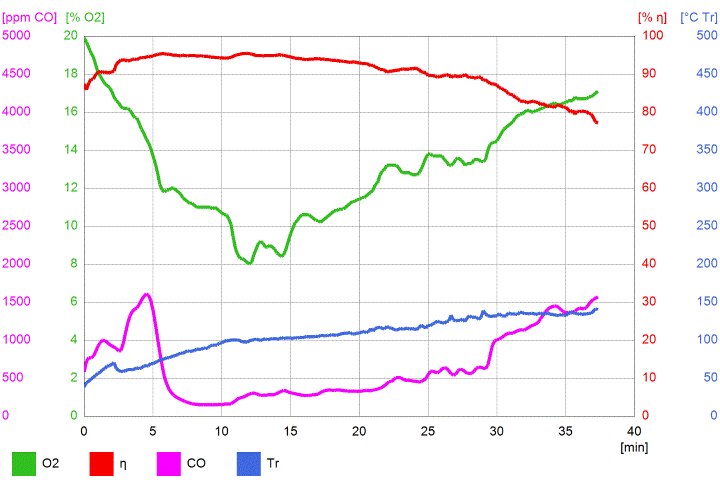 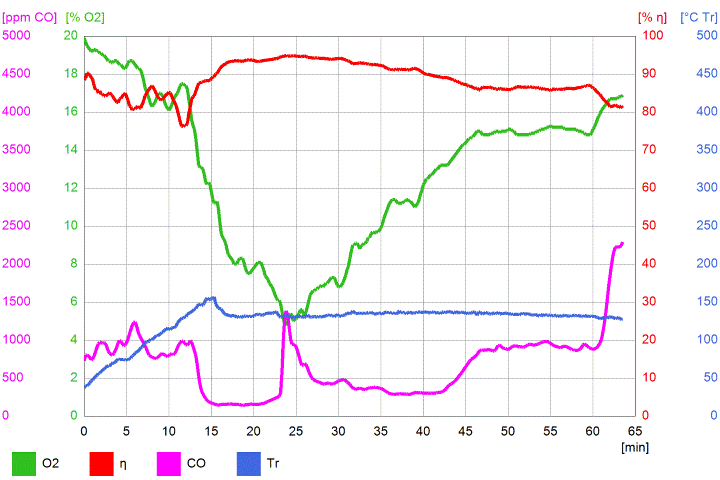 This second one happened to be very critical in the sense the oxygen level dropped far below what I consider as safe. Safe means 8%, lowest in this run 4.8%, so I'd hold my breath for a couple of minutes. 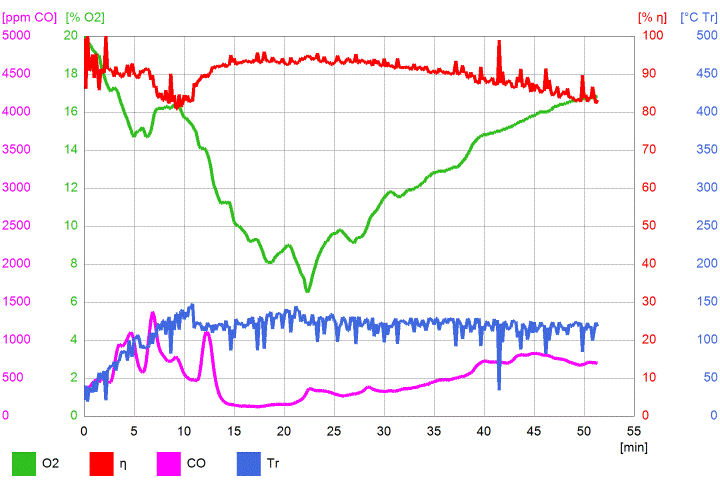 This third one shows the O² and the efficiency line as quite erratic. Probably caused by something that got stuck into the mouth of the probe. The rest of the diagram I am happy about. To conclude it: here's a video that shows the core running full tilt. Part of the flames isn't visable as it happened to be blueish, the rear of the top box glowing bright orange. One observation of a peculiar phenomenon: somewhere during half of the burns a black smudge appeared at the side of the top box, just below the brick that's hanging down. It might be a good idea to have a ridge at the side like some others have done and see whether or not this is the solution. Next goal: do another series of tests with the brick at the top box' floor included and see what the results are of that change in aerodynamics. |
|
|
|
Post by gadget on Mar 6, 2019 17:53:15 GMT -8
Peter this is one of the coolest heater designs I have ever seen. I love the vertical foot print. Bravo and great work. Glad to see it is working out and thanks for all your hard work and to everyone else's on this board for hard work and shared knowledge.
|
|