manU
New Member

Posts: 41 
|
Post by manU on Aug 13, 2017 4:21:58 GMT -8
Hello! I am new to the forum and first would like to thank all the people supporting and contributing to this knowledge sharing space. I have found lots of interesting new ideas and just wanted to share what I have achieved hoping to make my little contribution.
This is my stove running strong in the middle of its second winter. Oven + griddle + heated bench.
|
|
|
|
Post by satamax on Aug 13, 2017 4:57:46 GMT -8
Manur, it doesn't work anymore, try hostingpics or else.
|
|
|
|
Post by drooster on Aug 14, 2017 14:49:29 GMT -8
|
|
manU
New Member

Posts: 41 
|
Post by manU on Aug 14, 2017 15:56:40 GMT -8
Thanks for the help with the pics :-)
|
|
manU
New Member

Posts: 41 
|
Post by manU on Aug 16, 2017 4:23:12 GMT -8
Oven+griddle metal box: This is the interesting concept of my stove. Is the simplest way I have found for having an oven integrated to the stove, without having to deal with "not so simple" metal to brick/cob joints. In my experience fixing metal door or ovens to brick or cob are problematic due to de different dilation coef. and require special techniques and materials. With the setup I am showing the metal-cob joint is sealed with a fine clay sand mix (the same I use for the burn chamber) and gravity keeps things in place and airtight. No need for mineral wool or else. The box can expand with temperature without cracking any mud. Similar concept as how the barrel seals the classic rockets...
The hot gases go up the front wall of the oven, then the roof, then go down the back wall and into the bench.
More important: works great! Easy to get the right cooking temps in 10 to 15 min from cold start.
so... a heat exchanger in the shape of an oven+griddle that could be combined with different burn chambers or heat exchangers/bench
My stove is a 5 inch system: 5" pipe for exaust, with a short "angled L" rocket burn chamber (fuel load angled about 30*), with metal tray to allow air under fuel and with basic metal door that one day will be glass. The 30* angle really helps ergonomics when loading and view of the fire. Maybe helps a little with turbulence?? I used 15 or 20 refractary bricks as liners in the burn chamber and the rest is cob, stones, a few bricks and some metal to shape the ducts. I can give more details on the burn chamber if wanted...
but again, what I specially wanted to share is the concept of the box. I think of it as one simple solution to adding an oven to a stove.
I have built 3 more with the same concept in the last few months, and they are all cooking and heating great!
Ok, thats all for now, I will happily share more if there is interest. Hoping to get some feedback too.
Saludos desde Patagonia, Argentina
|
|
manU
New Member

Posts: 41 
|
Post by manU on Aug 16, 2017 14:20:39 GMT -8
|
|
|
|
Post by Vortex on Aug 16, 2017 14:52:15 GMT -8
Nice work Manur, do you have any pictures of them being built?
|
|
manU
New Member

Posts: 41 
|
Post by manU on Oct 4, 2017 8:31:50 GMT -8
|
|
manU
New Member

Posts: 41 
|
Post by manU on Oct 4, 2017 8:33:52 GMT -8
|
|
manU
New Member

Posts: 41 
|
Post by manU on Oct 4, 2017 8:35:14 GMT -8
|
|
manU
New Member

Posts: 41 
|
Post by manU on Oct 4, 2017 8:44:14 GMT -8
|
|
|
|
Post by pigbuttons on Oct 4, 2017 8:55:20 GMT -8
Awesome pics, thanks for sharing. Your whole room looks like artwork, very cool.
|
|
manU
New Member

Posts: 41 
|
Post by manU on Oct 6, 2017 15:11:50 GMT -8
Thanks pigbuttons
|
|
manU
New Member

Posts: 41 
|
Post by manU on Oct 6, 2017 15:40:20 GMT -8
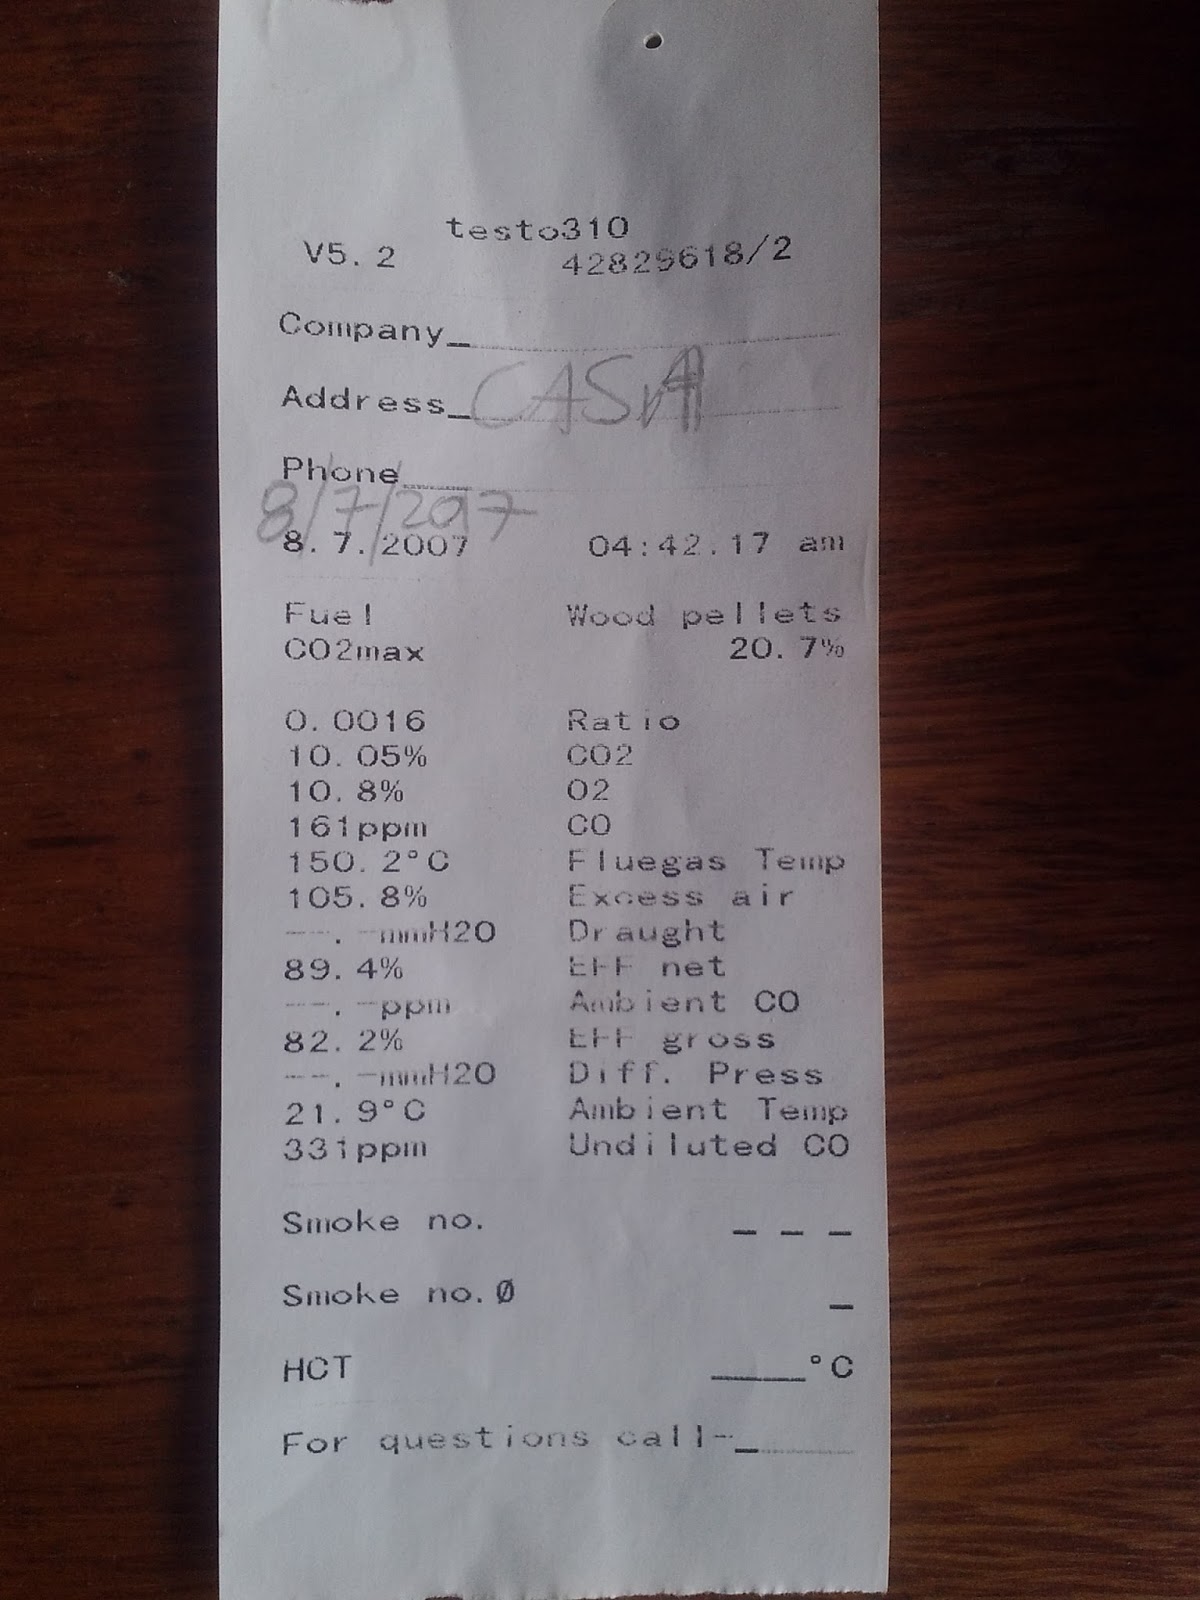
A couple months ago two friends came home with a Testo: I would appreciate some help interpreting this data. Some general advice on testing stoves would be great too. Maybe there's a thread about using the Testo?? Thanks  Note: Test conditions were not so ideal: not the driest fuel, the bench was warm. |
|