|
|
Post by manuel on Mar 16, 2015 2:14:50 GMT -8
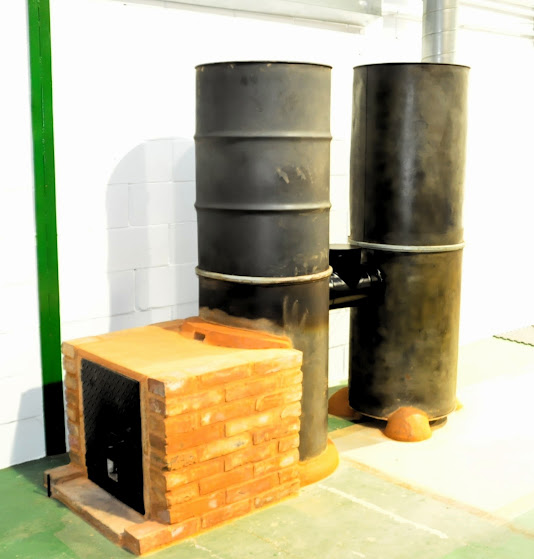
Hello all. It's been so long since I don't come to the forums, but I've reading now and then and built two more RMH since my first one, one winter ago... I'd like just to say thank you all the guys who help us the begginers with your kind advices and support. And here I go with our last built: an 8" batch box following Peter van der Berg plans of the one he/they built at the Innovators Gathering. His design was the perfect answer for the needs of the people who asked me to help them warm their big space: 184m2 by 8m high, on a cold place here in León, the north-west of Spain, on winters. We've changed just a bit some things but, in essence, is like a sister of the original design. It works great and they went from 6,7ºC to 20ºC on about 4 hours, so they are happy as we the two builders. So THANKS AGAIN Peter and the rest who share and guide!!!  link to the Picasa Gallery link to the Picasa GalleryI'm sorry I've lost a lot of the making-up progress photos. We built her once on a big open workshop we've conditioned for the testing. When well tested, then unmounted it brick by brick and then finally rebuilt it again on his definitive place. It needs some touch-ups on cob, but they're firing her all days and maybe we'll wait till the warmer days come to finish it. By the way, I was sure it would work since it's a well proof design and we just follow the fundamental points of it, but I'd like to understan why it doesn't need a big manifold just as other designs do. Could Peter or anyone else help me about this? |
|
|
|
Post by peterberg on Mar 16, 2015 4:42:13 GMT -8
Hi Manuel, It's good to see people follow the publicized design with commendable results. I can see you followed it closely with one major exception. The riser is a brick one in contrast with the ceramic fibre riser we used in Missoula. Just because the riser was round and relatively thin there was no need for a large manifold. The concept is simple but it's apparently not easy to grasp at first. The exhaust opening need to be large enough in order to provide an easy way out, that's all. How you achieve that isn't not as important, remember there's always more than one way to skin a cat... There are three factors in play, the most important first: #1 the horizontal distance between the riser and the barrel wall, #2 the circumference of the opening in the barrel wall, #3 the cross section area of that opening, #4 the free distance under that same opening. To start with the last one: this distance need to be at least half the diameter of the exhaust opening, preferably more. The circumference is easy because that's PiD. Multiplied by the minimum horizontal distance between riser and barrel. The result should be 1.5 times as large as the cross setion area. When it isn't, and it's not possible to enlarge the horizontal distance, make the exhaust opening wider by means of a reducer. When there isn't enough space below the opening you need to take care of that too. In case that last one is impossible only 3/4 of the opening is being used and you have to compensate for that as well. The idea behind all this: the gases won't stream straight through the opening. But are coming from above and the sides and also from below if there is sufficient space. It looks like a maelstrom, the middle of the opening isn't in use. The thicker the stream, the more of the opening is utilized. In fact, this is a stream profile made up by the edge of the opening and the thickness of the layer streaming through. Since the gases need to change 90 degrees direction you need more space in order to avoid friction. When spring is there and you are planning to finish the heater look at those points, those are very important. Even if you think it is alright as it is, make the changes anyway when the calculation indicates it is needed. The heater will work even better after that, especially when running full tilt. See also this thread: |
|
|
|
Post by pinhead on Mar 16, 2015 11:15:48 GMT -8
Beautiful build! I love the brick body (same way I built mine, in fact). I'm super envious of your chimney, that's for sure!
How did you solve the shifting roof problem? Considering how hot the roof of the batch box gets, the bricks in the ceiling of the box will undoubtedly shift around, forming cracks in the mortar. Did you use a monolithic slab as a roof? Or did the double-skin design eliminate this problem?
|
|
|
|
Post by manuel on Mar 17, 2015 10:24:37 GMT -8
Thaks a lot Peter.
I did read the thread you linked some time before, but it's now, when reading (twice) your answer, that I do think I fully grasp the idea! well... I will have a closer look as soon as coming Spring warms the weather, but I'll bet it's not well done as we built it. I'll let you know.
Meanwhile... could we use, instead of a reduction, just a bigger flue for connecting the first barrel with the bell-ones? Or would the added CSA of the conection be bad for the gases movement inside it?
I suppose (yet I have to read it some times more and make some calculations to completely get it on my mind) connecting bells would work with the same rule of thumb...
(Edit):
On the same "Helpful hint" thread I can read from Peter:
"According to the theory, the area of the entrance should be larger. The exit hole could be the same as the chimney cross sectional area."
OK. So I gess again maybe it would be no problem to have all transitions bigger than exit CSA..
Pinhead: thanks for your kind words. The chamber roof is in fact, as you supposed well, a monolithic 50x50x... 3cm (more or less, don't remember for sure) slab we bought from the same people who makes the refractary bricks, equal rated to 1400ºC. For the next one I'm planning for the house my and my wife will rent soon (I'll let you know because we need to make the house comfortable without using the current diesel heating) I'm thinking about using ceramic glass instead of the refractary if possible.
|
|
|
|
Post by shilo on Mar 17, 2015 11:08:06 GMT -8
" could we use, instead of a reduction, just a bigger flue for connecting the first barrel with the bell-ones?"
yes. that the best way
|
|
|
|
Post by peterberg on Mar 17, 2015 14:12:57 GMT -8
Meanwhile... could we use, instead of a reduction, just a bigger flue for connecting the first barrel with the bell-ones? Or would the added CSA of the conection be bad for the gases movement inside it? When necessary, it's better to use a reducer. Simply because a larger pipe has the disadvantage of another proportion to the bell. The point in a bell is the gases which stream into a much wider space, at least several times as large as the pipe itself. When the proportions change you'll run the risk of gases that could, just could, shortcut to the exhaust. And moreover, connections between bells would be best the same as the chimney stack. This is all just a feeling, an educated quess so to speak. |
|
|
|
Post by manuel on Mar 19, 2015 0:36:53 GMT -8
Thanks Peterberg and Shilo for your different answers... I gess we need more experimentation still  That's one of the good points of sharing different ways that, when viewed later taking some distance, will give us a better understanding of the common facts and rules. What a great place to walk in, this forum! |
|
|
|
Post by manuel on Mar 19, 2015 0:50:12 GMT -8
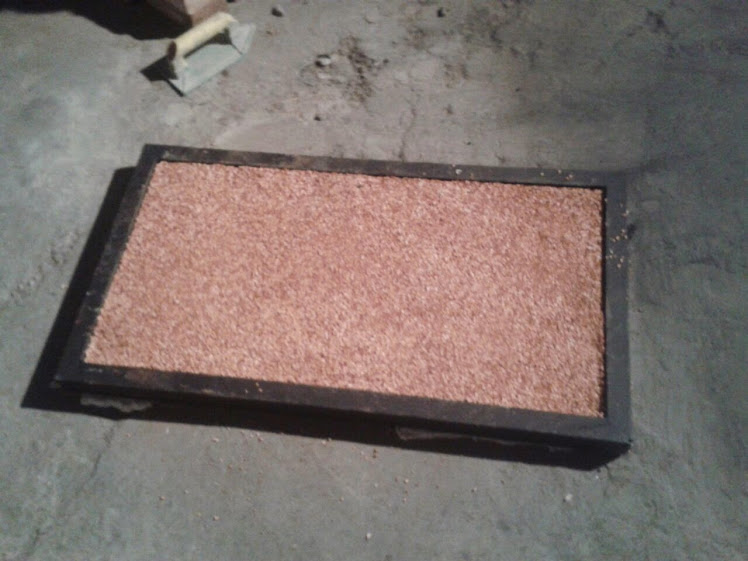
by the way: my friend and building partner, Fer, found some photos taken with his cellular (I've lost mines  ) and I've just uploaded them to the gallery. We thought about an easy way to make a flat and isolative floor for the stoves, and that's what we came up to: a metal frame in wich we could make an inner ring of mortar and then fill the rest with hard pressed perlite+clay slip. When the core of the stove was done we just slip it out (but we had to cut two bricks the fist time because we forget abut the frame on that point  )  And here there is the isolative floor with frame removed on the final setup  Any thoughts? |
|
|
|
Post by erikweaver on Jul 24, 2015 19:29:23 GMT -8
I'm planning to have air channels under mine, just as I have for the test build I used this past winter. This way the floor stays cool, because the hot air rises away. Insulation without the ability to shed the heat, heats up.
|
|
|
|
Post by patamos on Aug 27, 2015 18:04:18 GMT -8
When casting the base in place you can place a handful of 3/4" flexible pex tubes (or the like) spaced 6" or so in the lower part of the cast and pull them out once things are mostly dry.
|
|