morpho
Junior Member
 
Posts: 50 
|
Post by morpho on Sept 5, 2009 15:32:19 GMT -8
Hi Everyone,
Sorry Donkey!
I tried to look in the archives but it was taking too long as my "worldwide interweb" connection is slower than dial up and my battery is almost dead which would mean I would need to fire up the generator etc.
So I'm looking for some info about a smaller version of the mass heater.
My very understanding better half and I are moving into temporary digs this winter. The space is going to be a 20x20 box surrounding our little travel trailer. The whole thing is going to be wrapped in strawbale, tarped etc. So the insulation will be good, but the space is limited.
Is there a way to scale back the heater so instead of a 55 gallon barrel its a 5, 15 or 25 gallon barrel?
Got plans?
Math free plans? (or more specifically physics free plans)
Once again sorry for posting what is probably already in the archives.
|
|
|
|
Post by Donkey on Sept 5, 2009 19:01:51 GMT -8
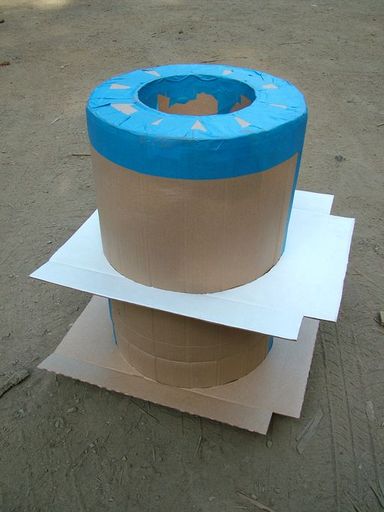
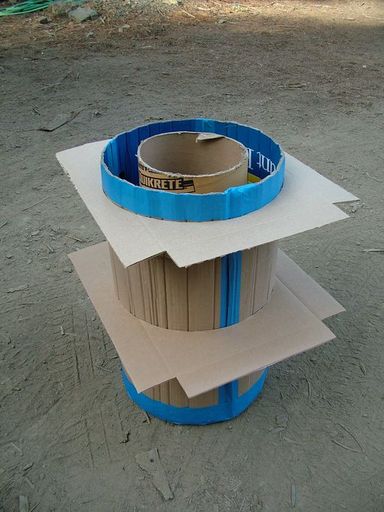
Use a narrower heat-riser. Six inch double-walled or even triple-walled stovepipe will fit into a smaller barrel and makes a fine heat riser. Though, I understand they can be short lived.. Pipe sections tend to be a bit overlong for a 15 gallon barrel, though you can just build up with cob and/or brick to place the barrel higher. You could also use two sections of single-wall stovepipe, one six inch and one eight or better yet, ten inches. Cut them to length. Build a plywood (or several layers of cardboard) washer that fits between the two pipes and acts as a spacer to keep them centered on each other. Place the arrangement, washer side down on a firm surface. The pipes should stand, one inside the other, evenly spaced all the way around. Pack between them with a mixture of pearlite and clay slip, try to keep the mix as dry as possible yet still sticky enough to press into a ball. Tamp the mix between the pipes and tap the sides as you work. Be gentle, you want to crush the pearlite as little as possible. Let it dry completely. Pull the wooden washer out and fill (if you wish) the gap left over with pearlite/clay. That will make a narrow but well insulated heat riser. The inner, six inch stovepipe will eventually burn out, but it's likely that the pearlite/clay will last a while, as long as it's not banged around. If you're careful, when it finally happens, the inner pipe might be picked out in pieces without damage to the rest. Theoretically, it should be scalable to almost any size from a five gallon paint can (soup can?) to a grain silo.. To illustrate the idea but in a different context, check the images below. As an experiment, I've built a cardboard form, gonna try casting a heat riser with it. The cardboard will be either peeled off or burnt off later.   |
|
morpho
Junior Member
 
Posts: 50 
|
Post by morpho on Sept 6, 2009 17:21:46 GMT -8
Thanks!
"scalable to almost any size"
Thats what I was hoping to hear.
I'll let you know how it goes.
Thanks again.
|
|
morpho
Junior Member
 
Posts: 50 
|
Post by morpho on Oct 29, 2009 7:27:44 GMT -8
Hi everyone.
Ok...after weeks of trying to find an appropriate size of a heat exchanger I have given up and now have a 45 gallon drum all ready to go.
Unfortunately in the time I was searching I had to put in a wood floor. So now I need advice on how to suspend this over top.
Could I build a brick container filled with 4 inches of perlite, then drop some pavers over the top of that then build the heater on top of this or do I really need to have the air gap underneath it?
Have pictures of how this is done?
The book is pretty light on this info.
Advice?
|
|
|
|
Post by Donkey on Oct 29, 2009 17:15:42 GMT -8
I think you'll need more than four inches.. More like ten or twelve. The stove will generate an INTENSE heat below the burn tunnel and heat riser.
The air gap helps to carry heat away instead of trapping it in and letting it build up. My sense is that with the gap, you can make the space slightly smaller, depending on how fast heat is moved away.
|
|
|
|
Post by comradesimba on Oct 29, 2009 19:08:06 GMT -8
A friend of mine put a rocket stove on top of regular ol' concrete blocks set with the holes facing the side and had it on his outdoor wooden patio deck. Hilarious - had a bread oven attached to the thing - baking bread eight inches away from 2x4s and never even scorched the porch
We're not too bright down here in podunk missouri, but we're willing to try anything! ;D
|
|
morpho
Junior Member
 
Posts: 50 
|
Post by morpho on Oct 30, 2009 10:38:27 GMT -8
thanks Donkey.
How is the gap created?
What what does it look like?
In the book it says: "four inch mineral clay insulation, suspended on four inch brick ledge"
what is mineral clay insulation? perlite/clay mix the same as the riser insulation?
I can't imagine this will take the weight of the stove so I am assuming it is framed within something to contain it and this structure also supports the stove.
Probably not a lot of call for rocket stoves on wood floors...but I've been pushed into a corner so I need some info. Thanks a lot for your thoughts and insights.
comradesimba.....
"Podunk Missouri" has nothing on me right now.
I am going into a Canadian winter with no electricity, no running water, a homemade composting toilet, I'm sitting under two tarps in a 33 year old 12 foot travel trailer with no furnace. Podunk Canada indeed!
Thanks for your input as well. I have a fear of being a headline in the local paper though.
"HILLBILLY BURNS DOWN TRAILER TO KEEP WARM"
|
|
|
|
Post by Donkey on Oct 30, 2009 17:41:47 GMT -8
Usually, it's all bricks on brick.. Bricks on edge, bridged by brick, filled with pearlite/clay. The air gap is just more of the same, just no insulation filler with the ends open.
Comradesimba has a damn fine idea there. Though the cinder block will probably heat crack.
|
|
morpho
Junior Member
 
Posts: 50 
|
Post by morpho on Oct 31, 2009 15:42:05 GMT -8
cool.
I think i get it.
do you think i could use a concrete pavers to separate the perlite and support the stove (with bricks under it to add support) or would the heat crack these as well?
ok.....I'm going to go and sand the remaining paint off the barrel. (there was a whole layer of paint that would just not burn off. It cracked a bit but just wouldn't flake off like the other paint layers....3 in total)
thanks again everyone.
|
|
|
|
Post by Donkey on Oct 31, 2009 20:12:38 GMT -8
err... Concrete heat shocks. The pavers would probably crack to bits. You should just try it in a mock-up stove outside and see what happens.
I suggest that EVERYONE build a stove (or better yet a few stoves) outside to get the hang of things first. Then you can experiment outside in a safer environment, where you are less likely to smoke yourself out or burn down the house.
Measure the space (and runs) that you want to use inside, build a full sized mock-up outside of that stove. It will give you a pretty good idea of what to expect when you move it inside, AND you can work out many bugs there.
|
|
morpho
Junior Member
 
Posts: 50 
|
Post by morpho on Nov 1, 2009 16:12:10 GMT -8
Hey Donkey,
I just wanted to drop a line and thank you for putting up with all our dumb questions.
You had to know they were going to come at you fast and often when you attached your name to this stuff!
I had to do a third trial version as the only stove pipe I could find was 6" so I had to rethink the whole thing. It failed miserably! So your advice to do several versions outside paid off thus far. I think the burn tunnel was too large....(but it couldn't have been more than a 1/8" off, so that just goes to show you have to be bang on with this stuff.
Funny enough, my first one was the best!
Oh well, it's a good thing I like to play with fire.
Thanks again.
|
|