|
|
Post by DCish on Aug 15, 2014 16:12:08 GMT -8
Sweet, so satisfying watch a rocket go from concept to successful implementation!
|
|
|
|
jrl
Junior Member

Posts: 101 
|
Post by jrl on Aug 19, 2014 5:09:33 GMT -8
One thing I've noticed is the insane amount of heat produced by the burn chamber reflecting back into the room through the door. In fact, the little steel panel on the door (where fire glass will go eventually) registers 400-600 deg F during operation. Besides scaling and erosion of the metal, I'm concerned that the stove door area and entrance-way to the burn tunnel is just too hot to operate. I need to use welding gloves to operate the stove without getting burned.
How do any of you guys guard against the heat of the burn chamber in a batch box system?
My batch box shouldn't really get any deeper than 16" per Peterburg dimensions, and I have to transition from brick to steel at some point in the design. For me I have 14-15 inches of brick/refractory and then another 2 inches of steel before the door. None of the combusting material is touching the door or anything, but it's still lightning hot during operation. If I even brush against the door parts I'll get an instant burn. |
|
|
|
Post by satamax on Aug 19, 2014 9:52:28 GMT -8
One thing I've noticed is the insane amount of heat produced by the burn chamber reflecting back into the room through the door. In fact, the little steel panel on the door (where fire glass will go eventually) registers 400-600 deg F during operation. Besides scaling and erosion of the metal, I'm concerned that the stove door area and entrance-way to the burn tunnel is just too hot to operate. I need to use welding gloves to operate the stove without getting burned.
How do any of you guys guard against the heat of the burn chamber in a batch box system?
My batch box shouldn't really get any deeper than 16" per Peterburg dimensions, and I have to transition from brick to steel at some point in the design. For me I have 14-15 inches of brick/refractory and then another 2 inches of steel before the door. None of the combusting material is touching the door or anything, but it's still lightning hot during operation. If I even brush against the door parts I'll get an instant burn. That makes me wonder if you're not a smidge short on primary air. Don't worry about it burning away. That steel isn't exposed too much. |
|
jrl
Junior Member
Posts: 101
|
Post by jrl on Aug 19, 2014 15:49:33 GMT -8
One thing I've noticed is the insane amount of heat produced by the burn chamber reflecting back into the room through the door. In fact, the little steel panel on the door (where fire glass will go eventually) registers 400-600 deg F during operation. Besides scaling and erosion of the metal, I'm concerned that the stove door area and entrance-way to the burn tunnel is just too hot to operate. I need to use welding gloves to operate the stove without getting burned.
How do any of you guys guard against the heat of the burn chamber in a batch box system?
My batch box shouldn't really get any deeper than 16" per Peterburg dimensions, and I have to transition from brick to steel at some point in the design. For me I have 14-15 inches of brick/refractory and then another 2 inches of steel before the door. None of the combusting material is touching the door or anything, but it's still lightning hot during operation. If I even brush against the door parts I'll get an instant burn. That makes me wonder if you're not a smidge short on primary air. Don't worry about it burning away. That steel isn't exposed too much. Are you saying more air/draft would suck the heat inward? |
|
|
|
Post by satamax on Aug 19, 2014 21:46:05 GMT -8
At least it seems to do it on mine, to some extent. Don't expect a cold door. But mine seems to be at less than 200C°/400F°
On the green machine. I don't know on the range retrofit, i haven't realy paid attention.
|
|
|
|
|
|
Post by DCish on Sept 2, 2014 9:20:28 GMT -8
Whew, valuable discovery about that gap. Very curious to see how it performs with that fix. And I may have missed it, but did you insulate the top of the new damper / bell top? That should be a good help too (though less critical, to be sure)
|
|
|
|
Post by satamax on Sept 2, 2014 9:44:55 GMT -8
Yep, DCish is right, you need to insulate the top of the damper of course. Let say 12 inches of glass wool would do! And it would be good to insulate the outside of the plunger tube, so it doesn't heat up the flue gases! I'm eager to see the results next time! Well done! And when it's finished and working well. You will have to go to permies and brag  ! |
|
jrl
Junior Member
Posts: 101
|
Post by jrl on Sept 2, 2014 10:14:12 GMT -8
Yep, DCish is right, you need to insulate the top of the damper of course. Let say 12 inches of glass wool would do! And it would be good to insulate the outside of the plunger tube, so it doesn't heat up the flue gases! I'm eager to see the results next time! Well done! And when it's finished and working well. You will have to go to permies and brag ! I don't go on Permies much. My interests are with stove design, not permaculture. Just a bunch of hippie nonsense, IMO. I like saving money on heating costs, but I don't want to live in a mud hut! |
|
jrl
Junior Member
Posts: 101
|
Post by jrl on Sept 2, 2014 10:17:02 GMT -8
Yep, DCish is right, you need to insulate the top of the damper of course. Let say 12 inches of glass wool would do! And it would be good to insulate the outside of the plunger tube, so it doesn't heat up the flue gases! I'm eager to see the results next time! Well done! And when it's finished and working well. You will have to go to permies and brag ! I did have 2 inches of Kaowool stuffed up under the damper (stove side) that was forced in place by wire mesh. I haven't insulated above the damper. I could get away with an inch or two above it, but I don't want to restrict the flue/smoke shelf above the damper too much. Plunger was also insulated, but I had to remove the insulation to get the fitment on the flange. I will insulate it again before I'm done. |
|
|
|
Post by satamax on Sept 2, 2014 10:22:44 GMT -8
Do you have much more pipe available?
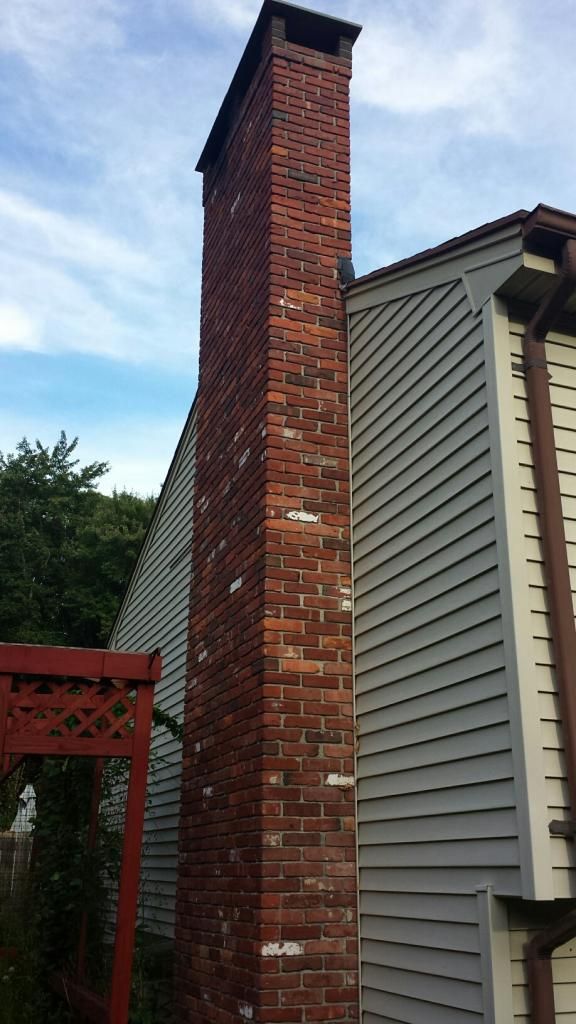
Would you mind taking a pic of the chimney from outside for me?
|
|
jrl
Junior Member
Posts: 101
|
Post by jrl on Sept 2, 2014 11:54:59 GMT -8
Do you have much more pipe available? Would you mind taking a pic of the chimney from outside for me? No, I don't have any more stove pipe laying around, I would have to purchase. Yes, I can take a picture of the chimney. |
|
|
|
Post by satamax on Sept 2, 2014 12:54:32 GMT -8
I was thinking that you could do a second bell in the chimney. With another plunger tube going in the oposite corner to the frst one. A piece of sheet metal on top of the chimney, with a hole. the plunger tube going nearly to the damper. All of this held by few screws in the massonry on top. Even if it's not perfect, and you loose some heat to the outside world. It still woudl be a gain, as otherwise, this heat would go to waste, direct to the outside air. That could raise your first bell's temp a smidge. Since it would insulate It. Only prob is ISA. If you have too much, it could be a problem! If you can find a piece of 150mm hvac galvanised pipe, long enough in a skip, it could be well near free energy May be worth the try! |
|
jrl
Junior Member
Posts: 101
|
Post by jrl on Sept 3, 2014 5:02:33 GMT -8
Here is the chimney. This fireplace is on the second floor. Like I'd mentioned before, inside this brick chimney are 3 separate flues. Two of them go down to the 1st floor, one for the oil furnace and one for the 1st floor fireplace. The 3rd goes to the fireplace on the second floor. Each flue is constructed of clay flue tiles mortared into place. There are cement/mortar smoke shelves angled above each fireplace that connect to the clay flue tiles. The cap on the top is basically a stone slab, maybe slate, suspended by brick in the 4 corners.
 |
|


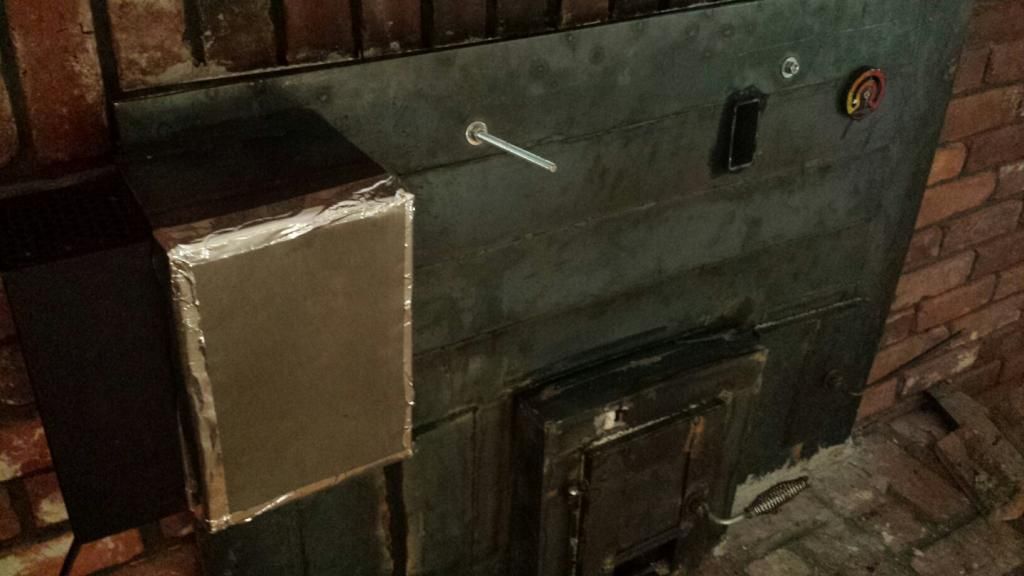


 ) Also, I put a bolt through the new damper and big washer over a bracket that is part of the cast iron damper frame. This keeps the damper firmly shut. I put some direct vent sealant around the edges of the damper. I don't know if the sealant will hold up to the heat, but it made me feel better to get air tight anyway.
 !
! 