|
|
Post by satamax on Jul 15, 2014 9:58:25 GMT -8
How far from the bottom is your plunger? Still about 8 inches?
Radek, iirc, said he heated the whole house with two loads a day. About 11kg.
Bring your front plate closer, about 1.5 to 2 inches, if you want the convection to happen without too much turbulence. Less than 3cm and you have laminar flow slowing the things too much. And more than 5cm and the laminar flow creates turbulence.
|
|
jrl
Junior Member

Posts: 101 
|
Post by jrl on Jul 15, 2014 10:40:39 GMT -8
How far from the bottom is your plunger? Still about 8 inches? Radek, iirc, said he heated the whole house with two loads a day. About 11kg. Bring your front plate closer, about 1.5 to 2 inches, if you want the convection to happen without too much turbulence. Less than 3cm and you have laminar flow slowing the things too much. And more than 5cm and the laminar flow creates turbulence. Plunger tube has a 90 elbow on the bottom. Top of opening is about 9 inches, bottom is 4 inches, it's a 5 inch diameter stove pipe. I haven't dropped it any lower yet, but worth a try. What do you mean by bringing the front plate closer, 1.5-2 inches? Are your referring to the theoretical second steel facing to create a convection panel? What post are you referring to with Radek? |
|
|
|
Post by satamax on Jul 15, 2014 12:04:52 GMT -8
Yes, about the theoretical front plate.
I don't understand why you insist using that elbow, it's not needed. Make a little sleeve around your five inch pipe, and bring it down 4 to 3 inches from the floor. As i said, you could go even lower, 3.75cm, but that may be looking for trouble. It all depends on how hot are your exhaust gases.
Radek's post, i think this is the one. Mind you the bell is huge compared to yours.
What's your final isa now?
|
|
jrl
Junior Member
Posts: 101
|
Post by jrl on Jul 16, 2014 5:57:14 GMT -8
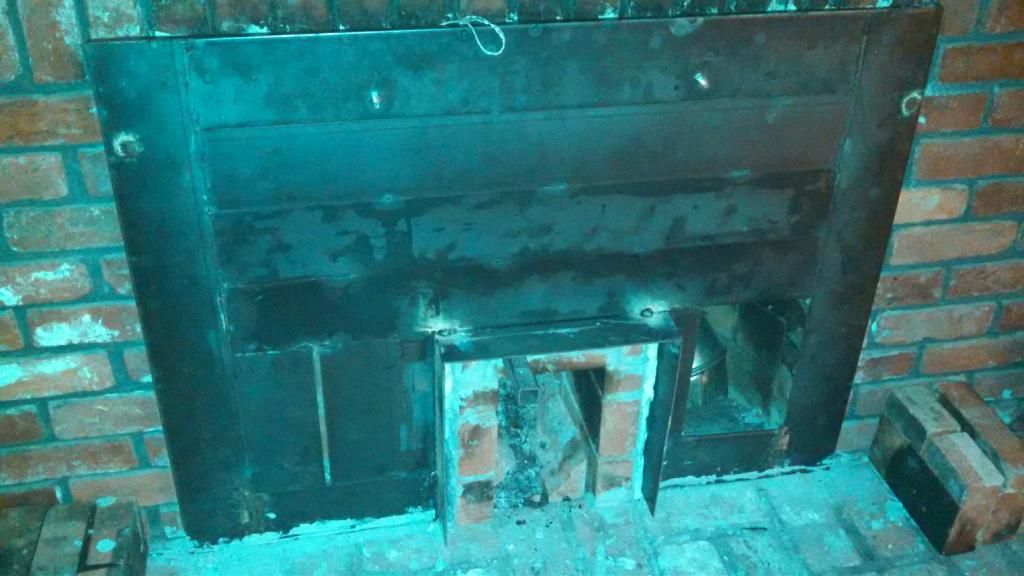
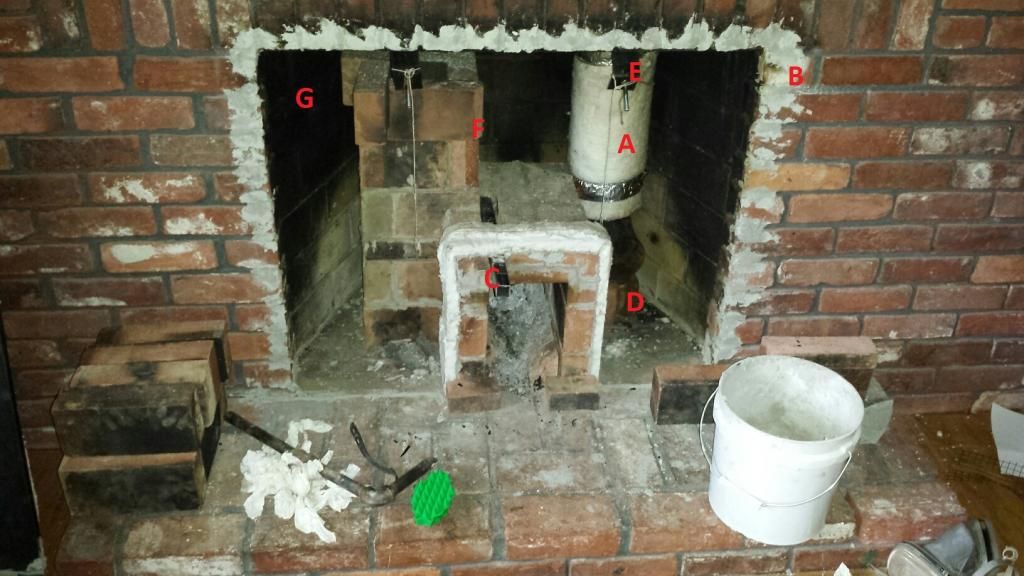 A. Insulated Plunger Tube. There is wire twisted around insulation. Foil tape was temporary. B. Some refractory cement to fill gaps between bricks along the edge. Another parging is needed. Steel facing has insulation around the edge that compresses firmly to the brick. C. P-Channel made of 1" ID square steel tubing. Drops down and fits nicely before the port to the riser. D. Infamous 5" elbow propped up by two bricks holding the plunger tube from falling out of the opening in the damper. Cast iron damper plate is slid to one side providing a 5" square opening that just fits this plunger tube. Replacement damper plate/flange to suspend plunger tube is not yet built. E. Welded steel lintel brackets to pull the steel facing against the brick with a bolt/nut. The strings are there to manipulate the bracket while lining up the bolts with the holes in the steel facing. F. Last level of brick for the riser is not yet cut and mortared. I haven't really seen much of a performance difference between an 18", 22", or 26" riser in this setup. The draft from the chimney seems to make the height of ther riser somewhat irrelevant. G. Black soot on walls from previous owner's years of using the fireplace, not from my burns with this thing. |
|
|
|
Post by satamax on Jul 16, 2014 9:03:54 GMT -8
|
|
jrl
Junior Member
Posts: 101
|
Post by jrl on Jul 17, 2014 5:20:37 GMT -8
An alarming fact presented itself last night. I originally thought that the backdrafting was just due to some pressure issues in my house that day. I see now that the backdrafting is due to the overpressure during startup. This confirms some of my original fears about this design. Smoke leaks out of every little crack in the brick and mortar and anything not air-tight in the steel during the first few minutes of startup. Once the system heats up or smoke gets to the chimney or whatever, the system retains negative pressure throughout the burn.
This slight overpressure during startup means that:
A. Everything about the system has to be completely air tight.
OR
B. A bypass damper is needed to let the chimney heat up before engaging the downdraft/bell system.
Anyone see any other options besides A and B above?
I went with a steel facing design that functions much like every fireplace cover. A padded metal front, clamped to the lintel with brackets pulling the facing against the brick surface. The steel facing half-laps the brick by a few inches. This design is garbage for keeping things airtight, but makes it easier to remove and requries less permenent changes to the fireplace. Well, lesson learned there, it won't work for a bell design.
So my next design is to use 2" angle iron and form a steel frame on the inside edge of the fireplace brick. Basically mortar an angle iron frame into place just inside the lip of the fireplace. Then, a gasketed steel facing can be bolted to the angle iron frame. Some decent stove gasket should keep it all air tight. You gain the benefit of gasketing against smooth steel surface as opposed to uneven masonry. Once it's completely air-tight it shouldn't backdraft because it's not going to come back out the primary air intake, or even the secondary. |
|
dabay
New Member
Posts: 3
|
Post by dabay on Jul 17, 2014 6:37:31 GMT -8
Hi, may i ask one question too?
why a rocket stove regularly using a "J" shape instead on "I" shape?
isn't it will eliminate the downdraft from the chimney?
|
|
|
|
Post by peterberg on Jul 17, 2014 6:42:48 GMT -8
Your conclusion is right, during startup there's an ever so slightly overpressure which turns into an underpressure within a couple of seconds to minutes, depending on the initial stack draw. From that moment on during the entire run this underpressure will stay intact.
I'd think the temperature difference between the inside of the chimney and the outside air is missing here. I'd presume you're in the Northern hemisphere so it's summer now. When it's hot outside the chimney won't draw at first, until it's warmed up a little bit.
In winter, the stack draw is much stronger so you won't see any overpressure because it's over in seconds.
|
|
jrl
Junior Member
Posts: 101
|
Post by jrl on Jul 17, 2014 7:03:52 GMT -8
Your conclusion is right, during startup there's an ever so slightly overpressure which turns into an underpressure within a couple of seconds to minutes, depending on the initial stack draw. From that moment on during the entire run this overpressure will stay intact. I'd think the temperature difference between the inside of the chimney and the outside air is missing here. I'd presume you're in the Northern hemisphere so it's summer now. When it's hot outside the chimney won't draw at first, until it's warmed up a little bit. In winter, the stack draw is much stronger so you won't see any overpressure because it's over in seconds. So the issue may simply be resolved by cold weather. That would be good. If smoke can escape through all these tiny cracks in the system, then during the burn when there is negative pressure, cooler air from the liviing space is coming in through those same cracks and cooling the chamber, reducing draft, etc. I wonder how much of an ill effect that has on the system currently. |
|
|
|
Post by satamax on Jul 20, 2014 6:59:44 GMT -8
Any progress?  |
|
jrl
Junior Member
Posts: 101
|
Post by jrl on Jul 21, 2014 6:40:41 GMT -8
Any progress? Nothing of interest. I've been knocking out welds here and there replacing the steel sheet metal facing with 1/8" steel flat. There's a lot of seems to weld. Also working on fitment of the steel facing to the fireplace with some 1" gasket. |
|
|
|
|
|
Post by satamax on Jul 22, 2014 9:27:53 GMT -8
Purfect! I've seen that you have lowered the elbow with another one! Acces door is nice too.
If i may say, find yourself some T shaped rolled steel, or angle iron, to make fins at the back, for added ISA on the metal plate, so it sheds out more heat, and also for stability. I'm affraid that your iron might expand and push things about!
|
|
jrl
Junior Member
Posts: 101
|
Post by jrl on Jul 22, 2014 10:06:35 GMT -8
Purfect! I've seen that you have lowered the elbow with another one! Acces door is nice too. If i may say, find yourself some T shaped rolled steel, or angle iron, to make fins at the back, for added ISA on the metal plate, so it sheds out more heat, and also for stability. I'm affraid that your iron might expand and push things about! Yeah, I'm not sure what's going to happen with all those seems on edge-to-edge welded steel flat. It's 1/8" x 4" mild steel. There shouldn't be enough expansion/contraction to actually bust a weld loose, but the whole thing might skew and twist a bit as it warms up. The fins on the back would definitely help keep it from twisting too much. I have some 1/8" x 2" steel flat that would be perferct for that. |
|
jrl
Junior Member
Posts: 101
|
Post by jrl on Jul 23, 2014 11:54:40 GMT -8
Access door fabricated.... 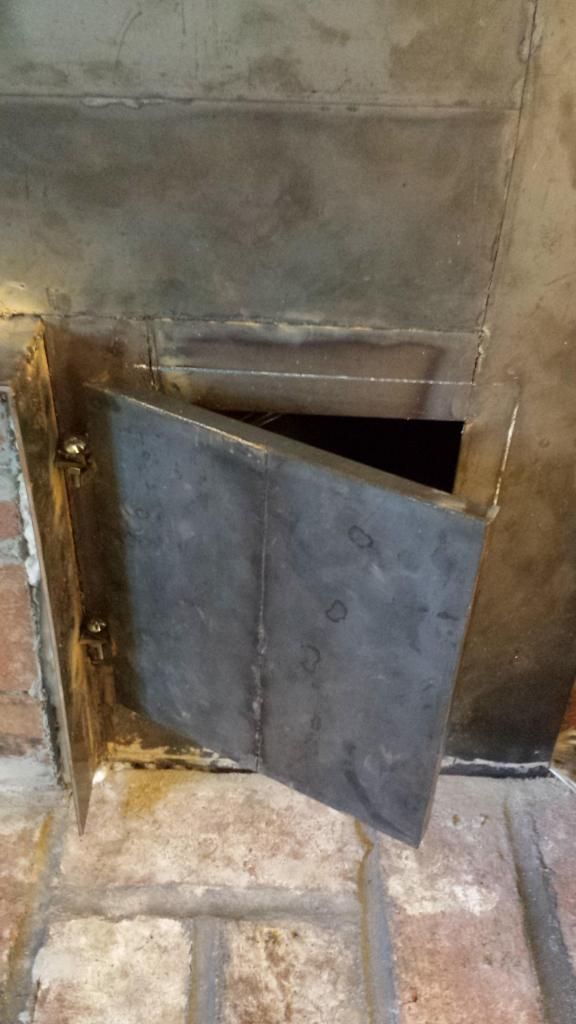 |
|