wibo
New Member

Posts: 26 
|
Post by wibo on Feb 23, 2014 14:31:25 GMT -8
Hello all,
This is my first post after reading lots of information om this forum. A big thanks to all posting their experiments and findings, allowing others an easy source of valuble information.
Short intro about me; I live in the netherlands and work for a Company producing luxourious yacht interiors. (Engineering).
Plan is to create a small efficiënt wood stove for my shed, now heated by an oil heater (Zibro) First starting with a J-type stove that may be expanded with a bit of mass later. System size 4" / 100mm
Cast core, 50/50 Perlite/refractory concrete
Riser, 80/20 Perlite/refractory concrete
Barrel & manifold made from a former LPG-tank, dia 12,5", length 39"
I'll keep updating this thread with pictures and other information as the project progresses.
Pics of building the mold for the core will follow as soon as i figure out how to post them here.
That's it for now.
Regards
|
|
|
|
Post by Robert on Feb 23, 2014 14:54:19 GMT -8
I'll keep updating this thread with pictures and other information as the project progresses. Pics of building the mold for the core will follow as soon as i figure out how to post them here. That's it for now. Regards Hello wibo. welcome on a board. Yes please do update with pics... I am interested how will the refractory concrete/perlite mix will work. regarding the picture it seems like we have exceded the limit here on a forum, so you will need to place them on some photo sharing site (like Photobucket) and send links here (if you learn how to do it we can see them in the thread right away). Good luck with your project:) Ps. Being a Netherlander you must have heard about Peter van den Berg and his development on a J-tube? Would be nice if you would implement his invention. |
|
wibo
New Member
Posts: 26
|
Post by wibo on Feb 24, 2014 4:08:54 GMT -8
Good luck with your project:) Ps. Being a Netherlander you must have heard about Peter van den Berg and his development on a J-tube? Would be nice if you would implement his invention. Read about his work on this forum. And the shape of the core is roughly based on his results indeed. Peters work also gave me enough confidence to go for a 4" version. (His is working..) Using a metal container to build the stove in, is borrowed from a person that calls himself "Zerofossilfuel" This should lead to a stove that can be used "stand alone" to start with. And if all works as expected i'll start adding some mass to make sure my shed doesn't freeze in winter. (not that we had any winter this year..) So the promised pictures: 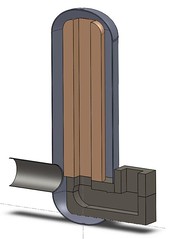 Concept Rocket Stove Concept Rocket Stove by Wicherd Knetemann, on Flickr Not a fully finished model, but it shows where I'm heading 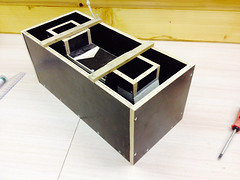 image image by Wicherd Knetemann, on Flickr The mold for the core. I choose to create the core in one piece. (burn out the mold inner parts) It will be interesting to see how the material will hold up in the curing process. We'll know more in a couple of days. After that a seperate feed tube (full refractory for more strength/ durability) and riser will be added. Cheers. |
|
|
|
Post by Robert on Feb 24, 2014 7:11:31 GMT -8
super nice... is a rendering made in sketchup?
also i do not see a secondary air inlet in your model... from what i understood (from Peters explanation)a tripwire itself (without a p-channel) doesnt make a big difference.
i am so much interested in a perlite/refractory concrete mixture. has anyne tried it before here folks?
|
|
|
|
Post by doggy1969bc on Feb 24, 2014 14:33:20 GMT -8
make sure you can clean it 4"/10cm is small to fit your hand in !
|
|
|
|
Post by Donkey on Feb 24, 2014 19:48:14 GMT -8
Yep, and the main area you will need to clean (as well as the firebox itself) will be at the bottom of the "barrel", the manifold area, where heat re-gathers to go into the pipe. Also, the manifold area as drawn may be too small. Check out this thread for manifold sizing information. |
|
wibo
New Member
Posts: 26
|
Post by wibo on Feb 24, 2014 20:20:06 GMT -8
robert; the model was just made to check if the burnchamber & heat riser would fit in the tank. (Solidworks) a p-channel will be included in reality. Some observations after pouring the concrete mix: - this stuff is very abbrasive, gloves are a must to save your hands/skin - dry mixing concrete and Perlite first, than adding waters seems to work fine - About 6 liters Perlite + 6 liters concrete + 2,5 liters water resulted in about 8 liters of mix, interesting... - i was advised to use little water. The mix was really dry and crumbly after mixing. After shaking the mold with mix, it got really wet on top. Almost as if all the water was pushed out to the top... Really curious now about the final result. - making pictures wile working with concrete is not an option. I added a pic of the filled mold to the set. (Click above images to view the complete set) Concrete used: Calde cast f50 Next job: the heat riser.. For cleaning i figured a vacum cleaner would get were my hands cant..
|
|
wibo
New Member
Posts: 26
|
Post by wibo on Feb 24, 2014 20:36:42 GMT -8
Yep, and the main area you will need to clean (as well as the firebox itself) will be at the bottom of the "barrel", the manifold area, where heat re-gathers to go into the pipe. Also, the manifold area as drawn may be too small. Check out this thread for manifold sizing information. Thanks for the advice and link. Barrel will be made to open for cleaning. As for the manifold; it has the same 2" clearence as the top of the heat riser. Still looking for a large to small diameter pipe fitting to increase flow in that part though. |
|
wibo
New Member
Posts: 26
|
Post by wibo on Feb 27, 2014 0:43:30 GMT -8
Burn tunnel ready and burned the mold out of the core: Lessons learned: Next pour will be with two halves. Plenty of airbubbles got shaked up to the bottom of the tunnel, but never made it up and out from there: 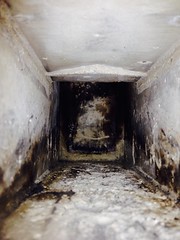 Looking from riser-side to feed-side; The black area is where the mold was still sort of intact after the fire (2 small loads) was out. Next step is casting the riser. I now have a riser planned that's just over twice the lenth of the burn tunnel. Any advice on riser length? Maybe Peter can inform me of the length of his riser in relation to the burn tunnel? |
|
|
|
Post by peterberg on Feb 27, 2014 3:49:45 GMT -8
Wibo,
I do prefer a slightly different method to size the lengths of the individual parts. Lengths are measured in the heart of the feed, tunnel and riser. The feed is from top to heart of tunnel, tunnel from heart feed to heart riser, riser from heart tunnel to top.
The proportions would be 1, 2 and 4 respectively. In a 4" system I would use a slightly longer riser so that boils down to a ratio of 1, 2 and 5 at least. The tunnel is usually the dictating factor so you have to use that as the starting point.
|
|
wibo
New Member
Posts: 26
|
Post by wibo on Feb 27, 2014 5:36:07 GMT -8
I do prefer a slightly different method to size the lengths of the individual parts. Lengths are measured in the heart of the feed, tunnel and riser. That's a method of sizing that makes sense to me  . Thanks for the info! I'll definately go with a 5+ length riser. I should have asked this in my previous post; Is there a preference for either a round or square inner riser? I've been looking at several posts here now, but not came across anything conclusive that answers that question. |
|
|
|
Post by peterberg on Feb 27, 2014 11:00:18 GMT -8
Is there a preference for either a round or square inner riser? No preference. However, please don't make the mistake to use the same cross section area when transferring from square to round or the other way around. When using the same c.s.a., there is a certain overlap at the corners of the square which in effect is a restriction. To illustrate this, I've drawn a circle and a square of the same c.s.a. and fitted these over each other. Both the square and circle are restricted, the red part is the resulting stream opening. Moreover, a round stream profile is much more efficient and to compensate for that the sides of the square should be the same measurement as the diameter of the circle. (not drawn here) Hope this makes sense.  Edit: I've done a rough calculation and found the opening is made smaller by as much as 15%. |
|
wibo
New Member
Posts: 26
|
Post by wibo on Feb 27, 2014 13:04:17 GMT -8
You're making perfect sense, Peter. I was considering something as in the image below. Going from a square opening to the system diameter in about 15 cm height. The heat riser will be made by casting a couple of rings. so I can stack them to the desired height. Burn tunnel is about 9 1/2" (244mm) length. With the parts I now have, I can go to a max riser length of just over 3,5x the burn tunnel length. ( 1, 2, 7+) Using rings will also allow me to experiment with different Riser heights by just adding or removing one or more rings. Time to start making a couple more molds... 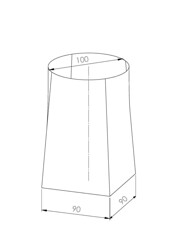 |
|
wibo
New Member
Posts: 26
|
Post by wibo on Mar 2, 2014 11:06:24 GMT -8
Some progress; The circular molds are made using plywood and PET-G sheets. (polyester). Using a thicker saw-blade than the sheet thickness, results in molds that are (very) slightly tapered, so the finished result should be released a bit more easy frome the mold. First cutting the concentric rings: 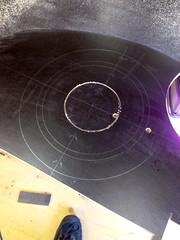 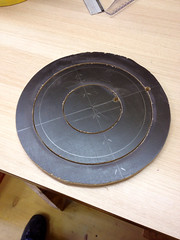 Fixing the PET-G sheets: 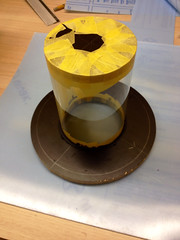 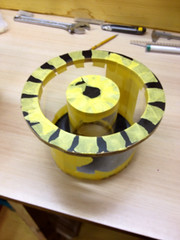 (don't worry, it's my photography skills, not your eyes for that last image. ;-) ) And here is the square to round mold for the riser: 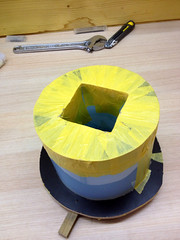 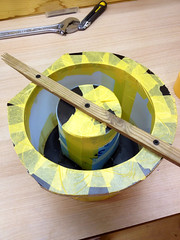 |
|
wibo
New Member
Posts: 26
|
Post by wibo on Mar 4, 2014 0:16:47 GMT -8
Here's the result: 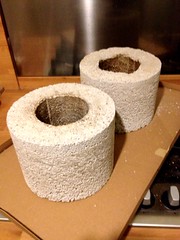 I've used about a 1 to 5 ratio of refractory concrete to perlite. Noticed in the transparend mold that the mix did not really react to vibrating, so decided to compact it by means of gently bashing it in.. That's why there is a difference in density from top to bottom. The following rings will be compacted more evenly. After the letting the parts cure in a sealed plastic bag for 24 hours, I took them out of the molds and put a fire through them. Rockety, but not spectacular. To much water in the parts to let the riser get to temperature. Ended the evening with putting both parts in the oven for about an hour (130 C) They came out nice and dry. More casting and playing with fire in the coming days.. |
|


 .
.