|
|
Post by briank on Jan 23, 2018 19:56:04 GMT -8
|
|
|
|
Post by briank on Jan 21, 2018 20:00:40 GMT -8
Beautiful! For us less artistic types, is there a halfway decent aftermarket stove door that can serve as a door or a bell/bench cleanout? Vogelzang's higher grade of barrel stove door isn't bad. I think it needs a better clamp on the handle, Here is a hackable handle that might serve. Also could use improved gasketing, but youse guys know how to make that happen. I'd prolly weld up the extra air inlet, or close it on a gasket, and add a properly sized primary air inlet. Maybe leave it alone and include it in the primary air calculations? Vogelzang used to sell a cheap stamped steel barrel stove door that was absolute crap, when I've messed with it. As bad as the old Sotz (a.k.a. Soots) stoves. Yeah, I had one. Admit it, so did some of you. But even this, with a better gasket, might make a fine bell cleanout, No? None of these compare with your nice artistry, but for us that probably won't match such craftsmanship, this kit might be an alternative to a leaky home-made door. Any other/better suppliers? These folks sell a nice stainless steel version of the barrel stove kit: tennesseebarrelstoves.com/product/base-camp-stove-kit/ |
|
|
|
Post by briank on Jan 21, 2018 19:46:32 GMT -8
One of these days when finances permit I’m going to import a pallet of these doors, which look easy to mount on a sheet metal frame around the BBR: m.alibaba.com/product/60254326372/Cast-iron-wood-stove-door.html?spm=a2706.7843667.1998817009.8.d04A5N#module-big-image-0In the meantime, I’m searching for older Vogelzang Frontiersman wood stoves and just using their frame and firebox door with glass. So far I’ve found three on Craigslist. I picked up the first two for $45 each, and the third for $150 last week. But it came with 10’ of class A stainless steel chimney including a complete through the roof assembly, and I sold that tonight on Craigslist for $125. So for a net investment of $115 I’ve gotten 3 full wood stoves to modify - or $38 each total. |
|
|
|
Post by briank on Jan 21, 2018 18:47:58 GMT -8
It seems rather important to be able to shut off primary and secondary air after the burn. People I've built stoves for including myself notice a huge difference between leaving the dampers open over night and closing them. Ok, thanks Joseph. I can retrofit Damper controls on these fairly easily. It’s something I might need to help Alex with next time I’m there too. If nothing else, I have magnetic strips/sheets I could place over them. |
|
|
|
Post by briank on Jan 21, 2018 18:25:51 GMT -8
Finish the firebox, the double shoe box riser (DSR), build the benches using reclaimed old 18”x9”x4.5” firebrick and 2’x2’ cement sidewalk pavers, figure out how to integrate this Conservo Toledo Cooker as a white oven, cap the rocket primary bell with a 14g square 24”x24”x 14” sheet metal box maintaining enough breathing space between the DSR and the cap, and apply a blast gate as a bypass damper on the bottom rear of the 24”x24” metal box cap... 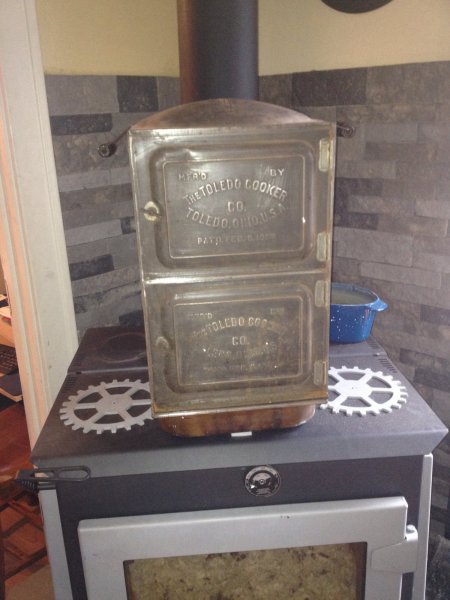  |
|
|
|
Post by briank on Jan 21, 2018 11:50:29 GMT -8
Today I started modifying a Vogelzang Frontiersman wood stove I found on Craigslist for $45. I simply used a Harbor Freight 7” angle grinder ($45 with coupon) and Metabo cutting disks to modify it. First I removed all the firebricks lining the wood stove and cut out the top, then the angle iron on the insides of the left, right and rear wood stove walls that previously held the firebricks in place. I’m left with an empty 21” wide x 17.5” deep by 15” tall rectangular steel box that I can use to hold my 6” or 8” rocket core. This took less than an hour of light work yesterday afternoon. In this build, I’m going to use a 6” BBR core oriented from left to right, with the firebox door being part of the right hand wall of the firebox. Port will be in the ceiling of the firebox on the far right, with a double shoebox riser directly above the firebox. A 24”x24”x14” deep square metal box will sit directly over the wood stove with double shoe box firebox and riser, and that will sit between 2 masonry benches on my family room fireplace hearth. But I just wanted to show how easy and cheap it can be to use old plate steel wood stoves like the Frontiersman to solve the issue of how to “build and mount” a firebox door with glass window. I’m using one of my 6” shippable cores (with minor modifications) to build this firebox and double shoebox riser configuration, and I’ll add pictures as that takes shape. The primary air holes already in the firebox door will be modified for primary air. The holes under the door in the wood stove frame will be modified and used to introduce the secondary air through the recess in the 1” ceramic fiber board under the firebrick split floor of the firebox. (The two current air holes currently seen in the rear wall of the wood stove will be sealed off by the left side wall of the firebox.)         |
|
|
|
Post by briank on Jan 8, 2018 9:23:13 GMT -8
|
|
|
|
Post by briank on Jan 5, 2018 16:54:51 GMT -8
I think in the end the best cheapest and simplest use of geopolymers is going to be as a coating, a simple cheap diy formula so that anyone can build and mortar in place a red brick firebox and riser, them coat them with successvive coats of geopolymers. Cement paving squares could even be used on top of fireboxes and primary bells, but with multiple coats applied so they are harder, insulative, and resistant to heat in general.
Red bricks are cheap (often free) and universally available. If not then adobe bricks are.
Building a rocket core out of red bricks or adobe, then just painting layers of geopolymer over surfaces exposed to fire and extreme heat, makes presses and molds and possibly even oven heating unnecessary.
If such a coating could be developed and perfected, it could then be made available to diy builders.
|
|
|
|
Post by briank on Jan 4, 2018 16:48:47 GMT -8
Instructions: The kit is between 60 and 70lbs, and comes in one 24"x16"x16" heavy duty cardboard box. If its too heavy to manage, you can just open it up where UPS left it and carry the pieces individually. The heaviest pieces are the two 21"x9" pieces of 2600HS IFB, but they're only about 12lbs a piece. Handle everything with care as both IFB and ceramic fiber board are relatively easy to break. If you signified which rocket configuration you desired at time of purchase, left or right sidewinder or rear port, the Venturi port will already be cut in the firebox walls. If not, pre-set the parts of the firebox walls, figure out where you'll be placing the port, then follow Peter van den Berg's instructions for a 6" rocket heater at batchrocket.eu/en/building#dimension to cut the port in the IFB firebox walls. IFB can be drilled easily for pilot holes for the port and cut easily with a hacksaw, other hand saw, band saw or jig saw. The parts go together pretty easily like a sheet cake on the bottom. First, one piece of 21" long sheet metal with a 1" lip at the sides and 3" at the rear. Next, 1" ceramic fiber board with the cut out up the middle for a secondary air channel is set flat inside the sheet metal, using the lips as a guide. Then assemble the stainless steel flange to the second, 20.5" piece of sheet metal using the mounting holes provided. Place this metal sheet directly on top of the 1" ceramic fiber board, with 1/2" space to the front edge of the 1" ceramic fiber board. This metal sheet has upward facing 1" lips on the sides, no rear lip, and an upward facing 3 1/4" lip as a sill in the front. Assemble the round stainless steel tube flush in the flange, and tighten the 2.5mm Allan wrench set screw. Next walls are assembled. Using 3000 degree refractory mortar (supplied) put a thin coat on the bottom edge and left and right edges of the 13.5"x9" IFB rear wall, and place it firmly with a 9" side facing down, centered against the rear lip of the sheet metal, with a 2.5" space on the left and the right side for the side walls. Left and right walls are next. Put mortar on the bottom of the 21"x9" pieces of IFB and firmly set them in place on the left and right sides, using the left, right and rear lips of the sheet metal as a guide. Now do the same with the two 21"x4.5" pieces of IFB,making sure they contact the rear walls. GENTLY tap all the walls together and downward (a rubber matter helps) to seat them firmly in place. If you signified which configuration, left or right sidewinder or rear port as well as horizontal or vertical riser orientation (only with sidewinders), the 6" exhaust hole will already be cut in the ceramic fiber board for the expansion chamber/riser. If not, set up the expansion chamber/riser first, figure out where you want to place your 6" exhaust hole, make a pilot hole with a drill bit, and cut it out with a hack saw blade, drywall saw or jig saw. Next take the ceramic cement (supplied) and apply to the top edges of the left, right, and rear firebox walls. Place the 20.5"x14" piece of 2" which ceramic board firmly on top of the firewalls. Place some weight centered over the rear, left and right walls of the firebox (a line of firebrick or two stacked red bricks should be sufficient) and let it all set up for at least 12 hours. Next set the four 2" expansion chamber walls upright in a 14"x16.5" rectangle. Apply the ceramic cement to the opposing surfaces of the walls and press firmly together, then apply ceramic cement to the top of the 4 walls and firmly press the 14"x16'.5" piece if 1" ceramic fiber board on top of the ceramic fiber rectangle walls. Place some weight (a line of firebrick or two stacked red bricks should be sufficient) centered over the 4 walls and let it set up for at least 12 hours. After the firebox and the expansion chamber/riser have been allowed to set, place the expansion chamber in the left or right sidewinder horizontal or vertical orientation, or vertical orientation for the rear port configuration. Apply ceramic cement to the surfaces which will contact the firebox, then press them together firmly, using weight to hold them in position while they set for another 12 hours. Be very careful in removing the weights before building the remainder of the rocket heater so as not to cause them to separate. Ceramic cement will be supplied in a ziplock bag approximately the consistency of runny peanut butter or thick pancake batter, and will be applied with a cake icing bag and nozzle (supplied.) Refractory mortar will also be supplied in a ziplock bag and can be applied with a small trowel (or a big kitchen spatula, as long as your spouse never finds out ;-) (I just typed up instructions from the top of my head, and don't have photos to illustrate them yet, so please let me know if they're not clear.) |
|
|
|
Post by briank on Jan 1, 2018 12:34:24 GMT -8
|
|
|
|
Post by briank on Jan 1, 2018 11:51:37 GMT -8
Just an FYI, the samples above are only about 4 cubic inches. It will take some techniques and a fair amount of expense to get a full sized stove core. Ok, thanks for being honest. I think some folks are under the false impression that this method is 1) ready for real world application and 2) would be cheaper than purchasing existing commercially available refractory products. |
|
|
|
Post by briank on Jan 1, 2018 8:52:35 GMT -8
Here is a proven recipe that I came up with over the summer. It has only been used to make samples, but those samples have been placed in the burn chamber of my J-tube and have proven durable. There are an infinite number of combinations that will work based on the vast number of ingredients and the ratios that can be tried. After doing many many batches, and monitoring which products yielded what characteristics, these products and ratios produced an excellent result. It may seem overly complex, and it is all store bought because I want it to be repeatable in the future and home dug clay will vary too much to my taste. The clay products were purchased from theceramicshop.com, the KOH from some ebay vendor, and the concrete aggregate vermiculite (agricultural vermiculite will most definitely not work), from a local construction materials supply house. The vermiculite is added to reduce weight as its volume is quite high per gram when compared to the clays. H20 120g KOH 25g Kaolin 40g Glomax 40g Petalite 15g Wollastonite 15g vermiculite 30g The H20 and KOH are mixed until completely in solution ( time will vary with heat, but can be done at room temp with patience). The dry ingredients are all mixed thoroughly together. Using a plastic paddle mixer in a drill at low speed, the liquid is slowly added to the dry ingredients until fully blended. It should yield a thick paste about like peanut butter (hope no one is allergic:joking). Press into a mold. I use my shop press, and a small amount of liquid is likely to come out, but only a couple of table spoons if all is well. It is allowed to air dry until it feels hard to the touch. For this size it took two days. It is then put into the kitchen oven at the lowest setting (+- 250F) for four hours. After allowing it to cool it was again put in the oven at 450F for four hours. At this point it is relatively stable, you can get it wet and it sheds water. But one sample was left in this condition and after several months in our humid Alabama weather it had some efflorescence, the next step will fix that. I put the other sample into my J-tube at the floor of the riser and ran a one hour fire. Multiple firings have not produced cracking or damage of any kind. In lieu of firing in the stove I found that curing the surface with a map gas torch until the surface shines red will also stop any efflorescence. I hope this will help those wishing to try geopolymers. In stead of heating in the oven, short, low temp firings of the stove itself should produce the same results. What I was trying to do is drive off any unreacted water from the material as slowly as practical because any of it turning to steam in any quantity inside the sample will make it pop and usually crack. ... These ratios were approximately what were in one of the samples of Davidovitz's patent. Excellent, thank you! This is a recipe describing exact amounts and techniques that can be easily followed (and its no longer just "on the horizon" ;-). It deserves its own, new thread. Possible sources for these materials Could/should be mentioned. Someone needs to try this for a full batch box build ASAP. (Sorry, I have my hands full with other stuff right now.) |
|
|
|
Post by briank on Dec 31, 2017 19:55:04 GMT -8
Maybe the first trial application can be in the firebox ceiling. High thermal stresses with low mechanical stresses, but readily replaceable with forethought in the construction. That will definitely prove the concept, if it holds up long term. At present I’m using 2” ceramic fiber board for the roof of the firebox and other than the health considerations it seems pretty ideal. |
|
|
|
Post by briank on Dec 31, 2017 19:48:48 GMT -8
|
|
|
|
Post by briank on Dec 31, 2017 19:25:28 GMT -8
Maybe the thread is already out there, but if someone can point towards a simple brick-making recipe I will do up a test sample and fire up the tiger torch  I am not at all opposed to geopolymers, which hold incredible promise, and I will happily promote them once a simple brick making recipe and technique that works every time diyers try them under reasonably controlled conditions is developed, but that’s the rub. To my knowledge, one simple, clear, concise and straightforward recipe, including specific materials, exact amounts and techniques that work every time the average builder tries it, has yet to be formulated and adequately communicated. Based on recent private communication, I have reason to believe that this is close on the horizon, but we’re just not there yet. It’s being boiled down into something cohesive and succinct from multiple threads and websites, but it’s not “ripe” yet. |
|


