|
|
Post by patamos on Jan 22, 2014 22:01:15 GMT -8
Wrapping up today for a spell of time back home with my family
Still seem to have reached my attachments limit.
Does anyone know how to delete a few high res pics from earlier in the thread?
well being
pat
|
|
|
|
Post by patamos on Jan 22, 2014 9:31:12 GMT -8
A few questions coming to mind:
Are these charged particles bound to the gas flow due entirely to the turbulence in the burn-chamber-riser elbow? And/or are they also picked up via rapid movement around the ash bed? If at all the latter then reshaping down drafts and ash bed layouts could have some effect.
Another idea (that i think was mentioned in an earlier thread), could an appropriate electro static charge not be added to a section of flue pipe?
well being
pat
|
|
|
|
Post by patamos on Jan 21, 2014 22:11:06 GMT -8
Just poured/cast a 6" round heat riser today. I've done about a dozen of these in the past few years using bagged 'molditX'. Usually no trouble. But today i was using a new blend of high temp refractory from a company called Clayburn. YIKES! It started stiffening up within 5 minutes. Big panic session placing tamping and thumping... Fortunately i had everything i needed on hand, including a helping hand when i yelled for help.
Word out here is: be wary if the literature says it is 'gunnable'. Which basically equates with 'fast setting'
well being
pat
|
|
|
|
Post by patamos on Jan 21, 2014 21:52:17 GMT -8
Hi Folks,
Thanks Matt. Yes the clean out is for the ash pit at the base of the downdraft chamber.
Well, after a few days of nose to the grindstone i have pulled a few more pieces together. One of the biggest challenges has been the poor drying conditions. Most days i have 3 power cords coming off a 6000watt generator feeding 3 heaters, a couple of lights, 1/2" drill, and my lil' old makita grinder. When we (3 others on site) run out of gas... things pretty much hit a stand still. I have put the propane flame weeder on fresh cobb to solid it up and keep it warmish during -5c over nights.
All in all, something of a hydrocarbon hypocrisy.
Anyway, most of the cob-paver bell tops are in place now. The flue to bell and bell to chimney transitions are complete
And i have gotten a start on the burn chamber today. I found some fire bricks rated to 3000f to use in the back of the burn chamber, but they quickly reduced 3 of my $40 diamond tip discs to molten metal. Shifted lay up strategy there.
I also had an alarming surprise when the (new product for me) Clayburn castable refractory cement began setting up almost immediately. There I was with 30" of 6+" inside 9" sona tubing to fill. Suz (client) hopped in to help tap things into shape, but it was an ugly time. We'll have to see tomorrow, and I won't be surprised if it is a little patchy here and there.
Note to self and others: when the supplemental literature that comes with the product says it is 'gunnable' that may = very fast setting.
All in all, I must say, this attempt to squeeze everything snug up to a staircase and around a couple of posts has posed some fair challenges. ULtimately i have had to work room-ward from the staircase post, but still try to keep it all tight so the bench doesn't turn into a kingsize spread. Looks like it will fly alright in the end. It will just end up being a sort of love seat, which is fine with the clients.
We're all on the look out now for an old slab of cast iron for the griddle deck. Might be mild steel in the end.
btw. my attempts to load pics are now being met with a message saying 'this forum has exceeded its attachment size limit'. Is there a cumulative maximum Bytes per thread? Some of the above pics were on the large size...
Guess it is time to learn photobucket anyways
well being
pat
|
|
|
|
Post by patamos on Jan 21, 2014 20:52:54 GMT -8
Cool I think I'll give that a go  |
|
|
|
Post by patamos on Jan 21, 2014 19:27:54 GMT -8
Hi Matt,
So if i place a 6"x9" piece of glass flush to the outside face of a 2" side wall. Would that likely do the trick in keeping things self-soot-cleaning?
By hot air wash do you mean the burn chamber gasses eddying/circulating through that space?
well being
pat
|
|
|
|
Post by patamos on Jan 20, 2014 20:53:46 GMT -8
Cool Y'all
Thanks for the replies.
Radek that is a beautiful heater.
Sounds like one window pane is the safer bet. I found a product in town called 'cermi-glass'. Not sure of its temp rating but will confirm. 'I'll likely set it 3" or more back from the inside surface of the feed/burn tunnel. At first i thought flush with the outside of the fire bricks (with gasket) but maybe further away embedded in a perlite-clay-sodium silicate blend.
I'm casting a beam to span the window opening. Might carve a little arch into it for effect.
well being
pat
|
|
|
|
Post by patamos on Jan 20, 2014 8:55:41 GMT -8
Hi folks,
I'm getting down to building a 6" J-feed and am planning a 5"x10" window placed flush to the exterior surface of the burnchamber wall. edges protected and cushioned with ceramic felt. And i am thinking about placing a second pane with a 1/8" layer of felt separating the two. BUt i am wondering if air pressure issues between the two could cause trouble.
If so, perhaps the outer pane could be set 2"+ away (closer to the exterior of the stove body) with an intentional pin hole to neutralize expansion contraction pressures...
Has anyone had experience with this and has advice to offer?
Any thoughts will be much appreciated
well being
pat
|
|
|
|
Post by patamos on Jan 16, 2014 23:19:35 GMT -8
Thanks Robert, Your positive spirit is contagious Well, after hearing all the bad news about regular portland cement-based concrete and heat... i have opted to 'treat' the underside of my pavers/bench deck with a cob-mesh-cob lay up.  The concrete was rough and porous enough for a good slip bond. I just hope gravity and any difference in behaviour of the cob and concrete under thermal cycling... doesn't cause delamination. Anyone with good or bad experiences on the matter please pipe up at will With temperatures ranging from -5c at night to +5c mid day, drying techniques came to mind... Discarded silviculture seedling trays have herein found yet another application. I think i am bound to write a '101 re-uses of...' book for these things. I moved the little woodstove out today. Prepped the burner deck and am turning my thoughts to that end of things. Some questions coming to mind include: What is the most effective and durable ash pit cleanout that people are relying on? My onsite-builder-friend Dan brought me a 1/4" x 5" threaded pipe cap today. I could see wrapping it in 1/8" ceramic felt once or twice... But man, that thing is gonna wanna move at the bottom of such a high temp downdraft chamber. So, ya, i am very open to alternatives. (b.t.w. to answer Donkey's original question on this thread: The main reason for the downdraft on one side only is due to space restrictions and proximity of wooden post and stairs.) Another question: I'm hoping to place a sheet of glass in the burn chamber. 10" long by 5" tall. I know it will reduce combustion temps, but aesthetic value trumps that. I see casting the outer (room facing) burn-chamber wall as a monolithic post-beam-post. 1.5"x1.5" thick with a dado to the outside so the glass can be slotted in with ceramic gasket. (Wondering about 2 sheets of glass with a gasket spacer?). Then carefully cobbing the outside. Wondering if this is sounding whacked?!?! Any and all feedback is appreciated. Also, as i approach a final decision about how i will build my heat riser... i am leaning again towards casting a 1"thick circular 6" to sit on top of a square 6" burn chamber. Looking to wrap it in ceramic felt then 3" of clay perlite and containing it all in a brick outer box, one side of which serves as the inside wall of the down draft chamber. If i snug the riser forward and round the back corners of the burn chamber i might be able to effect the back sweep and kick tail effects that Peter describes. Might place a full width high temp. firebrick on edge and carve the belly out a bit to effect the kick tail in the middle. For the corners my sense would be to form the curved transitions out of clay, screened perlite, and super 3000 masonry cement (sodium silicate i think). Matthew, do you have a ratios recommendation for this application? Oh and btw, on a logistical note: I have tried sending picture files at different quality and size settings, but haven't figured out how to make them appear larger in the posts. Suggestions please? thanks for all your interests and inputs well being pat |
|
|
|
Post by patamos on Jan 16, 2014 22:01:16 GMT -8
Hi Peter and Robert,
I am approaching a final decision about how i will build my heat riser. Thinking about casting a circular 6" to sit on top of a square 6" burn chamber. If i snug the riser forward and round the back corners of the burn chamber (probably with sodium silicate, perlite and clay) i might be able to effect the back sweep and kick tail effects. Peter, have you had any experiences with this approach from which you have drawn solid conclusions?
well being
pat
|
|
|
|
Post by patamos on Jan 16, 2014 21:31:52 GMT -8
Chatting with a friend the other day about 'intermediate impossibilities' i thought it might be of use to explain the meaning of this term that i used in my first post on this thread. Basically, an intermediate impossibility is a stupid idea that triggers a shift in someone else's train of thought whereby they come up with a good idea. On matters of brainstorming, the eurekas often come after a break in focus. Ridiculous humour (venting steam) is a common catalyst. Case in point - An acquaintance of mine who does contract work for NASA (how's that for name dropping...  was in a mega brainstorming session a while back. A small roomful of powerful minds were at an impasse nutting our something or other. This fellow needed to take a shit but kept holding back so that he didn't miss the crux of the problem solving. Finally, 4 hours and 4 cups of coffee later, he could bear it no longer. Off to the can he ran. And there, during a recess in concentration (so to speak), the answer to the riddle came to him. So, this much to say, as they say, when it comes to brainstorming, the only bad idea is the one we are afraid to mention... The filtering and funnelling can come later... I wonder if the suspended ions settle out any better in slower bell runs than in faster flowing serpentine flues? If so, what shape of bells might be more effective? well being pat |
|
|
|
Post by patamos on Jan 15, 2014 21:44:56 GMT -8
|
|
|
|
Post by patamos on Jan 15, 2014 21:36:50 GMT -8
|
|
|
|
Post by patamos on Jan 15, 2014 21:32:54 GMT -8
Hi Y'all I happened to be reinforcing a bell pier today and therein applying the technique that i wrote about this morning, so thought i'd offer some pics.  First clay slip the surface, then trowel on fairly wet cob with short (1/2" or so) straw fibre. Best way to make it that short is with a top-feed leaf shredder/mulcher that fits over a garbage can. MIght be able to source it in bags or barrels from livestock suppliers. For your application i'd recommend laying on at least 3/4" thick to start. This will distance the mesh from any micro fissures in the cob as it dries  Then spread fiberglass mesh across and rub it in with your palm. Best to rub in one direction so it doesn't wrinkle as it beds in 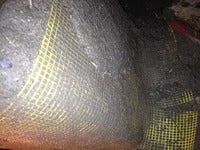 Then apply another layer of cob. For the first mesh layer i'd go with fiberglass cuz it will withstand higher heat than burlap before burning out This may be all the reinforcement you need. But another similar sandwich with burlap on top of that will make it bomber. btw. burlap is way easier to work with as it changes shape and bed in way easier. I have a few longer stories of how i gained faith in this approach... but for now am just wanting to share back into this forum that has been helping me out so much. well being pat  Attachments:

|
|
|
|
Post by patamos on Jan 15, 2014 21:16:22 GMT -8
Well folks, ticking along.
I made fair progress snaking the flue down the end and back towards the bell today. And in so doing fed (yet again) my penchant for utilizing scraps of brick, rock, chunks of concrete etc... All of which i carted over from the island and dropped in their living room, so the de-cluttering felt good.
4 variably swivelled elbows in a row made easy work of the tight spacing.
I had a propane flame weeder on the scene so opted to speed dry the bell faces so i can apply a tight coat of finish plaster sooner than later. I am usually loathe to resort to dyno fuel, but with my heaters, light, drill and cob/mortar mixer already running off a gas generator... the propane seemed an appropriate operation.
I also decided to boost the integrity of my deck support piers by wrapping them in a cob-mesn-cob layup.
Had a nice eureka on a cleanout strategy. pics of that tomorrow.
well being
pat
|
|


 was in a mega brainstorming session a while back. A small roomful of powerful minds were at an impasse nutting our something or other. This fellow needed to take a shit but kept holding back so that he didn't miss the crux of the problem solving. Finally, 4 hours and 4 cups of coffee later, he could bear it no longer. Off to the can he ran. And there, during a recess in concentration (so to speak), the answer to the riddle came to him.

