|
|
Post by briank on Dec 31, 2017 4:45:09 GMT -8
|
|
|
|
Post by briank on Dec 31, 2017 2:43:10 GMT -8
|
|
|
|
Post by briank on Dec 30, 2017 18:11:14 GMT -8
Sorry, damper? Ja Ja. For closing the chimney. Big impact on efficiency to have an airtight closure. Ok yes, that’s exactly what I was originally trying to say so we’re on the same page. (All I could think of for “dumper” were similar gate valves in camping trailer porta potties.  ) |
|
|
|
Post by briank on Dec 30, 2017 15:55:45 GMT -8
Probably Good as a dumper too. Thanks. Dumper? |
|
|
|
Post by briank on Dec 30, 2017 15:00:13 GMT -8
 You can link the photos in the thread there to this forum:  This is excactly what we need to see here as far as photo documentation goes. Thank you! |
|
|
|
Post by briank on Dec 30, 2017 7:53:31 GMT -8
5 batches in an 8" BB? This is an enormous amount of fuel, you should have much higher temps from that much wood in my opinion. Valid point. Hmmm... |
|
|
|
Post by briank on Dec 30, 2017 4:30:23 GMT -8
There’s a big difference between building a new configuration of a rocket heater using proven materials and techniques based on well established principles, and even recommending others do so, versus recommending others build a complete home rocket based on diy refractory materials for which diy techniques and recipes are not well established.
I’m just raising a caution, that’s all. With a recommendation for a DSR configuration of a barrel stove, the worst that could happen is a dirty burning inefficient rocket heater in a barrel. No catastrophic failure could occur due to the use of these materials.
In this thread it’s being proposed to use diy LTGS materials in building a home rocket, instead of well documented and utilized commercial refractory products. There is serious liability in that recommendation should diy LTGS polymers fail and a home burns down due to insufficient explanation and documentation of recipes, technique and precautions.
Peter’s recommendations are based on years of hard work, experimentation with real world designs and established refractory materials, testing with combustion analyzers, etc. Same with Matt’s and others. So there’s a robust body of evidence upon which to base a recommendation to build these units for home use, and should a failure occur, one can point to this robust body of evidence regarding specifically prior real world Rocket Heater builds to justify their recommendation. This robust body of evidence simply doesn’t exist yet regarding LTGS polymers and it would be premature to promote their use in actual diy home builds by newbies and lurkers, to the point that it opens one to serious liability should one fail.
I’ve said my piece here and raised what I feel is a necessary precaution. Carry on.
|
|
|
|
Post by briank on Dec 29, 2017 22:38:43 GMT -8
The NASA has used geopolymers for much higher temperatures many years ago. Keep experimenting and documenting! But just refrain from telling folks to use this technology at its current level of development inside their homes until some proven documentation exists for diy builds for this specific application. Diy home rocket heater builders ain’t NASA engineers. I agree that the potential to develop a low tech, cheap and local solution with this technology is stupendous! I’d have no problem at present recommending back yard or shop builds based on these techniques. However one would be irresponsible at best encouraging a batch box rocket mass heater build inside someone’s home based on the level of development of this diy technology, techniques and specific instructions/recipes developed to date. (I come from a medical background, so the idea of liability even from casual advice is always in the back of my mind, unfortunately.) |
|
|
|
Post by briank on Dec 29, 2017 22:29:11 GMT -8
300 F / 148 C at the top of the bell BENCH temps read: 133, 103, 90 F / 56, 39, 32 C - going from closest to bell to tail of bench The room is really as warm as we would want it, any more would reach sauna status. The walls read 95 F / 35 C floors range from 70-80F, about 21 C Great numbers! I might be biased and I’m no expert and don’t claim to be one, but given those primary bell temps and bench top temps I’d be loathe to recommend any modification of this build in any way whatsoever at this point. I’d consider your 8” masonry rocket mass heater a successful build - including the operation of the bench. The only thing I’d recommend is to complete the skin of the primary tower. |
|
|
|
Post by briank on Dec 29, 2017 17:58:32 GMT -8
I think we still need to see photos of a batch box rocket build as well as long term results for spans (firebox roofs, long sections of risers) of refractory geopolymers and successful overall builds before they can be recommended.
There’s lots of photographic and video evidence of successful batch box rocket builds available online and going back years now, using firebrick and ceramic fiber boards.
I have yet to see such documentation regarding refractory geopolymers. This seems to still be in the early conceptual and strictly experimental stage. One can’t tell people to build these to contain over 2000•F fires in the middle of their living rooms until one can document successful builds and give very specific instructions for the recipes.
People need to understand this is still strictly experimental and untested for any long term batch box rocket builds.
|
|
|
|
Post by briank on Dec 29, 2017 16:14:45 GMT -8
the top of bell reads 245 F the bench 116, 95, 85 F (going along the bench) the floor 77 F, walls 74-80 F range. That’s the best ratio of primary bell temps to bench top temps I’ve seen from your rocket so far. I have to wonder if not using the bypass as Matt recommended forced a slower/calmer stratification of the hot gases in the primary bell and allowed the bench to fill/heat better. |
|
|
|
Post by briank on Dec 29, 2017 16:04:15 GMT -8
I had the image of the spec sheet from batchrocket.eu/en/building#dimension saved in my iPhone and constantly referred to it during the build. All the dimensions are strictly according to Peter’s guidelines for an 8” batch rocket. (I think our riser was 60” while the specs called for 57 11/16”. Firebox is 12” wide, 18” tall, 24” deep, minus the 1 1/4” firebrick splits on the floor and rear wall.) |
|
|
|
Post by briank on Dec 28, 2017 10:20:21 GMT -8
Hi folks, I was visiting my local metal shop today, and I told him I need a cheap 100% effective bypass draft control damper for 6" stove pipe. He recommended I try a blast gate. They're "used to open and close branch ducts in a dust extraction vacuum system allowing air to be diverted only to machines that are operating, thus conserving air volume." Its actually cast aluminum with a sliding galvanized steel blade with a locking screw. Since it will be open on start up, he didn't think the galvanized metal would be a problem with the temps in a rocket heater, and when its closed its completely out of the direct exhaust flow. I can dissemble it and easily replace the blade with heavier gauge stainless if necessary. Its also relatively light and fits inside 6" stove pipe well. A 6" is ~$15. They make various sizes from 2” to 24”. www.blastgateco.com/Blast-Gates.php 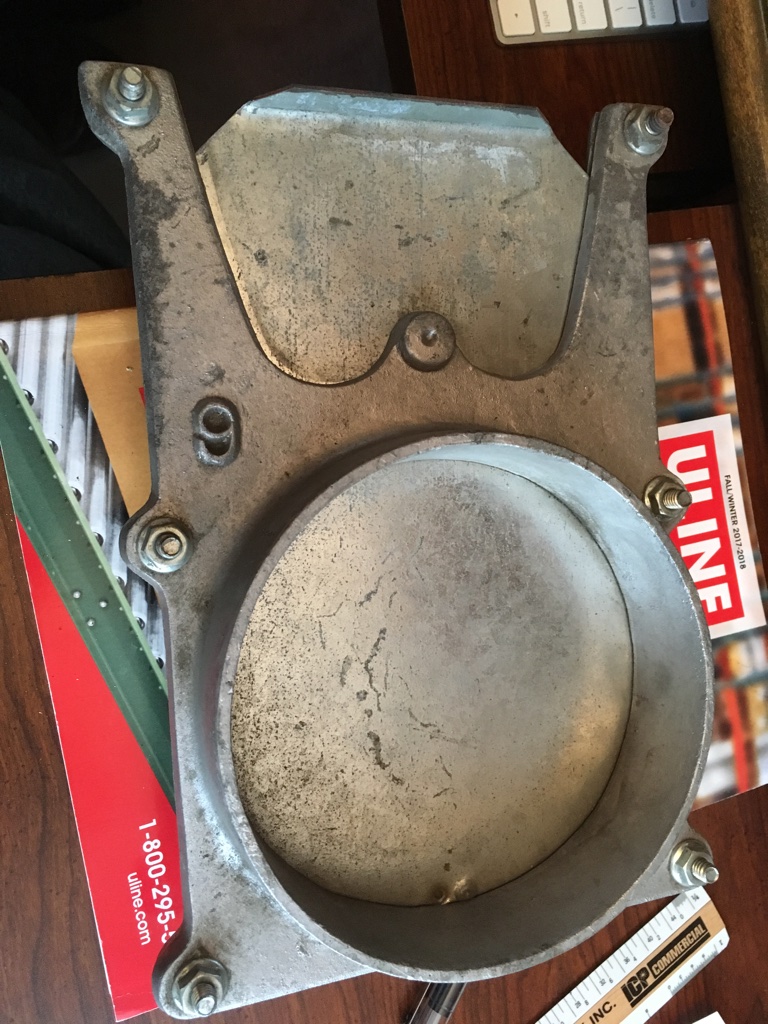 |
|
|
|
Post by briank on Dec 27, 2017 11:31:26 GMT -8
I'm pretty happy with where this shippable core kit ended up as far as a reasonable price. If I had pursued a vacuum formed ceramic fiber shape lined with dense fire brick splits as a core it would have cost $500 to $600 a piece, and I really thought that would have been too much. I can still go that route as another option in the future if there's demand for it.
|
|
|
|
Post by briank on Dec 27, 2017 10:20:41 GMT -8
PRICING: I'll be honest, between the 8 days I spent in NC with the rocket heater builds there and other travel this month, I've just gotten around to a detailed cost analysis in the last couple days. Because of the price of these big blocks, and using the more expensive 2600degree HS (High strength) insulating fire brick ("IFB") plus the high cost of ceramic fiber insulation board, plus my time to pick them up at the factory two hours away and to hand make each of these, the introductory price for a 6" batch box left or right sidewinder port or rear port design, with a simple ceramic board box expansion chamber/riser that will work with any of these configurations, will be $349 plus shipping. (This ceramic board expansion chamber/ riser can either be used horizontally or vertically, is about 8" deep and the length and width of the fire box.) The kit will be easily assembled by the purchaser. The side bricks will be assembled and attached to the floor with 3000degree refractory mortar (supplied) and the roof of the firebox as well as the expansion chamber/riser walls and roof will be assembled with ceramic cement (also supplied.) I still have to package a shippable core kit and take it to UPS to get a weight and typical shipping prices. An 8" shippable core will be available February 1, 2017. It will cost more in proportion to the much larger firebox. A 6" double shoe box configuration will be available in the coming months as the results come in on the design. That configuration is still experimental. I'l also make whole individual 2300degree IFB 24"x9"x2.5" or 3" (for traditional vertical risers) and 2600HS 24"x9"x2.5" IFB slabs, as well as individual sheets of different thicknesses of ceramic fiber board available, as well as the stainless steel secondary air flanges and tubes, in the near future. (I'm still working on the website with my web designer and we still hope to have a basic website and eBay store online January1, 2018, but that depends on his availability over these holidays, so it could be delayed a week or two.) Merry Christmas and Happy New Years! Brian The shippable core will be similar to the fire box below, with 2600HS IFB walls and 2" ceramic fiber board roof, a 1" ceramic fiber board floor with a secondary air recess between two sheet metal plates, but with a short stainless steel secondary air delivery tube as in the second photo. The purchaser will need to line the firebox floor, either with flat dense firebrick splits, or with angled dense fire bricks like as Peter van den Berg's illustrations:   |
|


 )
)


