dvawolk
Full Member
   DSR2 125mm open system (actual project)
Posts: 273
|
Post by dvawolk on Jan 24, 2013 10:03:40 GMT -8
|
|
dvawolk
Full Member
   DSR2 125mm open system (actual project)
Posts: 273
|
Post by dvawolk on Jan 24, 2013 10:10:49 GMT -8
///WORK IN PROGRESS///WORK IN PROGRESS///WORK IN PROGRESS///WORK IN PROGRESS///WORK IN PROGRESS/// It is 28th of October now and my batchbox is working. This post will be a condensed detail of my work. In case one tries to read the thread from start to finish, 90% of useful knowlege for building similar heater SHOULD be derived from THIS POST ONLY! The heater i build was 6" 150mm system size batchbox model, coupled to one single bell, with slightly complicated appearance (first bell, which is not really the exact bell)and coupled to a 18cm (7,1") insulated vertical stack 1,7 meters (5,6') high and then coupled to a 20cm (7,9") chamotte stack, 10,5 meters (34+) high from there on. The bad thing is that there are two inputs to this chamotte stack higher up the chimney that take away quite a bit of draft. So this heater should have a much better draft if it had a stack just for itself. ADD PHOTO AND LINK TO SKETCHUP FILE. ISA (inner surface area) of a bell should be dimensioned regarding the system size of the batcbox. For the 6 inch (150mm) the ISA of SINGLE BELL MASONRY heater should be somewhere between 5,7 and 6,5 sq. meters. Why i say somewhere? Because this depends on your chimney draft... The better the draft, the larger ISA you can have... So there comes a problem of how much ISA one should take... But the solution is that you shouldn't really care much about that - there exist some simple solutions to achieve slightly smaller/larger ISA even AFTER the masonry stuff is done - provided that you include some cleaning doors with the access to your bells. You can start with smaller ISA (say 5,5 sq. meters) and if it turns out that the exhaust gasses are too hot (imo, they will not go over 175°C as a maximal exhaust temperature, anyway), then you can add some bricks to the bell: the higher in the bell the bricks are, the more heat they will extract. As a side note, try to get this "aftermass" the double thickness of outer walls of the heater... OR You can start with larger ISA (say 6,5 sq. meters) and if it turns out that the exhaust gasses are too cold, then you can remove some ISA of the bell by putting insulation to one part of wall of the bell. Or by adding some barriers to the floor of the bell (details for these are found from page 13 on. OR You can just take the middle of ISA and in the end add/remove ISA as described above... (after some tests, i decided to go with 6.3 sq. meters of ISA - this excludes the ISA of batchbox and of the whole bell floor) ///WORK IN PROGRESS///WORK IN PROGRESS///WORK IN PROGRESS///WORK IN PROGRESS///WORK IN PROGRESS/// |
|
dvawolk
Full Member
   DSR2 125mm open system (actual project)
Posts: 273
|
Post by dvawolk on Jan 24, 2013 17:25:32 GMT -8
So. (this is all derived from THIS thread, written mainly by peterberg, Donkey and canyon) Peter (peterberg) sketched several options for horizontal bathbox version of RMH, including brick models. Up to today there are three models sketched suitable for different brick dimensions. Here are the files for all those (first nubmer shows narrowest DIAMETER of chimney flue to be attached! Below files are opened with Google SketchUp program, free to download and use!
- 150mm (6") for bricks 216x108x52mm (8.5x4.2x2.1 inches)
- 150mm (6") for bricks 250x125x64mm (10x5x2.5 inches)
- 187mm (7.4") for bricks 230x114x76mm (9.1x4.5x3 inches)
- (6") for castable refractory and a mould modelIf someone sketches another version, please, reply and attach it so that all will be in one place! The proportions/dimensions for this type are as follows (this is all derived from THIS thread): FIREBOX: width:height:length=2:3:4 Up till now length has been between 30-40cm. Longer hasn't been tried yet! The ceiling of the firebox is 10 cm (one row of bricks) from the top of the tunnel. TUNNEL or PORT: Tunnel CSA= 70% of heat riser CSA. Width of Tunnel for 6" about 55mm Width of Tunnel for 7.4" about 65mm P-CHANNEL: (what is this, see photos) CSA of Channel/CSA of Heat riser= 5% HEAT RISERMeasured from the ceiling of the tunnel upwards, should be at least 6 times as long as the height of p-channel inside of the firebox. CSA= cross sectional area - Firebox CSA : heat riser CSA= 4:1 or - Firebox minus sloped sides CSA : heat riser CSA= 3.6/1 TWO OPTIONS of OPERATIONFirst:fully open front and no p-channel.The open version do need a good chimney, otherwise it will smoke back now and then. The fuel need to be free from the firebox ceiling by as much as 5 cm. Second:Restricted front, with 15% CSA gap at the bottom of the firebox entrance. The restricted one is running hotter, more efficient. FACTS or something like that:--You have to have the fuel fairly compact (lying perpendicular and not like campfire) in the firebox. --The best efficiency is achieved when the firebox is loaded to a level well above the port. --The riser has to be very uniform in shape and c.s.a., otherwise the stove won't reach its maximum burn rate. --A change of a rectangle to a circle is not good, irrespective of the c.s.a. being the same. --Insulating firebox is not as important as insulating heat riser! --the batch-box horizontal feed systems tend to dump a WHOLE lot more heat into the mass in a whole lot less time, compared to original J-tube RMH with the same system CSA --the UNALTERED J-tube will burn cleaner compared to the UNALTERED batch box rocket. --the OPTIMIZED J-tube will burn cleaner compared to the OPTIMIZED batch box rocket. ( refractory option available in the future) --the OPTIMIZED batch box do produce a much cleaner burn as compared to the UNALTERED J-tube. --it is better to have the riser square as opposed to rectangle --A SQUARE riser will be on a par with a ROUND riser, when the DIAMETER of the circle is EQUAL to ONE SIDE of the square. Next post: how to calculate your own dimensions! |
|
dvawolk
Full Member
   DSR2 125mm open system (actual project)
Posts: 273
|
Post by dvawolk on Jan 24, 2013 18:04:30 GMT -8
This is gathered from text that member "jham" posted.
1. Decide what sistem size you want and name your DIAMETER of chimney flue.
2. Then use equation to calculate the Cross Sectional Area(CSA) of a chimey flue:
(CSA OF CHIMNEY FLUE) = (DIAMETER)2 * 3.14 / 4
3. Now solve the following equation (insert CSA of chimney flue and calculate)
Y = square root ( (CSA OF CHIMNEY FLUE) * 2 / 3)
4.Based on Y you can derive the dimensions of firebox (without slopes - these you will add in the end)
FIREBOX:
WIDTH= 2 * Y
HEIGHT= 3 * Y
DEPTH or LENGTH= 4 * Y
HEAT RISER:
HEIGHT= 6 * Y
CSA:
if ROUND: then the same DIAMETER as chimney flue!
if SQUARE: then one side of a square is the same as DIAMETER of a chimney flue!
---------------------------------------------------
EXAMPLE:
1. I want the largest system for chimney flue with DIAMETER of 18cm!
2.
(CSA OF CHIMNEY FLUE) = (DIAMETER)2 * 3.14 / 4
(CSA OF CHIMNEY FLUE) = (18cm)2 * 3.14 / 4
(CSA OF CHIMNEY FLUE) = 254 sq. cm(wohooo!)
3.
Y = square root ( (CSA OF CHIMNEY FLUE) * 2 / 3)
Y = square root ( 254 sq. cm * 2 / 3)
Y = square root ( 169 sq. cm)
Y = 13,0 cm(wohooo!)
4.
FIREBOX:
WIDTH= 2 * Y = 2 * 13cm = 26 cm (wohooo!)
HEIGHT= 3 * Y = 3 * 13cm = 39 cm (wohooo!)
DEPTH or LENGTH= 4 * Y = 4 * 13 = 52cm (wohooo!)
HEAT RISER:
HEIGHT= 6 * Y = 6 * 13cm = 78 cm (wohooo!)
CSA:
ROUND will have 18cm DIAMETER
SQUARE will have both sides 18 cm long!
Depending on your materials/ bricks try to figure out closest more or less practical dimensions!
I hope this helps!
|
|
dvawolk
Full Member
   DSR2 125mm open system (actual project)
Posts: 273
|
Post by dvawolk on Jan 24, 2013 18:29:59 GMT -8
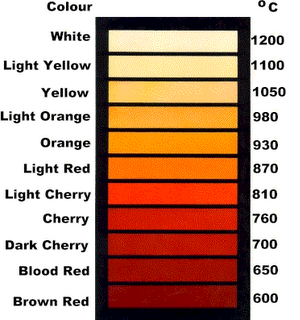
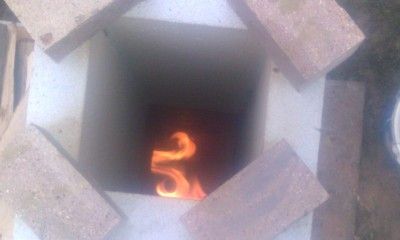
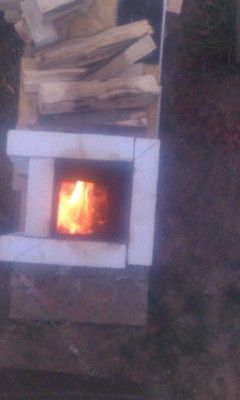
Today i built the engine with bricks and clay slip, outside. Working dimensions are the same, albeit using two different sizes of bricks + some insulative boards of AAC (aerated concrete) for heat riser. I started a fire on the bottom of the firebox, near the tunnel. Roaring started soon and then i added hardwood beech up to 2/3 of firebox height. About 5 kilos. This time i havent use any p-channel. I partly closed firebox with ceramic glass. It was roaring for about 45 minutes and after that coals were glowing for more than one hour. Impressed! Almost from the beginning (8 minutes or so) it was a SMOKELESS fire, despite wet material! The second firing was similar, i added about 5 kilos of wood on the remaining coals. After 3 minutes smokeless again. In this second run after 25 minutes i saw 10cm of flame coming out from top of the heat riser. I had there some iron and it was glowing in dark cherry color which indicates temperature somewhere 650 - 700 °C. Here is the color chart:  And here are some images (tomorrow video)   Please, comments! One question: what happens when at one time it burns (smokeless) only at the bottom of heat riser and then all of a sudden the fire is in the whole heat riser and the flame looks much softer, different than below?! Klemen (it is soaking wet with zero celsius here in Slovenia)  |
|
|
|
Post by Donkey on Jan 24, 2013 20:55:52 GMT -8
Nice!!
I've been contemplating writing this up and you beat me to it.
Well done, and thank you.
I'm curious about making deeper fire boxes. I wonder if one could be made that is twice as deep. ??
When using my stove here at home, I can load the channel 2 or 3 (stacks of wood) deep, as long as the fire burns from back (heat riser side) to front, it works fairly well.
|
|
dvawolk
Full Member
   DSR2 125mm open system (actual project)
Posts: 273
|
Post by dvawolk on Jan 24, 2013 22:42:22 GMT -8
Donkey, by deeper you men higher or longer? I am tempted with firebox length of about 55 to 60cm because our urning wood is usually sold as 1 metre long so with only one saw cut i can have firewood prepared. I will try how the firebox wouldbehave when using a wood 50cm long. That would be very practical!
|
|
Deleted
Deleted Member
Posts: 0
|
Post by Deleted on Jan 25, 2013 2:42:10 GMT -8
Nice!! I'm curious about making deeper fire boxes. I wonder if one could be made that is twice as deep. ?? With a larger surface the fire box would need an even better insulation. |
|
|
|
Post by peterberg on Jan 25, 2013 3:10:05 GMT -8
Klemen, your experience is spot on, the same as mine. The 45 minutes duration of the burn is correct. It doesn't matter how much fuel is in the firebox, the tolerance in time is plus minus 5 minutes. I've used almost exclusively soft wood like conifers and poplar. Since you are using beech and end with the same duration this suggest it is an attribute of the stove itself. With hardwood, the glowing phase will last longer though. Exit temps above the riser, using an optimized 6" stove with all the gizmo's on, can be as high as 850 C. (1560 F.), reached halfway the burn, started from cold using very dry softwood fuel. One question: what happens when at one time it burns (smokeless) only at the bottom of heat riser and then all of a sudden the fire is in the whole heat riser and the flame looks much softer, different than below?!( Let's say, not sure yet and maybe never unless I am able to make a plasma physicist curious enough to look into this. But... I can quess based on what I know about this. There's one thing that I am very sure of: the flame front shifts up the heat riser during the top of the burn. In December, I was able to borrow a 1370 C. (2500 F.) digital thermometer and sensor from a man in France. I've inserted the sensor 4" above the firebox floor in the back of the heat riser. That thermometer registered without a hitch 900 C.(1650 F.), 15 minutes after starting a burn. My own thermometer sensor was installed directly above the center of the riser. At the height of the run, the temperature of the lowest sensor dropped together with a significant rise of the highest. In short, I've tried several other places higher up and these test runs confirmed that the flame front shifted upwards and downwards again. Top temps inside the riser registered up till now: 1173 C., equal to 2140 F. Mark however, this shifting up of the hottest flame is more pronounced even started from cold, using a p-channel and restricted front opening. With a 50% open front and no p-channel the spewed out CO levels were markedly higher. |
|
|
|
Post by peterberg on Jan 25, 2013 3:25:19 GMT -8
With a larger surface the fire box would need an even better insulation. The best results where obtained with no insulation around the firebox at all. Instead, the riser has been insulated as good as I could achieve. Logically, the riser behind the port is the hottest spot, being away from the walls. However, the optimized stove can be smokeless within 3 to 5 minutes. The very moment the roar starts the exhaust will clear up. Noise and appearance will stay the same as long there is a flame through the port. Of course, the stove has to be dry inside using fuel as dry as possible, I've used fuel containing less than 15% moisture. |
|
Deleted
Deleted Member
Posts: 0
|
Post by Deleted on Jan 25, 2013 4:14:21 GMT -8
The best results where obtained with no insulation around the firebox at all. Maybe your design is less sensitive in this respect. I have only build stoves for cooking/baking, with a far less sophisticated design. My fuel is usually wet and rotten. |
|
|
|
Post by matthewwalker on Jan 25, 2013 12:33:11 GMT -8
I have a batch box that is 18"+ long. It works great.
|
|
morticcio
Full Member
   "The problem with internet quotes is that you can't always depend on their accuracy" - Aristotle
Posts: 371
|
Post by morticcio on Jan 25, 2013 13:00:02 GMT -8
Top temps inside the riser registered up till now: 1173°C., equal to 2140°F. Peter, With temperatures that high would you recommend the all or part of the riser being constructed with high grade brick. The "standard" insulation firebrick I'm using for the riser is rated for a maximum service temperature of 1260°C (2300°F). The others available are rated at 1425°C (2600°F) and 1535°C (2800°F). |
|
|
|
Post by peterberg on Jan 25, 2013 13:32:56 GMT -8
With temperatures that high would you recommend the all or part of the riser being constructed with high grade brick. Yes, the bricks that are coming easily at their maximum specification temperature are likely to fail in a few years. The kind that is rated at 1425°C (2600°F) should be good enough to prevent that situation. Standard refractory castable over here is rated at 1200 C. (2190 F.) and the stoves' temps are coming whacky close to that also. |
|
|
|
Post by pinhead on Jan 25, 2013 13:42:11 GMT -8
One question: what happens when at one time it burns (smokeless) only at the bottom of heat riser and then all of a sudden the fire is in the whole heat riser and the flame looks much softer, different than below?! I've noticed the same thing with "normal" rocket stoves when burning everything from oak 2x4s to cedar to plastic and oil. From what I have been able to ascertain, before the "burning riser" phase, there are still traces of unburnt combustibles leaving the riser. Once the temperature inside the stack rises to what is required to burn those chemicals, they all-at-once burst into flames. This theory is strengthened by the observation that the better-insulated the riser is, the sooner this "burning riser" phase is reached. It would also be supported by Petersburg's measurements, with the temperature being higher at the top of the riser than the bottom during this phase, as more chemicals are burning and producing heat within the riser. Firefighters call it flashover. I suspect it would be, more specifically, a hot rich flashover. |
|