|
|
Post by Donkey on Mar 22, 2012 19:53:22 GMT -8
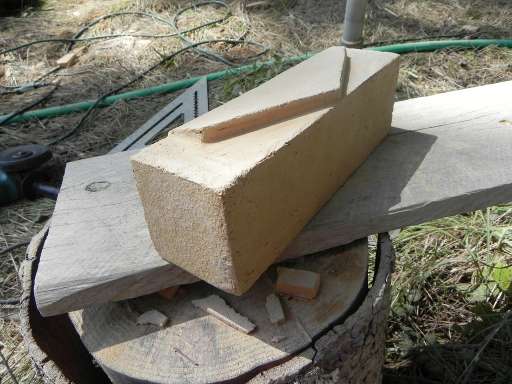
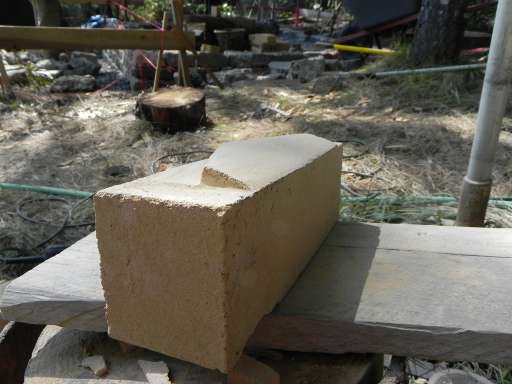
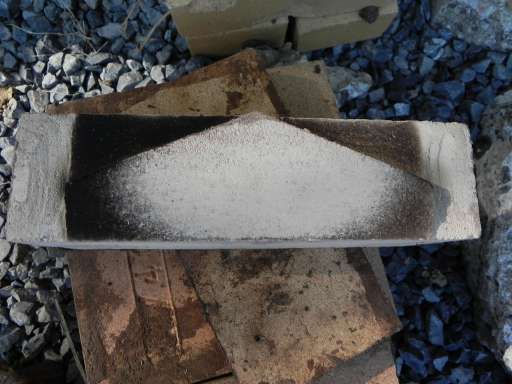
Peter, I'm building another rocket stove powered sauna and I want to incorporate a tripwire (among other things). Today, I made a brick tripwire. It's the second brick in the lineup and it looks like this:   The tripwire is (roughly) 8mm deep. I looked over your threads discussing them and made the tripwire pointed (arrow shaped) based on your comment that it works best at an angle to flow. We test fired the stove today, started with the tripwire brick in and after a time, switched to a normal flat brick. There' s no barrel on and the heat riser hasn't been insulated yet, so I didn't expect to see much difference.. I didn't. After taking out the tripwire brick, I did notice a pattern on the brick itself and photographed it.  You can clearly see where the hottest places of the fire (touching the brick) are. The stove is covered in wet cob/clay mortar, etc and hardly got up to heat.. I Imagine that after a good long hot fire, the carbon tracks will burn off. Thought you might like to see this before I ask my first questions. Is an 8mm tripwire too big? Is the angled cut a good idea? Am I on the right track?? ??! Thanks.  |
|
|
|
Post by peterberg on Mar 23, 2012 3:23:32 GMT -8
Is an 8mm tripwire too big? Hard to say. The goal is to initiate small eddies, and I honestly don't know whether the wire has to be proportional to system size. In my small trial version the wire itself had a height of 6 mm, mainly because it proved to be very difficult to make a smaller one in the soft XPS foam of the mold. Aerodynamically speaking, the height of the wire should be the same, irrespective of system size. So maybe, just maybe, 8 mm is on the large side of things. But don't worry, it's better to have one that's too big than none at all. Is the angled cut a good idea? This definitely is. The whole idea behind the arrow shape is spreading out of the laminar stream before disrupting it over the ridge of the wire, which is already visible on the fired brick. The angle has to be pointing to the heat riser in order to achieve that, but I'm inclined to think you did. The angle could be sharper using the whole depth of the brick to pronounce this effect. Am I on the right track?? Yes, to the best of my knowledge, you are. Mark however, the trip wire is emphasizing the effect of the P-channel. Without the channel, the wire is causing the required turbulence without the extra air mixing in. This has been clearly shown by blocking the channel with the wire in place. The rocket's behavior was more or less alike one equipped with a tunnel without trip wire at all. By the way, what's the system size of your latest contraption? |
|
|
|
Post by Donkey on Mar 23, 2012 6:37:50 GMT -8
It's an 8 inch system.
It's why I chose 8 mm. In the small scale development thread, you mentioned 5.5mm for 4 inch stove and 7mm for a six inch stove. I just guessed that it might be scalable and that it would need to be a little larger.
If it is better to make it smaller, I will.
|
|
|
|
Post by Donkey on Mar 23, 2012 7:06:35 GMT -8
Another question..
Looking at the cast trip wire in your thread, the profile of the tripwire is somewhat concave, like a skate-ramp, it flares. The tripwire I've carved is more wedge-like, straight transition (or close to it) from front to back.
Do you think it makes a difference? What kind of profile (do you think) is desirable?
|
|
|
|
Post by peterberg on Mar 23, 2012 9:07:00 GMT -8
The tripwire I've carved is more wedge-like, straight transition (or close to it) from front to back. Do you think it makes a difference? What kind of profile (do you think) is desirable? I've done the trip wire in the easiest possible way. The concave side is not intentional, more like sloppy work on my part. Probably, the best way to implement this is by running the ceiling horizontal. The wire doesn't need to stick out this way, downstream from the wire the ceiling has to go sharply up the required distance and shape and there's your aerodynamic state-of-the-art mini-turbulence-generator. So, whether or not the shape of the thing is flat, wedge-like or concave is not important I would say. Making the ridge bigger would result in more turbulence, yes. But also you'll get more friction for free in the gas path which isn't a good thing at all. My advise: keep it this way and see what the results are. I think it isn't that critical at all. |
|
|
|
Post by Donkey on Mar 24, 2012 10:48:33 GMT -8
Thanks Peter..
It's raining, and I won't be at the building site for a few days.. It will be a great day (today) to make a Peter-Channel for that stove.
The P-channel in my shower house keeps warping and needs to be banged flat every so often.. My plan for this P-Channel is to make it out of some serious thick metal, hopefully to solve the warping issue.
I'll post pics when I get to that point.
|
|
|
|
Post by peterberg on Mar 25, 2012 1:36:31 GMT -8
The P-channel in my shower house keeps warping and needs to be banged flat every so often.. My plan for this P-Channel is to make it out of some serious thick metal, hopefully to solve the warping issue. Probably it isn't necessary to have the P-channel made out of thick metal. Your first has been made out of a piece of a rounded tank. By hammering it flat, you've introduced tension in the material which is released when heating up. Hammering it again will result in more warping. In my experience, the steel will remain stable when it's made out of a flat piece of steel with the flanges made by means of a folding machine(?) Especially the lowest ridge which is the closest to the fire need to be tension-free, 3 or 4 mm thickness would be enough I would say. (0.118" or 0.157") |
|
|
|
Post by Donkey on Mar 25, 2012 9:22:39 GMT -8
Perhaps I could anneal the piece? Heat to cherry red and bury in ashes till cool.. That would relieve the tension somewhat. Thanks for pointing that out, I should have known it but... I find it interesting that the first time the plate warped, it warped inward and subsequently it's been warping out. Probably changed the tension direction by hitting it repeatedly. ?? Well.. I've begun building the plate out of 1/4 inch stuff. I sourced the material out of a piece of pipe. I think the pipe was used to pump concrete, as there were thin layers of cement in it. I cut the pipe heated it in the forge and pounded it flat.. Today, I planned to bend and grind it into shape. What's funny is that there is probably a lot of tension on this piece now.. Chances are that it would have warped too and I would have been utterly mystified..  Well... I've got some thinking to do. I'll anneal the plate in my shower house and see what happens and maybe I'll make the new plate out of the same stuff (water tank), anneal it too and perhaps use something thicker ONLY if this doesn't work out. This is good, that 1/4 inch stuff is a real bear to work with. Thanks again Peter! |
|
hpmer
Full Member
  
Posts: 240
|
Post by hpmer on Mar 25, 2012 9:34:21 GMT -8
Why not just leave it flat and use some sort of spacer? I used a long nail at either end between the stove and my Peter Channel. Seems to work pretty well without the need to bend the metal in a small and exacting dimension. Course, could be simply that I lack metal working skills and that was the easier path to take...  |
|
|
|
Post by Donkey on Mar 25, 2012 9:44:59 GMT -8
Well.. I want something durable and removable.. If I make it out of several small bits, they're likely to get lost, etc.
Plus, one nifty little all-in-one thing kinda appeals to my aesthetic sense.
And, I wouldn't go and put my metal working skills on a pedestal.. I'm just learning and have a LONG way to go to be even considered competent..
|
|
|
|
Post by nk14zp on Mar 25, 2012 9:47:43 GMT -8
Or use welding rods as spacers. And tack them to the plate.
|
|
|
|
Post by Donkey on Mar 25, 2012 9:51:13 GMT -8
Or use welding rods as spacers. And tack them to the plate. Yep, or the gap is going to be roughly 1/4 inch, I could cut thin strips of the same material and tack them on. Somehow, banging the thing out in one piece on the forge is just appealing to me..  |
|
|
|
Post by peterberg on Mar 25, 2012 10:35:52 GMT -8
Why not just leave it flat and use some sort of spacer? The beauty of a plate with folded flanges on the sides: it's stable. That's why tin cans have flanges and ridges and whatever. It provides dimensional stability. |
|
|
|
Post by Donkey on Mar 25, 2012 17:38:36 GMT -8
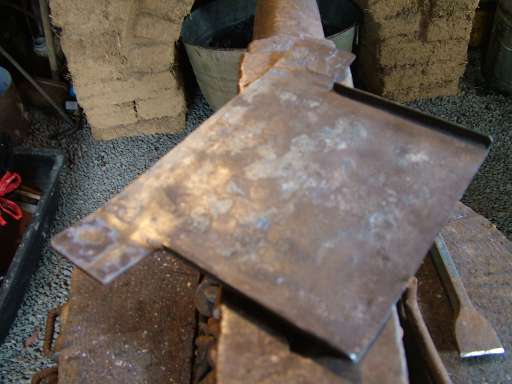
OK, I've made a new plate (for the new sauna) out of the thinner, hot water tank metal. I tried annealing them so they won't warp during use, my plate first. Heated the bottom half to glowing red and buried that half in a bucket of wood ash. When I came back to look, it was warped as all get-out.. I don't think that I heated it evenly and I KNOW it didn't cool evenly. Probably would help if I could get the whole thing in the bucket but it won't fit. So, I hammered it back to flat with as few hammer blows as possible and attempted to anneal the NEW plate. The fire was narrow and the plate wider, so I had to keep the plate moving to get an even heat. At cherry red, this time I just held it in the tongs and watched it cool. The plate began to warp a little (as it cooled), so I gave it a few corrective smacks on the anvil and that was it. I'll try them both out for a while and see if they warp. No idea if it will work, or if I did it right way. Here's a pic of the new Peter-Plate:  It sticks up 2 inches (above the feed) and the side tabs are 1 1/2 inches (each). The feed opening (of the stove) is (right on the dot) 7X7 inches. The channel is 1/4 of an inch deep and hangs down 3/8. I know, .25 is a bit too narrow, it's probably closer to .36 0r .4 (ish) (3/8 inch). Something told me to do it that way, so I did. Might have to make a slightly bigger one, to the more accurate number.. What the heck, I got plenty of tank left, they're not that hard to make and I'm having fun with it.  |
|
|
|
Post by Donkey on Mar 30, 2012 12:31:01 GMT -8
It's been raining pretty hard around here, so building the new sauna is on hold till it stops..
As a side note, the Peter-Plate in my shower house is acting differently now. Before when it warped, it "cupped", last night instead of cupping, the whole thing twisted.
In a lot of ways, it's acting worse than before in this respect (it's still keeping the fire clean). I assume that it was heated and cooled unevenly which caused new stress lines within the metal. So, I'll need to try it again and this time, get it right (hopefully).
|
|