|
|
Post by peterberg on May 13, 2022 1:40:18 GMT -8
It has been quite a while since I posted something about this subject so it's high time now. Some modifications and testruns later on, during March didn't result in a more stable behaviour. The first half of April was used for two workshops, one of those in the south of France. Plus one week to recuperate back to my normal life. At the beginning of May it started to dawn on me that the main difference between the development model and prototype one is the air inlet. A very sophisticated system, complete with a closing valve that can be fully open or closed, nothing in between. It do consist of a tube that feed into an air box as wide and deep as the firebox and high enough to house the valve. The firebox is on top of this air box, see picture. 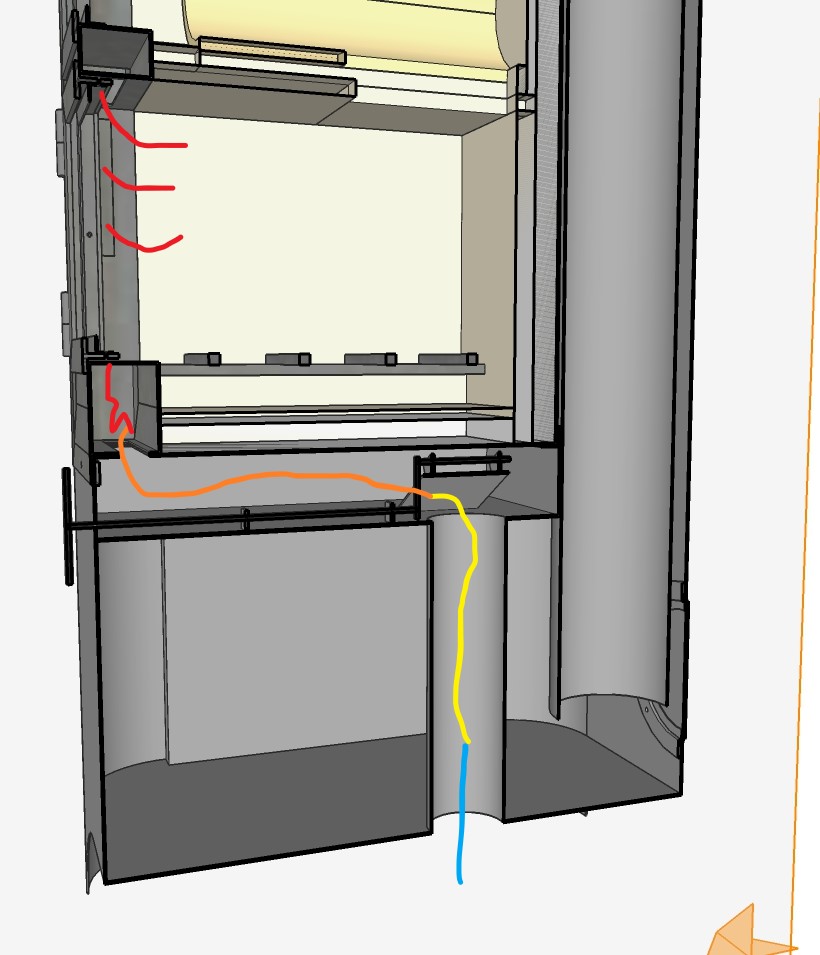 The trajectory of the air is shown, main point is the possibility of the air to warm up and expand greatly inside the air box and further down the line in the air frame around the door. Which would mean the air is a much larger volume by the time it enters the firebox. Lots of expansion means there's less oxygen in that volume so more volume need to be fed in. I kept wondering why the burn did much better while the door was open a generous crack. At some point I did shut down the air inlet and tried to run the stove with air through the door only. This worked up to a point so I concluded the fire could be fed with just *slightly* warmer air, certainly not scalding hot. Modifying the air inlet to just a gaping hole in the front under the door helped quite some way. Closing the lower slot under the door connected to the air box appeared to solve the problem. Actually I am slightly disappointed, the whole of the air inlet system felt so sophisticated. It could even be fed through an outside air provision, just a small box under the stove was all that's required. But that's water under the bridge now, and in the process I learned some new things. |
|
|
|
Post by peterberg on May 13, 2022 3:25:45 GMT -8
A couple of ways to load a firebox is tried uptil now. Main goal for the EU certification test is to bring the stove upto working temperature and then load it with larger size firewood. The fire need to be going first and when the owner think it's ready the test will start. From that point on the thing may not be touched by anyone, it should run fine by itself. The test ends when the CO² is down by 25% of its highest value during that run. Between the start and end of the test there should be at least 40 minutes, I am led to believe. One of the reasons why J-tube rocket mass heaters are difficult to certify in the EU. Quite a number of tests on the DSR3 prototype is done this way. The first test after the modifications were ready happened to be this one: 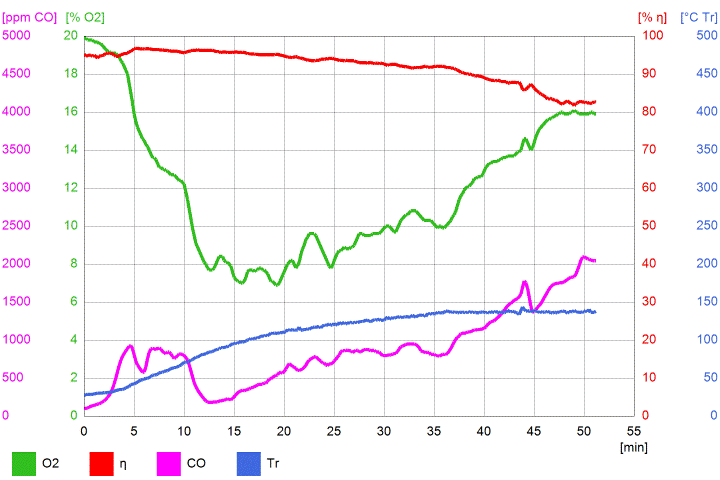 A warm-up fire, in order to do a refill and see what happens. It was filled half, with hardwood species, mostly beech. Not particularly nice and with low CO but surprisingly enough, within the restrains of the EU test. Averages: 11.8% O², 92.2% eff, 880 ppm CO, 106 ºC temp. The real test is of course after the refill, I used two of the largest chunks I had lying around. The CO shot up and the O² got down briefly and from there on it was just coasting. The door was closed from the start of the diagram. This was a very nice run, well within specs. When the first three minutes were left out of the equasion it would even be an outstanding one. 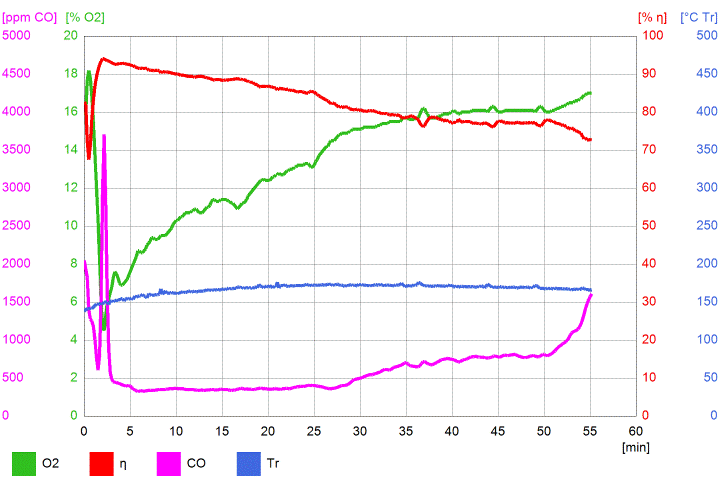 Next day, a full load in a cold heater, just to check whether or not the adagium "fill it, lit it, close it and walk away" still holds true. The picture shows how it was loaded. Big chunks at the bottom, smaller on top of that and some kindling on top with a barbecue lighter. 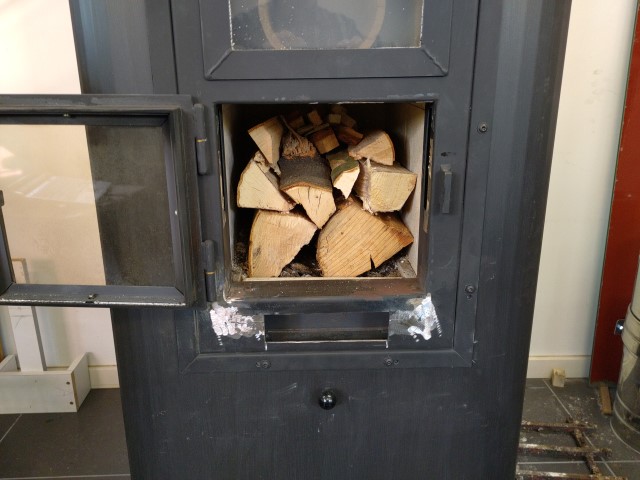 It started up with the door fully closed and I expected it would falter during the first 20 minutes. After all, it was a cold stove, without bypass or whatever. But it started without so much of a hiccup, maybe helped by the fact that the air frame kept relatively cool. It was cooled by the incoming air from the first minute onwards, so the "too hot air" phenomenon didn't play up this time. 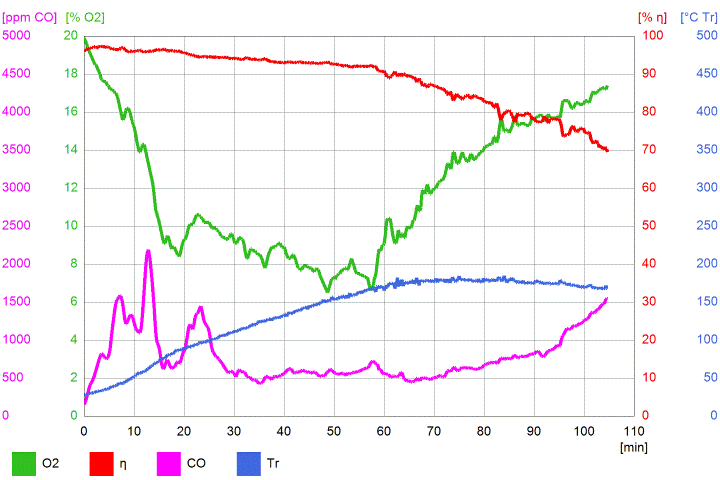 Averages: 12.0 O², 88.8% eff, 785 ppm CO, 136 ºC temp. The next run I tried something else: instead of making a small pile under the port I used slightly longer pieces and placed those vertically, leaning against the rear wall. Lit on top as usual, it commenced quite nice and relatively quick. In fact, it looked like a normal batchrocket that was turned 90 degrees towards the viewer. 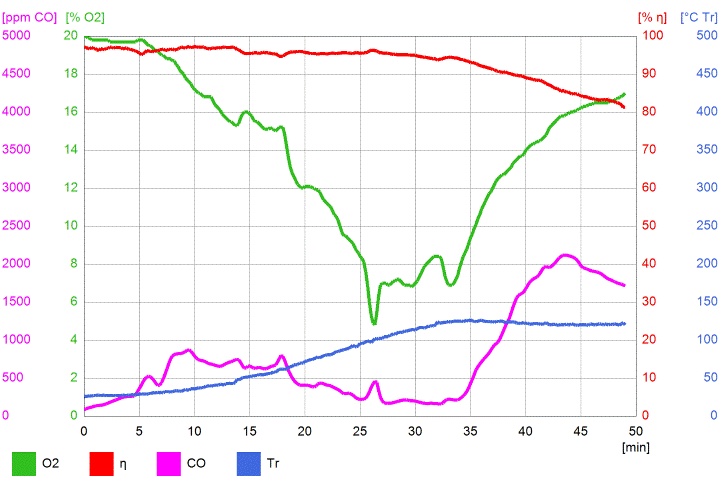 After this went to coals I shoved the coals to the back and placed two biggest chunks on top, just one end over the coals. I let the Testo run until three minutes were done and restarted it. By doing this, the test started after the first smallish peak that showed in the second diagram above. 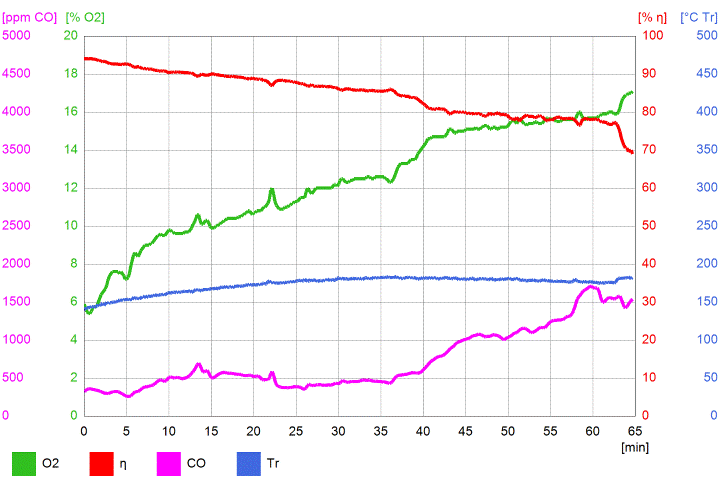 This is in line with the EU test, the owner of the stove is allowed to signal at which point the test would start. Not an all-time low CO level, but fairly medium throughout the test. As is, this would be enough to get certification without problems on the parameters that I am able to measure. Averages: 12.4% O², 84.8% eff, 738 ppm CO, 173 ºC temp. For the test the CO should be corrected for 13% O², which comes down to 704 ppm. Not a large difference, but for a close call it could mean it being certified or not at all. I am led to believe the average need to be lower than 1200 ppm, measured from start to end. Of course there are more parameters to check and configurations to try, I'll expect it will take some time. |
|
|
|
Post by josephcrawley on Aug 9, 2022 15:45:29 GMT -8
I've got a stove job coming up and would like to use the dsr3 core. I've drawn it up using 9x4.5x2.5 brick including the top box at a 7 inch system size. I am nervous about pinching the gas flow in the upper box as I have drawn it. Also I worry the thin cut soft brick to simulate your vacuum formed riser will not hold up over the long run. Would it be reasonable to measure the volume above the circular riser and convert that to space above a riser constructed from brick. By this I mean how I have it in the below drawing but filling the top box(no corners cut or space on the left or right of the riser). Hopefully that makes a modicum of sense. drive.google.com/file/d/134dWI3H-o_cJ5RVJjzrP7pON8TIUgQ_j/view?usp=sharing thanks! Edit rather than rely on my poor description I modified the drawing to show my idea. To calculate the increase in top box volume I calculated total volume above the midpoint of the riser then subtracted half the volume of the riser from that. Why the midpoint? I guess it seemed logical to me. drive.google.com/file/d/1LEc1NpWpqK7FHaTYMOrwQCMmkeW5AIR-/view?usp=sharing |
|
|
|
Post by peterberg on Aug 11, 2022 1:03:39 GMT -8
josephcrawley, You are following a different way to calculate the top box' space. What I did is very different, not in volume but in cross section area instead. The csa around the tube should be at the very least 150% of the tube's internal cross section area. Following this, your first drawing shows a ratio of 1.348, second drawing 1.256. Both are way too cramped, it should be at least an 1.5 ratio. To this end the space around the tube is large enough to allow a lower gas speed and higher expansion. Passing that phase, the gas stream need to go through the end port which is system size again. The hoped for net result would be result in a blockage against overfuelling. In a word: a limited gas velocity. As far as I am aware this worked for my development model as well as for the scaled up version done by "The Loam Freemanship". Having said all that, I am not sure the shape of the space around the tube would be of any significance. It looks like the stream profile is the commanding aspect, at least at present. So the idea as pictured in your 2nd drawing might work as well.
|
|
|
|
Post by josephcrawley on Aug 11, 2022 5:27:27 GMT -8
All is made clear! I will let you know how it goess.
Do you have an emissions test scheduled? Any updates on your commercial venture?
thanks
|
|
|
|
Post by peterberg on Aug 11, 2022 7:07:55 GMT -8
Do you have an emissions test scheduled? Any updates on your commercial venture? Since this is a low-cost venture, the guy who's doing the drawings for the laser-cutting is very busy (with other things) at the moment. He's doing this work in order to get our commitment to help with a real mass heater. So development on the second prototype is on hold for now. As soon the 2nd proto is ready and operational we are planning to have it tested by an accredited laboratory. It's hopefully over and done before the end of the year so don't hold your breath. |
|
|
|
Post by ridleycove on Oct 5, 2022 12:14:25 GMT -8
Has anyone considered using medium or heavy duty splits to reduce damage from loading logs in the firebox with an outer lay of insulated brick or Superwool? Upper chamber could still be insulated FB since the chances of impact would be very slight. I ask because I won't be the only operator (and repairing or replacing the innards doesn't sound like something I want to have as a routine chore).
And any thoughts if K-26 bricks are sufficient for upper chamber?
Thanks,
Randy (+43.78,-69.90)
|
|
|
|
Post by peterberg on Oct 5, 2022 12:58:26 GMT -8
Has anyone considered using medium or heavy duty splits to reduce damage from loading logs in the firebox with an outer lay of insulated brick or Superwool? Upper chamber could still be insulated FB since the chances of impact would be very slight. I ask because I won't be the only operator (and repairing or replacing the innards doesn't sound like something I want to have as a routine chore). And any thoughts if K-26 bricks are sufficient for upper chamber? Yes, has been done, even regular firebricks on its side. See donkey32.proboards.com/thread/3899/dsr3-build-200mm-system-benchHeavy duty bricks are recommended. |
|
|
|
Post by ridleycove on Oct 8, 2022 12:12:15 GMT -8
Looks like I have even more studying ahead! Thank you Peter.
|
|
|
|
Post by banung on Mar 27, 2023 10:11:28 GMT -8
This DSR3 design is very interesting.
I wonder how is possible that is has so good performance without secondary air intake?
|
|
|
|
Post by peterberg on Mar 28, 2023 11:32:41 GMT -8
This DSR3 design is very interesting. I wonder how is possible that is has so good performance without secondary air intake? Years ago, I found out an open batchrocket, without door or secondary air provision, could burn as well as a closed one. Efficiency is somewhat lower although not a great deal. Reasoning about it, I came to the conclusion lots of the front air is streaming over the fire to the port where it goes down quite willingly due to the lower pressure and higher air velocity in the port. Something similar is happening in the DSR3. The port is tilted towards the front, so the top end is closest to the door and air supply. All air is fed in through the door frame, all in the top half so a substantial part is reaching the nearest end of the port. And also, pushing the flames away to the back of the firebox. The result is about the same as in the standard straight batchrocket. Secondary air is fed into the top half of the port while the flames are pushed down by the flow over the fire. Mind you, that's not the whole story. The DSR3 design suffered from overfueling quite easily, which is at long last resolved by the proportions of the different spaces. In the flat riser the CSA is 100%, around it the CSA is 170% or more, and the exit port is system size again in the shape of a long and narrow opening. Net result is the gases are expanding tremendously in the flat riser, giving space to expand further in the back sweep and need to go through a smaller opening again. Two "ports" in succession with an expansion area between those two results in a system that is very reluctant to go into overfuel mode, also called thermal runaway. It sounds simple now that I read it but it took me a full year of experimenting to get it this far. In no case are the above conclusions scientifically substantiated, they are only plausible Uptil now the Loam Freemanship in the Netherlands built 12 or more upscaled versions of the DSR3. All customers saying the same: the thing burns very calm and relaxt without the drag racing characteristics of the standard batchrocket. |
|
|
|
Post by martyn on Jul 29, 2023 0:35:30 GMT -8
Hi Peter, has there been any further progress with manufacturing the DSR3?
Do you Intend to publish the exacting dimension on your web site?
|
|
|
|
Post by peterberg on Jul 29, 2023 6:47:29 GMT -8
Hi Peter, has there been any further progress with manufacturing the DSR3? Do you Intend to publish the exacting dimension on your web site? Hi Martyn, Regarding progress of the DSR3 manufacturing: it's still on hold, regrettably. As you may know, it's a low-cost endeavour so I am still waiting for the product designer to finish the drawings. He indicated he planned to do exactly that during his holidays. I fully intend to publish the whole shebang on the website, yes. Writing a whole article about this in Dutch and English is no mean feat, by the way. It'll cost time and a lot of determination which I seem to lack these days. My brains are getting old, or something similar. Recently I started to collect materials for yet another experiment. Another approach of the now-classic batchrocket in fact. A simpler build, lower profile and less prone to overfuelling, not surprisingly a couple of the best features of the DSR3 minus the complex build. To this end, I need to send in my Testo for calibration which probably will cost the best part of my yearly budget for experimentation this time. And since I like experimenting much more than anything else, publishing has to wait for now. |
|
|
|
Post by skywalker on Aug 2, 2023 1:47:17 GMT -8
Hi peterberg, Please let us know if we can do something for you. As you may know, we are more than happy to help out. Maybe we can build the setup for your new experiment in our workshop and do some test runs together. Or get some materials, cut them to size and deliver to your place. Whatever helps for you. Just to make development a bit more easier. Another idea we are playing with: We are thinking about making an open source guidebook for the DSR3 build. In collaboration with you of course. We think we found a way to make these stoves in an easy and affordable way, pretty low tech and with most of the materials everybody can easily source. We are also thinking of offering a complete self build kit. An adjustable table + dsr3 core + doors and all the other materials. To fill the gap for those people that are not able to do all the metal work. We've delivered three so called 'self build dsr3 kits' in the last months. A good building guide is essential and maybe even a 3-day workshop with theory and practice in our workshop. Just some thoughts... Sieger De Vrijlemerij |
|
|
|
Post by peterberg on Aug 3, 2023 1:50:22 GMT -8
Please let us know if we can do something for you. As you may know, we are more than happy to help out. Hi Sieger, thanks for the generosity, much appreciated. As always, distance does matter so I'll think it over whether you driving roughly 250 km and again while returning home is worth the effort. Maybe we can build the setup for your new experiment in our workshop and do some test runs together. Or get some materials, cut them to size and deliver to your place. Whatever helps for you. Just to make development a bit more easier. Thanks again, in general I want to re-use most of the materials that were used in the DSR3 development. Besides, I have two bags of refractory concrete lying around which were meant for an emergency heater for Ukraine. The heater plans were ditched due to lack of funding but the concrete is still here. The current idea isn't a DSR4-ish project, by the way. It leans on the notion of a wider riser, as wide and deep as the width of the firebox. Lower as compared to the normal batchrocket riser and containing about the same volume. Closed off by a round hole or a slit that is system size again. The overall effect is tremendous expansion in the riser and a confined exit hole to the bell. The goal is to achieve the same burn-rate limitation effect as in the DSR3 design. Also a much simpler build for first-time DIY builders. Depth would be larger but this disadvantage could be compensated for by building it as a sidewinder. Something like this I did before, with a conical riser, see donkey32.proboards.com/thread/3379/tapered-riser-batch-box-coreWhat do you think of this idea: if and when the results are encouraging, you could build the sidewinder variant and I'll come to Groningen to measure it? Another idea we are playing with: We are thinking about making an open source guidebook for the DSR3 build. In collaboration with you of course. We think we found a way to make these stoves in an easy and affordable way, pretty low tech and with most of the materials everybody can easily source. We are also thinking of offering a complete self build kit. An adjustable table + dsr3 core + doors and all the other materials. To fill the gap for those people that are not able to do all the metal work. Excellent idea! A guidebook that's ahead of the website's update, that would be funny. We've delivered three so called 'self build dsr3 kits' in the last months. A good building guide is essential and maybe even a 3-day workshop with theory and practice in our workshop. I do know of one kit, yes. What's the total of DSR3 builds so far? I always refer to you guys as The Loam Freemanship, as having lots of experience with building this design. |
|


