|
|
Post by invention1 on Jul 28, 2018 12:57:43 GMT -8
Starting prototype construction - pellet basket, pellet feeder, and tube which will become the P-channel. Anything not directly in the firebox is mortared with regular masonry mortar, firebricks right in the firebox done with cheaper refractory mortar available locally. This stuff (meeco red devil brand) won't stand up to the temperature we expect to achieve, however it is fine for a prototype that won't be fired more than a few times.  |
|
|
|
Post by invention1 on Jul 28, 2018 13:01:02 GMT -8
P-Channel, welded up out of heavy square tubing, 1.5" inside diameter, 1/4" wall.   |
|
|
|
Post by invention1 on Jul 28, 2018 13:02:07 GMT -8
Trying out some bricks for size <iframe width="26.59999999999991" height="20.200000000000045" style="position: absolute; width: 26.59999999999991px; height: 20.200000000000045px; z-index: -9999; border-style: none;left: 5px; top: 65px;" id="MoatPxIOPT0_52708973" scrolling="no"></iframe> <iframe width="26.59999999999991" height="20.200000000000045" style="position: absolute; width: 26.6px; height: 20.2px; z-index: -9999; border-style: none; left: 1257px; top: 65px;" id="MoatPxIOPT0_13813031" scrolling="no"></iframe> <iframe width="26.59999999999991" height="20.200000000000045" style="position: absolute; width: 26.6px; height: 20.2px; z-index: -9999; border-style: none; left: 5px; top: 1003px;" id="MoatPxIOPT0_35145723" scrolling="no"></iframe> <iframe width="26.59999999999991" height="20.200000000000045" style="position: absolute; width: 26.6px; height: 20.2px; z-index: -9999; border-style: none; left: 1257px; top: 1003px;" id="MoatPxIOPT0_77024111" scrolling="no"></iframe>  |
|
|
|
Post by invention1 on Jul 28, 2018 13:03:51 GMT -8
Bottom of firebox constructed on top of 1" sheet of ceramic fiber insulation.  |
|
|
|
Post by invention1 on Jul 28, 2018 13:43:32 GMT -8
So, as expected, the pellet basket is fragile. It is made out of ceramic rods, which are brittle. I broke one just by touching it roughly. If they don't cut it, which is entirely possible, I can replace them with stainless rods at some expense, but stainless rods will eventually burn out. The other option is to reinforce them. These ceramic rods are originally meant to be used in electrical heaters - and they have four small holes through the length of them. I also have a great pile of nichrome wire. Nichrome has the advantage over many other metals of having a very high tolerance for heat - higher even than stainless steel. This is one of the many reasons it is used in electrical heaters - able to glow cherry red throughout its life without failing. There should be very little oxygen inside these ceramic tubes, reducing corrosion of the metal by high temperature. And at the ends, temperature should be less, being exposed to primary air where the wire emerges. I'm going to rebuild the pellet basket with new rods, but this time run nichrome wire through all the four available holes, and tension it at the end if possible. A tension element would make these rods much stronger, and would also mean if they did crack, they would not fail immediately.
Most of the wire I have is actually Kanthal alloy, slightly superior to Nichrome and able to withstand continuous duty at 1106C/2022F without spalling. THat's probably enough, since it isn't exposed directly to air or flame and is in the path of the primary air.
I'm working pretty hard to make this ceramic stuff work, but it is one of the innovative parts of this design. If this actually works, it's a breakthrough in hacking pellet stoves, as most DIY designs use steel or stainless steel pellet baskets which fail. If it doesn't, well, that box of ceramic rods wasn't going anywhere.
|
|
|
|
Post by invention1 on Jul 28, 2018 13:56:12 GMT -8
It looks like, according to this post, my P-Channel vertical part is a little short. Oh well, I'v got plenty more 2" square tubing to make another one. P Channel Dimensions |
|
|
|
Post by invention1 on Jul 28, 2018 14:21:01 GMT -8
As I posted on a thread about the "5 minute riser" which if you haven't run across it, is a riser made out of ceramic fiber insulation slipped inside a piece of stovepipe of the proper diameter, I'm wondering how the 5 minute riser connects to the port. A slot in the riser, and the insulation perhaps - but what seals the connection between that and the masonry of the port? Seems like if this was loose it would leak. Trap the bottom of the riser in a layer of brick against the face of the port?
This masonry would be essentially at the bottom of the bell, and not subject to such high temperatures. Can masonry at the bottom of the bell (bottom 24" maybe) be made out of conventional masonry and conventional portland masonry cement?
|
|
|
|
Post by peterberg on Jul 29, 2018 0:23:30 GMT -8
Regarding mounting of the 5 minutes riser: I'd think the same method as with a vacuum formed ceramic fibre riser could be used. This would be the same as for a riser out of split firebricks, those are prone to heat cycling creep, essentally walking away. Here's a picture of the build during the Innovator's Gathering in Montana 2014. 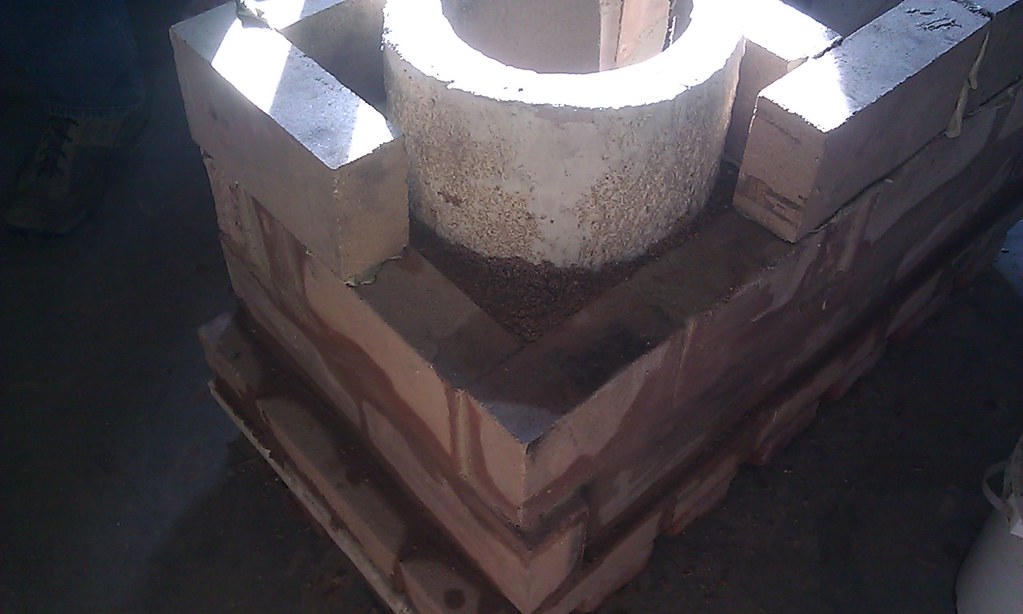 The bricks of the firebox' walls are extending along the sides and the back of the riser. A mixture of perlite and clay slip is used to fill the back and the sides between bricks and riser so it'll stay in place. In fact, you could use anything as back fill since the outside of the 5 minutes riser won't get terribly hot. This way, you could just cut out the port in the riser itself. A flat face on the firebox' side around the port is even better so the port isn't any deeper than the thickness of the bricks. The floor of a bell that's vented to the side could be done in ordinary bricks and mortar, yes. I do prefer cement, lime and sand in proportions of 1:2:12. This is a quite flexible mortar with one part hydraulic components and four parts sand. |
|
|
|
Post by invention1 on Aug 22, 2018 18:32:36 GMT -8
A few photos of construction and a test run with pellets and cordwood Port and Pellet Basket: Port end of firebox:  Side view, plus a junkyard of old stove experiments in the background:  Front view:  Absolutely clear smoke using pellets, achieved after ten minutes of terrible and smoky results. Pellets were hard to start, maybe I don't have the technique yet.  |
|
|
|
Post by invention1 on Aug 22, 2018 18:34:32 GMT -8
View down the riser during a pellet firing. There is a faint red glow at the bottom (hard to see) but basically this wasn't enough fuel to get the stove up to temp.  |
|
|
|
Post by invention1 on Aug 22, 2018 18:40:15 GMT -8
Now a firing with cordwood: <iframe width="15.399999999999977" height="20.200000000000045" style="position: absolute; width: 15.399999999999977px; height: 20.200000000000045px; z-index: -9999; border-style: none;left: 5px; top: 20px;" id="MoatPxIOPT0_96280706" scrolling="no"></iframe> <iframe width="15.399999999999977" height="20.200000000000045" style="position: absolute; width: 15.4px; height: 20.2px; z-index: -9999; border-style: none; left: 708px; top: 20px;" id="MoatPxIOPT0_77314800" scrolling="no"></iframe> <iframe width="15.399999999999977" height="20.200000000000045" style="position: absolute; width: 15.4px; height: 20.2px; z-index: -9999; border-style: none; left: 5px; top: 959px;" id="MoatPxIOPT0_1787426" scrolling="no"></iframe> <iframe width="15.399999999999977" height="20.200000000000045" style="position: absolute; width: 15.4px; height: 20.2px; z-index: -9999; border-style: none; left: 708px; top: 959px;" id="MoatPxIOPT0_85922790" scrolling="no"></iframe>  That's more like it!
Cordwood burn was great - absolutely clear smoke for 45 minutes, double helix shape in the riser, sometimes the gases in the riser tube were so hot that they glowed when they exited. This wasn't fire, the gases were just red hot. That's how it should look. I have no Testo (yet  ) so the clearness of the smoke is the best indication I have of efficiency. |
|
|
|
Post by invention1 on Aug 22, 2018 18:48:29 GMT -8
So here is a couple of conclusions: The sloped firebox is a terrible idea. I knew that, just had forgotten that I knew that. Smokes like hell whenever you open the door. The door can't be at the top of a firebox. The recycled electrical disconnects are cool, but they may or may not work. Jury is still out on that idea. The reinforced ceramic pellet basket worked, insofar as the ceramic rods, reinforced by nichrome, did not fail. Some have cracked, but they hold. The pellet basket is too small for an 8" stove, or else I didn't have it full enough to run an 8" stove. Either the basket needs to be bigger, or the stove needs to be smaller. Most people build 4" baskets inside 4" steel tube stoves, that seems about right, but this would probably work better with a 6" system than an 8". Need to scratch my head about that problem. I might try firing with scoops of pellets in the basket, instead of using my feeder. Pellet basket can stay in just fine when loading cordwood. I wasn't rough with it, and poked around with an iron, everything was fine with the pellet basket. It can stay in there, and doesn't need any cover to use it with cordwood. It does need to be removable for potential repairs. It is not removeable in this prototype. Not sure about the pellet feeder. Lots of people get away with gravity feed, I may be working too hard here. It tried to jam at one point, I let it run and it got out of it, but makes a lot of noise and I suspect the motor will eventually fail.
As a cordwood stove, this thing is awesome. Pellet stove still needs work.
|
|
|
|
Post by smarty on Aug 24, 2018 23:18:33 GMT -8
Thanks for sharing your experiments. It’s an interesting idea.
|
|
|
|
Post by invention1 on Aug 25, 2018 19:27:43 GMT -8
Update on another run: I thought about the last burn, and the fact that the flames seemed to function correctly, create a ram's horn in the riser, and fill the firebox when loaded with cordwood, but didn't seem to fill the firebox or reach the port using pellets. Pellets hard to start and get to draw, etc. I started thinking about the weight of the wood I'm using - and began to realize my pellet basket can hold way less wood than putting cordwood into the firebox. I don't have enough fuel - or alternately, I have too much stove for the fuel I am putting in (pellets I mean). The pellet basket I made (by guessing) is too small for an 8" stove.
A 6" stove riser is 56% of the CSA of the 8" stove. Or about half. Everything on the 6" stove scales to about half (with a few exceptions). I found a piece of 6" metal stovepipe to replace my 8" "5 minute riser", stuffed some loose bricks and pieces in the inside of the firebox until the dimensions roughly conformed to the firebox dimensions of a 6" stove, covered up a few bottom inches of the port, so it is roughly the height of a proper 6" port. I stuffed some brick pieces into the primary and secondary air openings until they approximated half of the original free area. Voila'! An 8" prototype converted to a 6" prototype!
The results are beautiful. With everything scaled down to approximately 6" or a crude approximation, the stove starts easy (on pellets), draws well, doesn't smoke with the door open, and the smoke is absolutely clear almost immediately. On pellets now there is a nice "rams horn" or "Double helix" fire pattern in the riser. The run seemed to work really well (again, no Testo yet) by my crude visual measurements, and most important of these is clear smoke. After things are up to temp, the exhaust doesn't even smell like smoke - it is really just gases. Just a beautiful run. I then added some cordwood, and hitting a chunk of cordwood with the propane torch for a few seconds, next to the remains of the pellet fire and inside the hot stove, it burst into flame right away. Amazing. Once again a good burn, but scaled down, good rams horn/double helix pattern in the riser, no smokin out the open door when I peeked in, just ran beautifully.
So the pellet basket I built really really wants to be in a 6" stove. I had first targeted an 8" stove. 8" (about 4.4 KW over 12 hours) represents about half the heat load of my house on a design heating day, probably keep up with all of it under average conditions. The heat put out by a 6" stove is about half that, 1.9 KW, basically 1/4 of my house's heat load. So the 6" stove will warm my toes, the 8" stove will actually fight the power bill and heat the house in all but the worst conditions. The heat pumps do the rest.
So that's an argument for scaling this up to make the 8" pellet basket work. I'm still struggling to figure out how to make this as a practical consideration. The first prototype pellet basket was not easy to make, and in the prototype design is not removable. This is an absolute must, as pellet baskets eventually fail, and should be taken out to clean every so often. Still studying on this problem.
|
|
|
|
Post by peterberg on Aug 26, 2018 0:50:10 GMT -8
Hmmm... In order to run well in an 8" version the pellet basket should be closer to the port, I'd think. It's all a matter of scale, in the original test bed it made a markedly difference having the initial small start-up fire close to the door or close to the port. The latter option yielded a much better burn overall, not to mention an earlier switch to smoke-free running. Explanation is simple: the earlier the flames reach through the port the soonest under pressure and turbulence is created.
I'd think you could use that same basket in the larger model but it need to be closer to the port, that's all. Making the firebox shorter could be one solution. No need to scale the other dimensions, it should work like that since the firebox is in reality a tunnel. Shortening that tunnel has as a consequence that the firebox' capacity is smaller for cordwood.
BTW: when the smell coming from the exhaust is like a laundry or very faintly like wet socks or wet charcoal it's as close to complete combustion as you'll ever get. I could test such a setup later in the year with my own house heater, provided I can buy just one bag of pellets plus I have to weld a crude basket which can be filled with a scoop.
|
|


 ) so the clearness of the smoke is the best indication I have of efficiency.