|
|
Post by chrisz on Feb 14, 2018 8:45:36 GMT -8
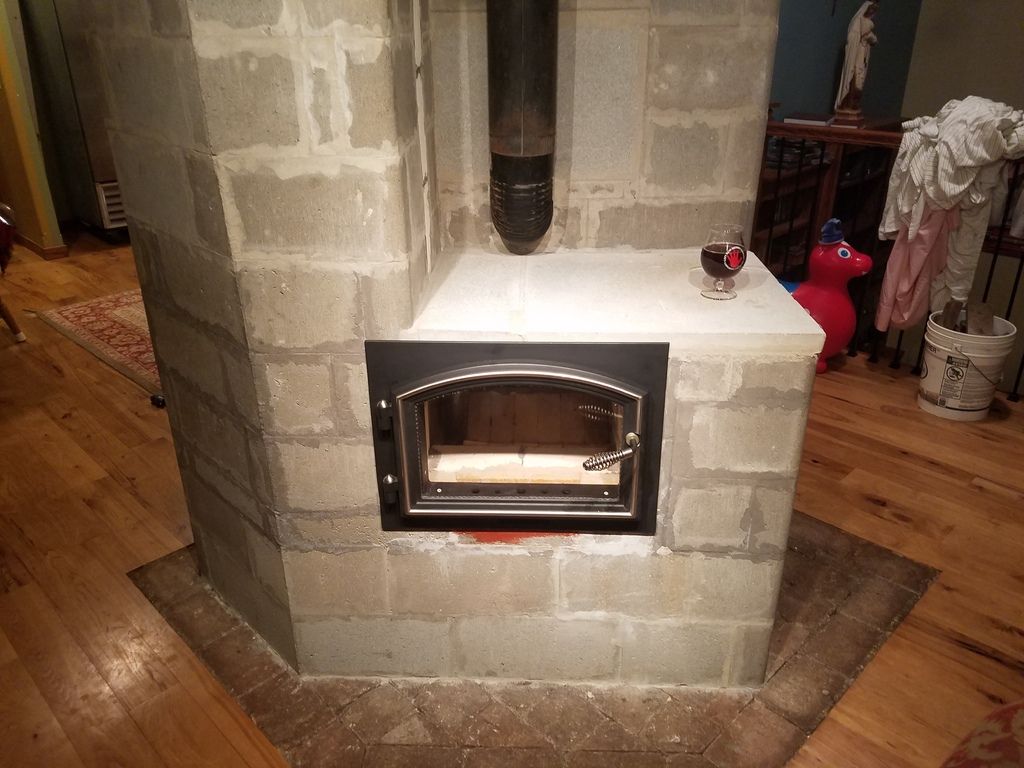
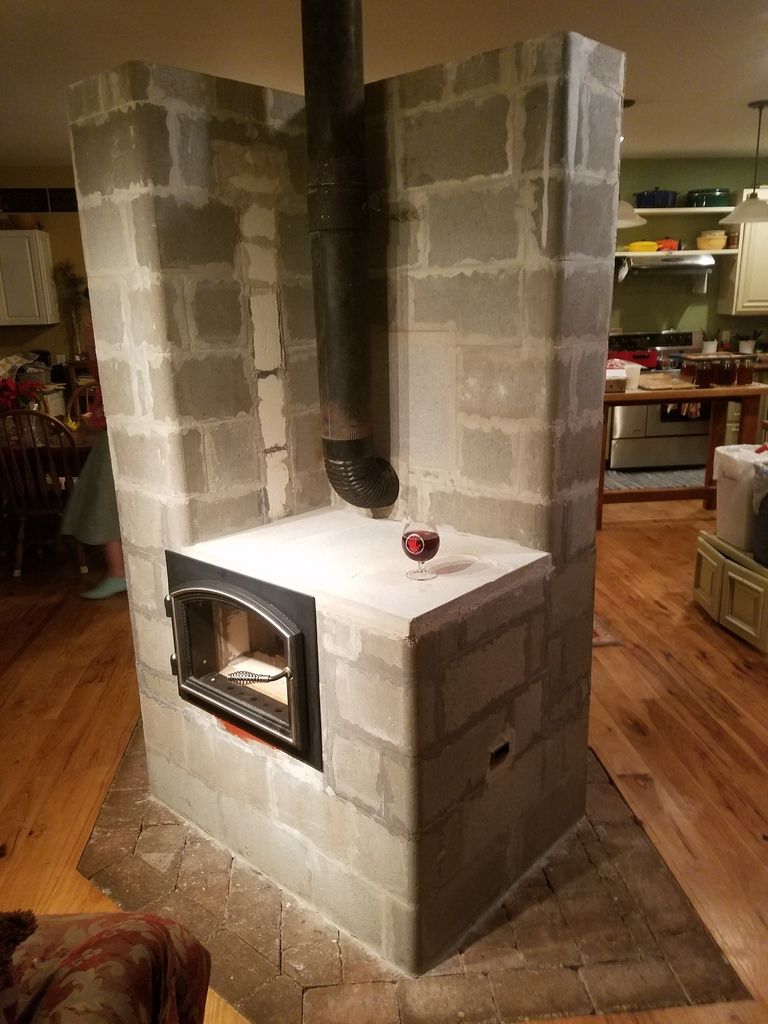
![]() Good morning. I finally "finished" my batch box rocket mass heater, and have it up and running. For me this has been a project in the making for 3 years. I'm pretty excited about it. Thank you all for the help and inspiration.   I do have a few more questions. . . It has developed a few cracks along grout lines as it fires. They grew a little as it's hot and come back as it cools. I have a firebrick liner on the inside of the first bell where the most and largest cracks are, so I'm not worried about anything. How do I go about putting a finish on it trying to minimize the cracks coming through in the outer layer? I was originally planning on plastering the outside. But I'm open to veneer brick or veneer stone or possibly something else if theres a way to attach it in hopes of it not cracking also. thank you cz |
|
|
|
Post by Vortex on Feb 14, 2018 15:06:46 GMT -8
Nice build Chris. What kind of mortar did you use? The ready mixed stuff that comes in tubs, will do that because it's to strong. It doesn't have the flexibility of a clay sand mix.
|
|
|
|
Post by josephcrawley on Feb 14, 2018 18:54:22 GMT -8
Looks great! Did you put a gap between the 2 layers of brick? Where did you get those sweet rounded bricks?
|
|
grga
Junior Member
 
Posts: 76 
|
Post by grga on Feb 15, 2018 0:21:15 GMT -8
Very nice and precise build! Is this sidewinder or probably regular batch box where you have door from the side?
For the crack I would use hi temperature silicon (to 300 C) which stay elastic. Higher temperature stuff usually is not elastic and you do not need so high temperature.
Veneer stone is probably a good (nice and modern to my eyes) choice, if new crack appears it will find the way between those little stones. You can use good quality tile glue (elastic end resistant to at least 80C) and it will be fine. You can also add Fiberglass mesh for facade in to the glue before stones…
I found no crack in my heater and I used 30x60 cm tiles with a good quality glue. Hope it will stay this way, the outside walls go to cca. 60 C. My bell has double skin with a few milimeter space between filed with a thin layer of glass wool. I did nod grout the tiles jet, I will probably do it with regular silicon which should be fine up to 150C. – In your case there will be no grouting.
To use only plastering I would go with glue and mesh and final layer. Or some good recipe with clay, sand, cement, etc. where I do not have much experiences.
|
|
|
|
Post by ericaus on Feb 15, 2018 1:06:11 GMT -8
That looks terrific!!! Can you give us more details on the door assembly?
Eric
|
|
|
|
Post by satamax on Feb 15, 2018 3:41:54 GMT -8
Nice looking.
|
|
|
|
Post by Jura on Feb 15, 2018 6:09:13 GMT -8
Hi Chris! Congratulations!
Is it the influence of perspective of the photo or the firebox box is not standard sized?
As to insulation: it looks like vermiculite board.
Is there any other type of insulation over the firebox?
How hot does the "wineglass supporting" surface get?
|
|
|
|
Post by drooster on Feb 15, 2018 10:52:44 GMT -8
Every civilised stove needs a glass of wine.
|
|
|
|
Post by Jura on Feb 15, 2018 11:26:58 GMT -8
Every civilised stove needs a glass of wine. well... In my masonry culture the Holly Hephaestus is believed to require an offer of a stronger shot :-)  ) |
|
|
|
Post by chrisz on Feb 16, 2018 10:21:54 GMT -8
I realized after I posted this, there is a special section just for showing off completed builds. So If possible or Necessary, please move to the correct section. My apologies.
1) Yes I did use the premixed refractory mortar in plastic tubs.
2) I "sort of" left a gap between the two bricks. They were not mortared together but they my be touching a bit more that they should
3) the local brick yard carries concrete block with rounded corners, I was pleasantly surprised with that addition.
4)this a a regular batch box, with a the door on the side and not the back. It also has the Walker Pre Port, and not the P ChannelProst.
5)GRGA thank you for your advice on the exterior finish work.
6) I purchased a wood stove door and then fabricated a metal frame for it. So far I'm pretty please with it. I took 3" angle iron cut and welded it, welded some pipe on for the door hinges, and cut a slot in the bottom for primary air intake, and painted it up.
7)the firebox is the size specd out by Peter van der Burg for a 6" batch box, with the exception that the door side was extended out 4 or to accommodate the 4" concrete block exterior.
8)the fire box was constructed out of 2.5" thick insulating refractory bricks. No other insulation was used. The 4" concrete blocks make up the exterior "shell" The top of the wine glass support was just a larger precast concrete stepping stone of sort I found at the store. They came in 24" x 24" pieces, they worked better for covering the top. I also made an oven on the other side out of them also. The oven doesn't really achieve oven temps, but It was an afterthought and its a warming shelf for sure.
9) It was actually a Belgian style Quad I picked up last summer for special occasions. The initial firing of the was surely a special occasion for me. PROST!!!
10) YES, I'm thinking on how and where I need another stove / heater.
|
|
|
|
Post by chrisz on Feb 28, 2018 11:01:56 GMT -8
this morning I read a very good (sounding) solution to my cracked brick situation, and trying to plaster over it. I thought I'd pass it on...
Fire up the heater and get it good and hot, so that the cracks open up. Insert wedges, cut nails or somethings that will take up the gap, and brace it/them open. Plaster will.
|
|
Deleted
Deleted Member
Posts: 0
|
Post by Deleted on Mar 1, 2018 1:30:13 GMT -8
chrisz , Be careful, if you fill an open hot crack, on the next firing there will be an even greater push on the sides ! On old tepluschka stoves they used to fill the top of their vaults with sand and it turned out to be a very bad idea because the sand would go inside the dilatation cracks and at each firing cycle the dilatation would be stronger on the sides of the vaults because the vault was becoming larger with the sand coming in. If you make a system to close your secundary air after the firing, you'll get some extra percents efficiency. I can't put a number on it, but i'm sure it's not negligible. Hope it helps,, Regards,
|
|
|
|
Post by pinhead on Mar 2, 2018 7:31:40 GMT -8
chrisz , Be careful, if you fill an open hot crack, on the next firing there will be an even greater push on the sides ! On old tepluschka stoves they used to fill the top of their vaults with sand and it turned out to be a very bad idea because the sand would go inside the dilatation cracks and at each firing cycle the dilatation would be stronger on the sides of the vaults because the vault was becoming larger with the sand coming in. If you make a system to close your secundary air after the firing, you'll get some extra percents efficiency. I can't put a number on it, but i'm sure it's not negligible. Hope it helps,, Regards, I tried that very thing (sand in the cracks) on one of my first bell benches. Was a bad idea for that very reason. |
|
becky
New Member

Posts: 1
|
Post by becky on Mar 23, 2018 7:58:25 GMT -8
It looks very pretty. I would probably do a stone veneer if you are worried about plaster cracking. In my experience even lime plaster will get hair cracks when heated and cooled constantly(from living in an older house with a regular fireplace). I think it adds character though.
|
|
kkp
Junior Member
 
Posts: 55 
|
Post by kkp on Jul 14, 2018 15:23:30 GMT -8
Chris, perhaps some flexible rtv would keep your bell more air tight. You could use just a thin layer over the grout lines
|
|