|
|
Post by luke01 on Nov 10, 2017 23:41:18 GMT -8
Hi all!!
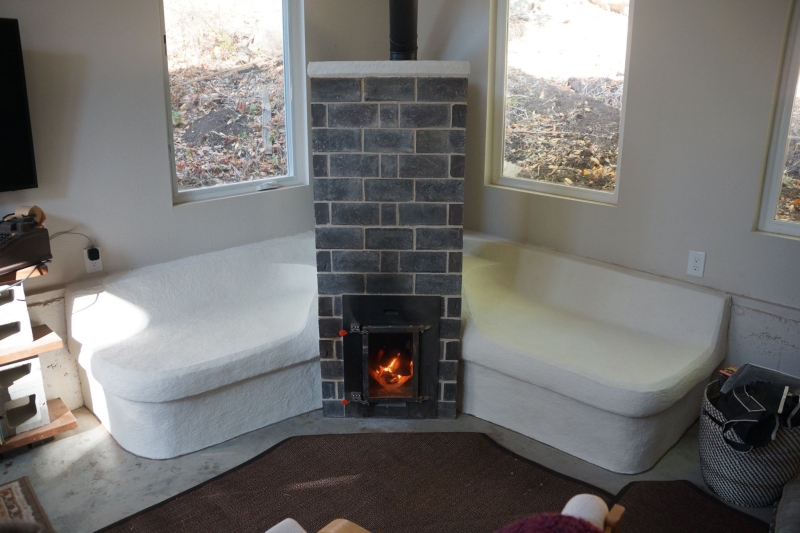
Its been a while since I posted anything here. Last week we had a visit from Peter who ran a workshop and helped us build our new heater. It was an awesome workshop and we are over the moon with our new heater.
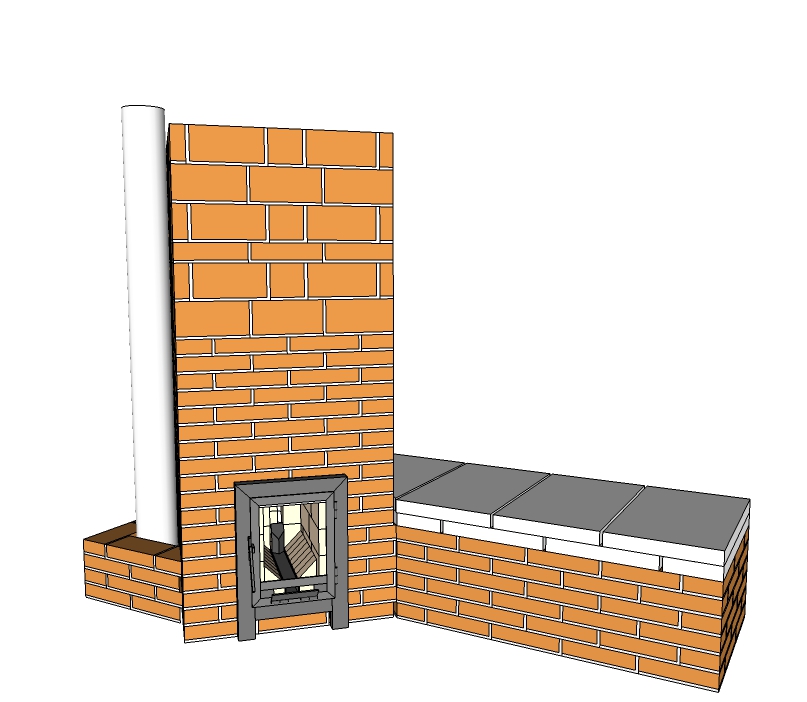
Eventually there will be a full write up, photos and I think Peter will upload the sketchup model he made when it has been updated with the changes that were made to the original design because of some issues we had while building it. Mainly changes to the riser as the brick saw we had wouldnt cut the octagonal riser pieces accurately enough.
The build over all went really well and the little batch box burns really well too.
We are so grateful to you for having come over to run the workshop Peter. Thank you so much!
While you are waiting for more info, here is a time lapse of the whole build:
|
|
|
|
Post by peterberg on Nov 11, 2017 12:04:32 GMT -8
It has been a succesful workshop, I am very satisfied with the build construction-wise. The whole thing is entirely without friction which paid itself back in starting up for the first time without a hitch. The whole of the thing contained an awful lot of water and the chimney draw was weak but noticable. Although we had the choice to prime the chimney first I decided we should try without, the chimney pipe remained really cold for 15 minutes although the fire was clear and made the right noise.
Apart from the construction of the bell/bench part, the riser happened to be a simple square one out of split fire bricks 25 mm (1") thick. As Luke already stated, the hired wet saw wasn't capable of cutting the splits to 22.5 degrees in a straight line so I had to come up with a plan B. So this turned out to be a 15x15 cm (6" square) riser with 1" superwool around it.
At the back of the riser we did a 45 degree angle at either side with little firebrick triangles. Only 25 cm (10") high, just to help the double vortex to form easily. The rest of the riser is just a square, I even left out the bottom ramp deliberately. This is based on what I've learned from the development of the floor channel and the double shoebox core, this latter one ran very clean without any guiding backsweeps or corner chamfers while the double vortex eyed much more chaotic. This is done in combination with a floor channel, I never tested this one with a square riser without backsweep, so this is the first test, regrettably without Testo.
The results were quite remarkable, as soon as the right noise was noticeable I went outside to view the chimney top. Just a white plume of 2' (60 cm) long was visable which dissolved in mid air. Clearly only water vapor, even adding more fuel didn't change the appearance. It's possible I accidentally, forced by the circumstances, found a way to simplify the design. More testing is called for, the drawing will be posted in due course after I do the necessary amendments.
|
|
|
|
Post by Orange on Nov 12, 2017 9:41:47 GMT -8
clean build! No floor insualtion? What would be the bell floor temperature?
|
|
|
|
Post by peterberg on Nov 12, 2017 11:28:43 GMT -8
The floor of the bell is typically the lowest temperature of the whole setup. Since the exhaust opening is very low and wide only the coolest gases will touch the floor. Bell floor temperature wouldn't exceed 40º C, mainly heated up by the surrounding walls through radiation and conduction. A strip of the floor around the heater will therefore be just handwarm, very nice when seated on the bench.
I could have added insulation on the tiled floor inside but that would have deminished the wall surface area as well. Or would have added to the height of the bench and main bell.
|
|
|
|
Post by Orange on Nov 12, 2017 11:46:31 GMT -8
I see. But there must be some kind of insulation under tiles otherwise the whole floor is a large cold condusctive surface.
|
|
|
|
Post by peterberg on Nov 12, 2017 12:03:17 GMT -8
As is probably clear, I used an idea first employed by Donkey for his double bench heater which is strictly symmetrical.  Luke and Tracy's heater is asymmetrical in that there's just a bench at one side and the exhaust funnel at the other. It's also a 6" system but the main bell and the bench are much wider inside so the ISA is 5.2 m² for this heater, not counting the floor and the firebox. It's deliberately slightly underspecced so the thing would be able to start without any problems in almost all circumstances. The 45º angle of the main bell to the bench makes the opening between those very wide, so there's a pillar in the middle of the bridging in addition to twin steel bars. Those spaciously openings to the bench and the exhaust are responsible for the very, very low friction in the system. Which in turn made it possible to light the first fire without any precautions like priming the chimney. We left the air inlet open during the night and Luke started the thing again the next day, probably just before noon. As he reported, without a hiccup at all despite the fact the heater was cooled off nearly completely and still very wet. Today I amended the drawing to the state it was actually built, the SketchUp file can be downloaded via this link. The file is in SketchUp version 8.  |
|
|
|
Post by peterberg on Nov 12, 2017 12:38:09 GMT -8
I see. But there must be some kind of insulation under tiles otherwise the whole floor is a large cold condusctive surface. Must, must... That might be true in a cold climate but this heater is situated on a Mediterrean island famous for its mild climate. Choices were made, tiles will stay in place. |
|
|
|
Post by woodrascal on Nov 15, 2017 7:15:07 GMT -8
Thanks for posting this build Peter.
On the video you seem to be inserting a layer of white material (ceramic fibre insulation blanket?) between the inner and outer layer of bricks in the upper bell. Is this to allow for different expansion rates of the masonry?
If it is insulation, does this significantly affect the heat transfer between the bells layers?
|
|
|
|
Post by esbjornaneer on Nov 15, 2017 12:01:30 GMT -8
Wonderful to see the method of supporting the fire brick cap/roof with T-profile irons. Are they mild steel? What dimentions? How are they laid? With clay mortar? Allowed to expand through the fire brick wall?
How to bridge the top of a bell has always been my 'problem', but this is great.
What are the tiles that were used to cover the bench?
And where was the ceramic blanket bought from? I have not managed to fine a source of it where I have tried in Granada province.
Esbjorn
|
|
|
|
Post by peterberg on Nov 15, 2017 12:06:12 GMT -8
On the video you seem to be inserting a layer of white material (ceramic fibre insulation blanket?) between the inner and outer layer of bricks in the upper bell. Is this to allow for different expansion rates of the masonry? If it is insulation, does this significantly affect the heat transfer between the bells layers? Yes, that white stuff is Morgan Thermal Ceramics Superwool. It is there to allow expansion of the top part, being the hottest, of the bell without cracking the outer shell. Interestingly, the rate of warming up at the outside of the bell is roughly the same for the top part and the rest alike. Excluding the bottom 6 inches of course. Without this separate firebrick liner heating up of the top part would be much quicker (and ultimately hotter). |
|
|
|
Post by peterberg on Nov 15, 2017 12:34:12 GMT -8
Wonderful to see the method of supporting the fire brick cap/roof with T-profile irons. Are they mild steel? What dimentions? How are they laid? With clay mortar? Allowed to expand through the fire brick wall? How to bridge the top of a bell has always been my 'problem', but this is great. The T-profiles are mild steel, 40x40x4 mm. Actually I was aiming for 50x50x5 mm but this was what we could get at the time. They aren't laid in clay mortar but on the 1/2" Superwool that's wrapped around it instead. The profiles are also a bit shorter so at the ends there's also a layer of the same stuff. Between the steel T's the space is filled up with superwool again, the fire bricks are laid on that and are only mortared together with a refractory mortar. The rest of the space around the firebricks is filled up with, again, superwool and also between the firebricks and the final layer of common bricks. To be on the safe side, I enlarged the top gap between riser and top deck to 50 cm (20"). What are the tiles that were used to cover the bench? And where was the ceramic blanket bought from? I have not managed to fine a source of it where I have tried in Granada province. The tiles on the bench are cement based floor tiles, much like concrete pavers. Those were cheap and has mass enough when used in two layers. The overlapping seams are there for to keep it airtight. Temperature wouldn't be very high so there's no need for refractory there. The superwool was bought through Amazon Spain. |
|
|
|
Post by woodrascal on Nov 15, 2017 14:31:44 GMT -8
Yes, that white stuff is Morgan Thermal Ceramics Superwool. It is there to allow expansion of the top part, being the hottest, of the bell without cracking the outer shell. Interestingly, the rate of warming up at the outside of the bell is roughly the same for the top part and the rest alike. Excluding the bottom 6 inches of course. Without this separate firebrick liner heating up of the top part would be much quicker (and ultimately hotter). Thanks very much Peter. |
|
|
|
Post by Orange on Nov 15, 2017 15:16:30 GMT -8
Wonderful to see the method of supporting the fire brick cap/roof with T-profile irons. Are they mild steel? What dimentions? How are they laid? With clay mortar? Allowed to expand through the fire brick wall? How to bridge the top of a bell has always been my 'problem', but this is great. I think yasintoda did it with L profiles 2mm. I'm puting the whole 1500x2000x2mm steel sheet over the bench. |
|
|
|
Post by luke01 on Nov 24, 2017 11:41:03 GMT -8
I see. But there must be some kind of insulation under tiles otherwise the whole floor is a large cold condusctive surface. we insulated the whole slab when building the house. |
|
|
|
Post by luke01 on Nov 24, 2017 11:46:24 GMT -8
thanks Peter for all the info and the updated plans. the heater has been running great! ran a batch this morning and sitting here nice and warm tonight.
I will be putting up another video soon with some footage that I took so will bea easier to see the build than in the time lapse.
|
|