|
|
Post by Vortex on Sept 19, 2017 8:59:55 GMT -8
I agree with Peter. In my stove, the OD of the 6-inch riser is eight inches and the barrel is 24 inches ID. I also have a good 10 to 12 inches above the riser. The heat riser has always been the most difficult part for me when building rocket stoves. Luckily I've found a super simple way! It's so easy anyone can do it! I use an inch-thick ceramic fiber blanket as my heat riser, formed inside an eight-inch stove pipe. The density of the ceramic-fiber holds itself in shape. It works wonderfully. If you're good at salvaging materials, you can find superwool beneath the glass of a glass-top cook stove. If you'd rather not salvage materials - and would like to have plenty extra for future builds - Walmart sells the stuff: UNITHERM Ceramic Fiber BlanketThis is the inside of my riser:  Neat idea. How long does the ceramic blanket last like that? For extra insulation you could wrap the outside of the pipe as well. |
|
|
|
Post by n8ivetxn on Sept 19, 2017 9:20:26 GMT -8
Good thinkin'! - What would you use to secure it outside the pipe? I uploaded a pic showing some places for a chimney outlet. Of course, I can cut a hole anywhere, but for simplicity, there are a couple of places that seem good (to the unlearned!!). www.flickr.com/photos/158311195@N04/36515626943/in/dateposted-public/If the chimney is tilted or leaning some, how will that affect function? |
|
|
|
Post by pinhead on Sept 19, 2017 10:42:34 GMT -8
Wow, that is cool! And it's so simple! - I should get a roll of it, I may be building some more of these things, lol.... So, you use a barrel, instead of a brick riser? Ok... I was thinking mine would be brick. No particular reason.... And you have a lot of "gap" in there too, nice. If I use brick, would I need to make the top removable for maintenance or any other reason? I just thought of something else. I don't know a welder out here..... I saw a suggestion on this forum, about using threaded pipe with an elbow (to make L shape) as a substitute for the p-channel. Does that sound feasible? What are your thoughts on the height of a chimney? Tomorrow my radiant barrier foil will be here! Thank you both for the words of wisdom  I used an eight-inch stove pipe - mild steel, nothing fancy. The insulation protects the steel from the intense heat and low-oxygen environment so it should last virtually indefinitely. Similar to this: 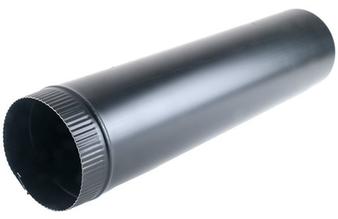 You want the heat riser to be as "low mass" as possible whilst still withstanding the destructive conditions present at the peak of the burn. When you refer to brick, are you talking about insulative firebrick? IMHO the only materials that are readily available as well as highly effective are ceramic-fiber blanket or board, and insulating fire brick. Some people have used various DIY mixtures such as clay, ash, vermiculite, perlite, etc., but none of those generally have the "staying power" of ceramic-fiber and firebrick. The brick would need to be further insulated to optimize combustion by wrapping it with an acceptable insulator such as rockwool or, again, ceramic-fiber. Anything that is much more dense than those two are a compromise, IMHO, and detrimental to the performance of the stove. With regards to chimney height: The higher and better-insulated, the better. The Batch Box won't run optimally without the assistance of decent draft as provided by a chimney. It will undoubtedly "run" but it will be much more difficult to live with without a good chimney. Keep the chimney inside the greenhouse for as much height as is possible to help with draft; a cold chimney can be a bear to get flowing. Another oft-overlooked feature of a good stove is the inclusion of a bell bypass. Since bells are so good at extracting heat, you'll want a user-configurable bypass to aid in cold-starting. In a long bench such as yours with the chimney at the opposite end, all that would be required is a closable bell exit feeding the chimney at the top of the bell. Basically you want to get the chimney warmed up as quickly as possible to aid in drawing air through the system to evenly warm the entire heat exchanger. Neat idea. How long does the ceramic blanket last like that? For extra insulation you could wrap the outside of the pipe as well. I used that particular stove all last winter, pushing it as hard as I could for as long as I could - I loaded it up with Osage Orange a few times just to see how it would respond. I peered through the throat of the stove recently and couldn't see any appreciable breakdown or thinning. I placed a few inches of CF in the floor of the riser in order to produce Peter's recommended "ramp" and that seems to be holding up as well. I would expect the back of the riser, opposite the port, as well as the ramp would be the two highest velocity points and therefore wear down the most quickly but as far as I can tell, they haven't worn at all. I'll try to stick a camera in there to get a closer look but it looks to be very robust. I can't say it'll last 20 years but I can't say it won't, either! On my stove, I supported the riser around the outside with tightly packed rockwool in order to hold the riser in position. If I were going to make the stove permanent I would have used some plumbers tape to attach it to the body of the batch box somehow. As it is, we're renting the place and will likely have to remove everything if/when we move out. |
|
|
|
Post by n8ivetxn on Sept 19, 2017 11:12:19 GMT -8
I used an eight-inch stove pipe - mild steel, nothing fancy. The insulation protects the steel from the intense heat and low-oxygen environment so it should last virtually indefinitely. Similar to this: You want the heat riser to be as "low mass" as possible whilst still withstanding the destructive conditions present at the peak of the burn. When you refer to brick, are you talking about insulative firebrick? IMHO the only materials that are readily available as well as highly effective are ceramic-fiber blanket or board, and insulating fire brick. Some people have used various DIY mixtures such as clay, ash, vermiculite, perlite, etc., but none of those generally have the "staying power" of ceramic-fiber and firebrick. The brick would need to be further insulated to optimize combustion by wrapping it with an acceptable insulator such as rockwool or, again, ceramic-fiber. Anything that is much more dense than those two are a compromise, IMHO, and detrimental to the performance of the stove. Yes, I was planning to use the insulative firebrick - big, heavy, cream colored bricks.... However, I like your riser better, so I'll use it instead! Can I use the firebrick for the outside, instead of a barrel cover? If so, do I need to incorporate some kind of interior access? - I know people who build j-tubes with barrels often make the top of the barrel removable..... |
|
|
|
Post by n8ivetxn on Sept 19, 2017 11:27:58 GMT -8
With regards to chimney height: The higher and better-insulated, the better. The Batch Box won't run optimally without the assistance of decent draft as provided by a chimney. It will undoubtedly "run" but it will be much more difficult to live with without a good chimney. Keep the chimney inside the greenhouse for as much height as is possible to help with draft; a cold chimney can be a bear to get flowing. Another oft-overlooked feature of a good stove is the inclusion of a bell bypass. Since bells are so good at extracting heat, you'll want a user-configurable bypass to aid in cold-starting. In a long bench such as yours with the chimney at the opposite end, all that would be required is a closable bell exit feeding the chimney at the top of the bell. Basically you want to get the chimney warmed up as quickly as possible to aid in drawing air through the system to evenly warm the entire heat exchanger. Ok, so I need to investigate how to insulate that pipe....wow, this is cool stuff, I think I understand.... the warm air in the chimney tends to rise, so it creates a little oxygen draft to feed the cold start.....am I tracking?? I think I might be able to get 10' of height for the chimney, something like that. |
|
|
|
Post by pinhead on Sept 20, 2017 5:40:47 GMT -8
I used an eight-inch stove pipe - mild steel, nothing fancy. The insulation protects the steel from the intense heat and low-oxygen environment so it should last virtually indefinitely. Similar to this: ![]() You want the heat riser to be as "low mass" as possible whilst still withstanding the destructive conditions present at the peak of the burn. When you refer to brick, are you talking about insulative firebrick? IMHO the only materials that are readily available as well as highly effective are ceramic-fiber blanket or board, and insulating fire brick. Some people have used various DIY mixtures such as clay, ash, vermiculite, perlite, etc., but none of those generally have the "staying power" of ceramic-fiber and firebrick. The brick would need to be further insulated to optimize combustion by wrapping it with an acceptable insulator such as rockwool or, again, ceramic-fiber. Anything that is much more dense than those two are a compromise, IMHO, and detrimental to the performance of the stove. Yes, I was planning to use the insulative firebrick - big, heavy, cream colored bricks.... However, I like your riser better, so I'll use it instead! Can I use the firebrick for the outside, instead of a barrel cover? If so, do I need to incorporate some kind of interior access? - I know people who build j-tubes with barrels often make the top of the barrel removable..... I've only ever used barrels as the primary bell. My original plan for the cellar heater I built was to go brick-to-the-ceiling (one large bell) but I ran out of brick and patience. If you were to do that, you should be aware that there will be a significant delay between the time you light the fire and the time you actually get heat from the stove. Being a greenhouse you likely will want to keep the temperature fairly even - which means firing regularly - so that would only be a real problem at first light. How you plan on using the space will determine whether you want the entire stove to be "mass" or part of it "metal." For instance, I built a high-mass stove for my work shop and shouldn't have; using the shop mostly on the evenings and weekends makes for a long time between burns where the mass has the chance to cool off, increasing the delay between lighting the fire and feeling heat. However, if I were in the shop every day, burning a load of wood at least once a day, a high mass stove works beautifully due to the heat storage. With regards to chimney height: The higher and better-insulated, the better. The Batch Box won't run optimally without the assistance of decent draft as provided by a chimney. It will undoubtedly "run" but it will be much more difficult to live with without a good chimney. Keep the chimney inside the greenhouse for as much height as is possible to help with draft; a cold chimney can be a bear to get flowing. Another oft-overlooked feature of a good stove is the inclusion of a bell bypass. Since bells are so good at extracting heat, you'll want a user-configurable bypass to aid in cold-starting. In a long bench such as yours with the chimney at the opposite end, all that would be required is a closable bell exit feeding the chimney at the top of the bell. Basically you want to get the chimney warmed up as quickly as possible to aid in drawing air through the system to evenly warm the entire heat exchanger. Ok, so I need to investigate how to insulate that pipe....wow, this is cool stuff, I think I understand.... the warm air in the chimney tends to rise, so it creates a little oxygen draft to feed the cold start.....am I tracking?? I think I might be able to get 10' of height for the chimney, something like that. Yes, exactly correct. Remember that the batch box can require more air velocity and volume than a J-Tube due to the increased CSA of the burn box. Once the door is closed, it will likely use much less air but while the door is open, it requires quite a bit more air in order to prevent smoke-back. High chimney draft greatly helps in this regard. This is also why a bell bypass is so helpful; if, for instance, you'd like to add wood to the fire in the middle of a burn (say, you want it fully loaded before you go in for bed), than opening the bypass should help prevent smoke-back while reloading. Plants don't like carbon monoxide any more than we do, so any time you open the door you should first open the bypass. |
|
|
|
Post by n8ivetxn on Sept 20, 2017 8:49:29 GMT -8
Ahhh, Ok, so to keep a fairly even temp in the greenhouse, especially at night, I will need some mass (and that bypass too!). I can see how an exposed barrel would be better for a shop heater.
I will be firing it regularly, probably late afternoons, and refilling it before bed.....lol, I may start sleeping on it! ;-) I've lived here for about 9 years and I've seen it get down to about 12F on a few nights. Brrr.
Would you happen to know where I can see some pics of the flue and baffle on the blind bench/cul-de-sac bell? Have you seen any posts regarding dimensions of the flue and baffle on one of those?
I'm so pressed for time and behind on all this, I need to get something up and running quick or those plants will be moving into my living room!!.... My radiant barrier comes in at lunch today. I was trying to set it up for a test run yesterday, but the weather is stormy and squalls kept passing over, soaking everything.
I'll get a bypass while I'm at the hardware store, I think they have them for $10. I've been scouring CL for anything I can salvage, but then, so is everybody else!!
Have a good day! ~ Rita
|
|
|
|
Post by n8ivetxn on Sept 20, 2017 8:51:38 GMT -8
|
|
|
|
Post by pinhead on Sept 20, 2017 12:33:29 GMT -8
Ahhh, Ok, so to keep a fairly even temp in the greenhouse, especially at night, I will need some mass (and that bypass too!). I can see how an exposed barrel would be better for a shop heater. I will be firing it regularly, probably late afternoons, and refilling it before bed.....lol, I may start sleeping on it! ;-) I've lived here for about 9 years and I've seen it get down to about 12F on a few nights. Brrr. Would you happen to know where I can see some pics of the flue and baffle on the blind bench/cul-de-sac bell? Have you seen any posts regarding dimensions of the flue and baffle on one of those?I'm so pressed for time and behind on all this, I need to get something up and running quick or those plants will be moving into my living room!!.... My radiant barrier comes in at lunch today. I was trying to set it up for a test run yesterday, but the weather is stormy and squalls kept passing over, soaking everything. I'll get a bypass while I'm at the hardware store, I think they have them for $10. I've been scouring CL for anything I can salvage, but then, so is everybody else!! Have a good day! ~ Rita The flue should be the same diameter as the heat riser. You only need one flue/chimney. I'm not sure to what you're referring when you say "baffle" because the bell bench doesn't need any baffling inside. I suspect your design will look similar to this - though with only one bench: 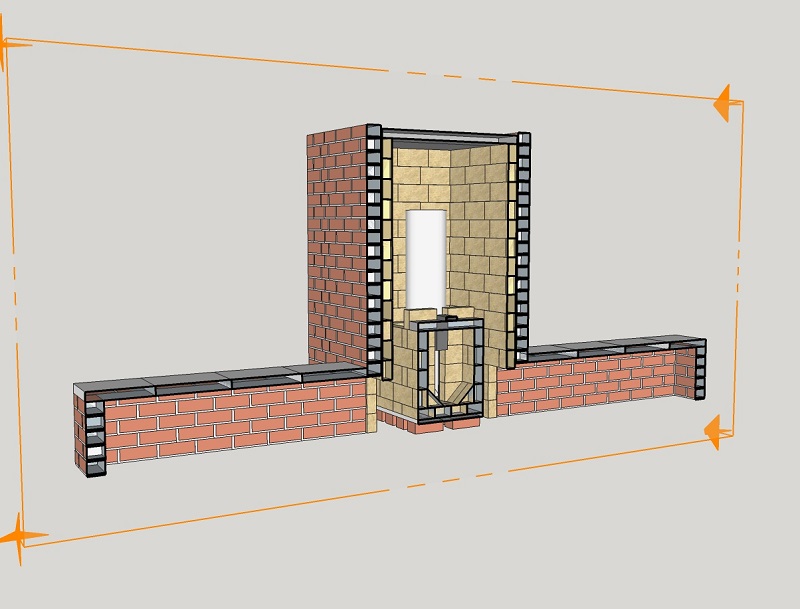 All that is required to make the "blind bench" work is to have the exit at floor level or slightly above. As long as the "roof" of the bench is higher than the top of the exit (i.e. the transition from the structure to the chimney), convection will allow heat to travel into the bench. The larger the height difference between "roof" and "exit," the steeper the temperature gradient between those two points. |
|
|
|
Post by n8ivetxn on Sept 20, 2017 17:08:24 GMT -8
Yes! - Oh, you just barely missed it! - On the same page you got the image, right below it, actually, Peter has a pic of the baffle that fits right behind the firebox, on the wall. Peter says: "The placement of the exhaust opening to the chimney stack is very important in this design, as in any bell design. As this design has benches attached to it (absent from the previous examples shown) thought needs to be given to how we get the hot gases into the benches and not 'short circuit to the exit flue' beforehand. The drawing below shows how it was achieved. A fireproof baffle board (in this case calcium silicate) is placed off the rear wall of the main bell and capped off at the top, see 3D drawing how this is done. Not seen in the picture below is the exit flue, 'hidden' behind the baffle plate. The circumference of this baffle board multiplied by the distance between it and the rear wall of the bell should be much larger than the cross sectional area of the flue. This is to ensure we do not have a restriction to the easy flow of gases into the flue. The openings cut into the baffle (as seen below) are also of a size much larger in area than the cross section of the flue. Again, we do not want restrictions to the gases. There is no 'opening' at the top of the baffle board, we do not want access to the exit flue until after they have opened into the benches. Note that the cutouts in the baffle are well below the level of the benches." - However, in his article, there are no dimensions given, just a word problem.... I know it sounds awful, but math just isn't my thing. I wish it was.  Ok, so the flue is still the same size as the riser, I got that part.... But, you say the blind bench bell doesn't need a baffle? It will work without one? Maybe I should just try that instead of worrying about it, or I could just wing it and try??? ...lol... Wow, it was painful trying to find materials for this project! You would think this stuff would be readily available, especially in a part of the world that has excessively wet and cold weather. Not so. I spent the day driving all over Creation for a stove pipe, a handful of rock wool and a sheet of ceramic fiber. Geez, maybe I should go into business.... Ok, tomorrow I have decent weather and all the stuff to get started. I'll set up a test run in the yard! Thanks for your patience Pinhead! I apologize for being, well, a pinhead!  |
|
|
|
Post by keithturtle on Sept 20, 2017 18:45:06 GMT -8
Yeah, no need for apologies, sis. The learning curve here has guard rails that work well enough if we don't go too fast.
Take your time and learn from your mistakes.
Someone once said, "Learn from the mistakes of others, you'll never live long enough to make 'em all yourself."
Turtle, slow
|
|
|
|
Post by peterberg on Sept 21, 2017 0:18:25 GMT -8
But, you say the blind bench bell doesn't need a baffle? It will work without one? Maybe I should just try that instead of worrying about it, or I could just wing it and try??? ...lol... The baffle plate behind the firebox is there in order to keep the bell's exit low. As such it is a means to an end, that end can be achieved in a number of ways. So the baffle plate isn't mandatory, as long as the exhaust opening will fit the definition. Another way is to create a low and wide exhaust opening which in turn leads to the chimney pipe. It's important that you'll understand the principles and once you do, you can find your own solutions. Keep us posted, so we'll be able to steer you in the right direction. |
|
|
|
Post by n8ivetxn on Sept 21, 2017 8:37:46 GMT -8
Thank you Peter, I appreciate the input - I'll keep y'all posted I've been reading a lot of material (mostly yours!), and I read through the Bell Theory section again last night....The light bulbs are coming on! I think once I build the test model and see how the pieces fit, I'll understand a little better how it all works together. Matt's barrel system is great, so much faster, and cheaper, than laying brick, lol..... and the humanitarian applications could be life saving for many people. |
|
|
|
Post by n8ivetxn on Sept 22, 2017 13:38:22 GMT -8
Results of yesterday's mock up / test run: I made 2 mistakes: I forgot to place the brick across the top of the portal  , in front of the riser and I was trying to light the fire incorrectly. After I tried the initial lighting, I came in and read batchrocket, where Peter describes the technique used for lighting. However, it was just about dark, so I quit for the night. It did burn for a while, however. From the kitchen, I could see smoke rising out the stack (and a few other places, lol!), and this morning there were some burnt sticks in the box. I did photo-document, but it was such a homely contraption, I'm embarrassed to post them to flickr!  I have some new bricks, but I used the old ones for this set up.... Now, I have my radiant barrier stapled into place, along the greenhouse wall. I started laying the foundation pavers and I realized I will not be able to fit the 6" heater into that space. It has a depth of 38" max. Sooo, I may try the sidewinder box instead. I'll be reading up on it and moving the base around to see what works in that space..... |
|
|
|
Post by n8ivetxn on Sept 25, 2017 10:15:16 GMT -8
Latest photos: www.flickr.com/photos/158311195@N04/ I just placed the splits on top for visual purposes. I used most of my ugly bricks for the feed box. I'll use the new bricks on the riser, for a tighter fit and hotter temps.... I'm not sure yet what I'll use to fill in around the riser. It's possible I'll just use some refractory cement. I thought about pouring a cob around it, but I'm not sure about the insulating properties. Does anybody have any suggestions? ~ Rita |
|


 Ok, so the flue is still the same size as the riser, I got that part....


 , in front of the riser and I was trying to light the fire incorrectly. After I tried the initial lighting, I came in and read batchrocket, where Peter describes the technique used for lighting. However, it was just about dark, so I quit for the night. It did burn for a while, however. From the kitchen, I could see smoke rising out the stack (and a few other places, lol!), and this morning there were some burnt sticks in the box.
 I have some new bricks, but I used the old ones for this set up....