|
|
Post by pinhead on Mar 4, 2014 6:41:05 GMT -8
Those look nice. What are the dimensions? How tall will the heat riser be once it's all put together?
|
|
|
|
Post by Robert on Mar 4, 2014 8:52:08 GMT -8
hey folks.
just did some research since i want to make a waterglass/perlite composite for a riser and it seems like perlite can handle max 900C. I am wandering how it will cope with the higher temperatures around the tunnel and bottom part of a riser...
looks like vermiculite is better option.
just wanted to share this information.
|
|
|
|
Post by satamax on Mar 4, 2014 9:59:55 GMT -8
|
|
wibo
New Member

Posts: 26 
|
Post by wibo on Mar 4, 2014 12:10:52 GMT -8
pinhead: Inner diameter = 4" (100mm), Outer diameter = 8" (200mm) Height of 1 part is 6" (150mm) The height for the riser will be 4 or 5 parts. 4 parts: riser height about 27" (680mm) 5 parts: riser height about 33" (830mm) Burn tunnel length is 9.5" (244mm) Measurements for Riser and Burn tunnel measured as indicated by Peter earlier in this thread. Thanks for sharing, Robert. As indicated by Santamax's info, Perlite & vermiculite are close regarding temp handling. Since Perlite was more easily available to me, the choice was simple... Tests will show what will happen.
|
|
|
|
Post by Robert on Mar 4, 2014 13:30:52 GMT -8
thanx guys for information. from this information i understood that the limit is 650C for a composite. i am so much interested in making the riser from the mixture of perlite-water glass - and little furnace cement on top. |
|
|
|
Post by satamax on Mar 4, 2014 22:21:59 GMT -8
|
|
wibo
New Member
Posts: 26
|
Post by wibo on Mar 5, 2014 0:31:30 GMT -8
I'm currently using a refractory concrete made by Calderys: www.dropbox.com/s/b476tdgzkhrvp9e/CALDE-CAST-F-50-TDSH.pdfthe wall thickness for the tunnel is 40mm (1.6") For the burn tunnel i've mixed it with perlite in a 50 /50% ratio (volume). After 2 burns, there's a bit of cracking visible in the top of the tunnel. Doesn't seem to have any structural consequences though. Inside of the tunnel looks nice and smooth. And I'm pretty sure it's hot in there, no soot deposits on sides and top, and no smoke after a couple of minutes. So clean burning. This has no visible effect on the perlite so far. There was no insulation around the tunnel yet, and there won't be until i've finished the riser and feed tunnel. As it is, the feed is not more than a hole.. and can hardly be called a tunnel. Burns so far without insulated riser (6" duct) and no feedtunnel. So far I've used the biggest part of a 25 kg bag of concrete. Looks like I can build the 4" burntunnel and riser from one bag of calde-cast, and a couple of buckets of perlite. That's under 60 euros. I do want to make some samples of the concrete without perlite, to see how hard and strong it is unmixed. The burntunnel is rather soft-ish and it's easy to scrape of material. Not sure if that's a result of my crappy mixing and casting skils. The riser seems to come out a tad harder, but more crumbly since it's mostly perlite. (5 to 1 ratio) I did put the riser parts in a plastic bag, so no water could escape until after the curing period. Looks like that is resulting in a somewhat better product. |
|
wibo
New Member
Posts: 26
|
Post by wibo on Mar 6, 2014 12:09:54 GMT -8
A couple of test results: - Heat riser: Stacked up 3 finished parts of the riser and lit a fire. 3 parts is 2x the length of the burn tunnel. It worked fine, did draft but... That got better after installing a bit of extra height. So it's safe to conclude the heat riser will be at least 5,5 times the burn tunnel length.
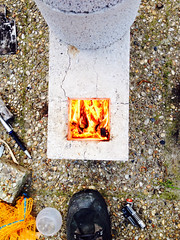
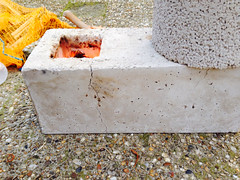
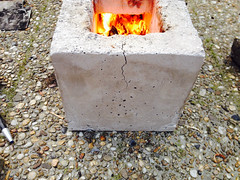
- Burn tunnel: Burning it this time it got nice and hot. And cracked a lot! See the pictures below.
|
|
wibo
New Member
Posts: 26
|
Post by wibo on Oct 17, 2015 15:21:10 GMT -8
It's been more than a while sinds I was last here. Lets just say the past year was not all fun..
Last couple of weeks i've been working on my little project again. The 1st core did not survive more than A couplet of burns. So a new one was made. No mixing with perlite, just the refractory concrete. Wall thicknes 25 mm (1"). It's hard as a rock. Cast in two halves, like Peter's version.
Goal is to have a small heater, almost like a regular stove.
By now, two LPG-tanks have been cleaned, cut and welded into a compact stove. Placed core and riser inside, and filled all remaining space with perlite. Unfortunately not many foto's were made during building. I will upload A vid and A few pics tomorrow.
It burns fine, and the exhaust is clean. (No visible smoke that is...)
Next is a Nice coating and A Bell of some form to capture A bit more heat. Would be nice to get some testing done to see hoe well it performs. First i need to get a thermometer to get some temperature readings. More later...
|
|
wibo
New Member
Posts: 26
|
Post by wibo on Oct 18, 2015 7:29:47 GMT -8
First a video of the first burn: youtu.be/QjyW9Epsx7QNothing spectacular. There are some adjustments needed: - feed is to long. It's now about 19cm, should be 12 cm. - turns out the new core has a slightly larger csa. Making the 100 mm flu pipes just undersized. Time to find 120mm-ish pipe. So.. It works, even burns clean. But takes long before it gets to that point. And the exhaust gasses are cool enough to stick your hand in them. More work to be done before its considered finished. I will make some pictures of the inside when the thin gas cooled enough to lift the top off. Cheers |
|
wibo
New Member
Posts: 26
|
Post by wibo on Nov 14, 2015 2:52:09 GMT -8
Here are some of the pictures I promised: It's in a fully functional state now: Cast core and riser inside 2 salvaged tanks. Bottom tank is isolated with perlite. The complete stove does heat up. But it takes some time for the bottom tank to become too hot to the touch. Need to get a thermometer. Burns cleanly shortly after startup. (no visible smoke that is) Top gets hot fast. exhaust stays lots cooler. No instant burn on touching it. Condense does form when started cold, keeps showing a bit of condensation cloud until about the end of the 1st load. (all depending on outside temp.) A lot of heat seems to be taken out of the gasses thanks to the complete stove heating up. All in all a succesful experiment. Though it needs a decent chimney to draft. (currently using 4 meter of 150mm uninsulated duct. And 1 meter of pipe 100mm from the stove angled down through the wall... Time to build a permanent chimney....  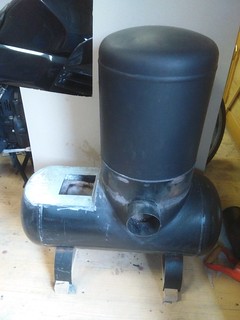  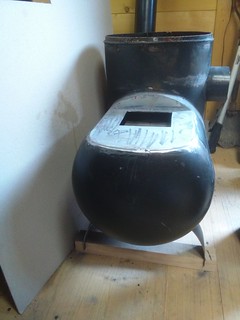 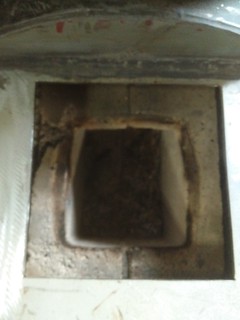 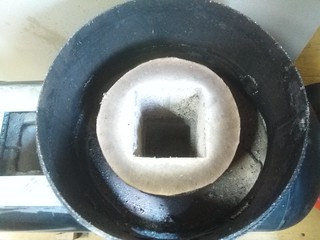 |
|
|
|
Post by Vortex on Nov 14, 2015 6:34:16 GMT -8
Wibo, That's a nice little rocket 'woodstove replacement' you've built there. An insulated chimney will definitely improve things. Then you could maybe think about a higher bell.
|
|
|
|
Post by matthewwalker on Nov 14, 2015 6:35:19 GMT -8
Nice job! I like it.
|
|
wibo
New Member
Posts: 26
|
Post by wibo on Nov 28, 2015 13:31:29 GMT -8
Did a bit more testing today. Also took some temperatures. Changes to the last test are an added p-channel and the riser height was increased a couple of inches. Still on the same temporary chimney. Although some extra care was taken into making it more air tight. Today was a windy day. Not sure it helped with the draft. There was plenty of it. Some observations: There was lots of draft before start up. That made things easy. Quick start. And smokeless very quickly. Noticed that the roar inceease as the feed was packed full with wood. Not sure if its improving clean burn, but it looks like a fully stuffed feed improves the process as there is a bigger roar. Did two burns. Top of barrel at 400°c /750°F and exhaust at the end of the burn stil aboce 100° Seems all is working fine. But lack the testo data to proof its clean burning. Here's a short filn with some clips during the burn youtu.be/6TPezb3C280 |
|